D Pillar – Painting? (Post #602) 10/3/2022

D Pillar Work, Interior trim painting…allergies

I got out into the shop and was working on some peripheral projects over the weekend. Peripheral because they don’t directly get the Big White Bus back on the road for driving. These are the cosmetic fixes, plain and simple. The primary project line is getting the motor back to 100% and making it reliable. I completed the repair of the heater fan blower motor. That disabled the motor due to the coolant hoses being removed.

I did start the motor about a month ago. Surprisingly she fired right up. I was really happy about that. I have not addressed the original issue with the reliability of the motor which is the ignition system. I’m 94.67% sure I’m going to replace the distributor with a Davis Unified Ignition (DUI). Its an all in one unit built in Memphis, Tennessee. Seeing the price today makes me wish I’d have bought it a year ago. The price has gone up about 50$(US). Although waiting has allowed me to start the one year warranty when I’m actually driving her.

All other projects from the list….linked here [Okierover.com Blog] not counting the replacement alternator, which I believe is where my vampire batter drain is coming from, are not keeping me from driving her.

I’ve ordered Knightsbridge seat covers. I finally talked myself out of putting leather back in. The estimates I got from local car upholstery companies were more expensive than ordering new leather…..customized with embroidered family crests on the headrests and my face digitally embroidered on the seat backs. Just kidding, but seriously, super expensive. So I ordered seat covers I’m not afraid to get muddy and dirty.

My new radio and speakers have arrived. I’ll need to watch the install video, call tech support 16 times, and finally give up and have the Evil German Dude or JagGuy help me install it. I’ll post something about that when I get closer to installing.

Still a couple of interior trim pieces that need painting. I am not going to remove them, I’m going to paint them in place, its just not worth the effort to remove them. The door cards came out without much effort and I need to wash them down, tape them off, and paint them. Perhaps next weekend.

I know this post was about the D Pillar so let me close with that. I have the welding repair still yet to do. As mentioned in the video, I used a palm sander and 100grit sandpaper to remove the glue from the beauty cover. It formerly had vinyl wrapped on it.

I’ve cut out some closed cell neoprene foam to replace the rust inducing open cell crap they delivered the Range Rover with from the factory. I’ve decided to start with painting the beauty panels. Rattle can style…can’t get much more redneck than that. I’ll show the finished product when I get it done.

Thanks for reading, watching, and Happy Rovering.

Reduce, Recycle, Reuse, Roof Rack (Post #601) 9/25/2022

While visiting my buddy JagGuy at his awesome shop, I saw something in his metal trash trailer. It was a mesh like material. I went over to check it out and it was a door off a server rack. You’ve seen these before or maybe you haven’t been in a server room where physical access the servers is secured by a keyed door of some kind or other.

I asked him if I could save it from the recyclers. He said, “Sure.” I told him I was going to see if it would work as a floor for my roof rack. We ate barbeque, chatted for a while, and I tossed the door in the truck and drove home.

The door was about 74 inches in length and 23.5 inches in width. My roof rack is 4 foot by 4 foot. So this door, cut in half, fit perfectly across and left about a foot of space uncovered along the length.

I think that will work.

I cut the door in half with my angle grinder and a cutoff wheel. I dry fitted the halves on the roof rack and was happy with the results. I went to the hardware store (twice, or was it three times, maybe twice to one store and once to another) to get stainless steel bolts, washers, and nyloc nuts.

I wiped the door with some grease and dust remover. I then painted it with some black spray paint I had left over from another project. I removed the roof rack from the roof and drilled my holes (lots of holes some in the wrong places) and got the hardware installed and tightened up. Several of the bolts failed catastrophically when I was tightening them up. Each one that failed, failed about the same as the others about midway up the bolt. My dad used to complain about the cheap Japanese products that began flooding the country in the 1970s. Today we complain about the cheap CHINESE parts that flood our country. I didn’t check the country of origin on these bolts, but let’s go with China for arguments sake. Bring back American made hardware. I promise not to complain too much when they fail. At least if they fail, an American had a job making them and we aren’t sending money to a country determined to destroy us. (stepping off soap box)

I recorded several videos of my cutting and narrative about what I was going to do only to have my phone camera fail in the heat of my shop.

“Blazing Saddles” (1974) Pure genius.

The temperature in the shoppe was 110F that day. I would have this trouble again later when recording video for several other projects. I really need to upgrade my camera equipment to a GoPro or something. Maybe my wife will buy me one for my birthday in two weeks….hint, hint. (who are we kidding, she doesn’t read my blog, she’ll never see this)

So I have the upgraded roof rack installed and I’m pretty happy with it. I feel pretty good about myself too. I recycled and reused something that would have just been thrown away, eventually bought by a Chinese scrapper, and made into some cheap crap and sent back to America for someone to buy and then either throw away, or be stacked in a garage packed full of crap.

Thanks for reading and Happy Rovering.

Why Not Spend the Extra $12? (Post #585) 9/13/2019

We’ve all been there. If you haven’t, you will. You’ve been stopped dead by a failed part. In this case my friend JagGuy’s wife. JagGuy was absent from one of our weekly lunches, this time he missed out on a greasy cheeseburger from Tucker’s. He was waiting with his wife on the tow truck to arrive to haul one of their Discovery’s to his shoppe for a repair.

Continue reading “Why Not Spend the Extra $12? (Post #585) 9/13/2019”

Video Blog: Panhard Rod Bushings (Post #573) 6/24/2017

Professional driver, do not try this at home.

I discuss panhard rod bushing failure and deathwobble.

I demonstrate how knackered my panhard rod bushings were.

Removing the failed bushing requires you to use a “punch”, I used a socket which is slightly small in diameter than the bushing, to press the failed bushing out. It is similar to the process of pressing them in except when you press in new ones you used a socket that is larger in diameter than the bushing.

I demonstrate how to press in new bushings. Find the beveled side of the panhard rod and the bushings will go in easier than the side that is not beveled. I used a vise to get the bushing started. This helps with getting the bushing “square” in the hole before you apply the press to the bushing.

Getting the tool lined up correctly is 90% of the battle.

Victory is mine. The bushing is pressed in. You do this for both sides.

I had trouble with the width of the bushing sleeve and it require a bit of grinding to get it mounted. I used a bench mounted grinder. Just take off a little of the material and try to fit. If you need more, grind off a little more then refit. I went to the bench grinder four times to get both sides right before mounting with the bolts.

Thanks for watching and Happy Rovering.

Lucas Elimination Part Duex (Post #572) 4/6/2017

If you’ve been following along with my plan to eliminate my Lucas ignition system you know we’ve had some struggles. Remember the goal, to replace the expensive and moderately reliable Lucas parts with easy to source, available in nearly any auto parts store, inexpensive (sometimes with a lifetime warranty) ignition parts.

No one wants to pay 200$(US)+ for an ignition module that takes 5 days to arrive from one of the coasts or 100$(US)+ for an ignition coil when you damn well know that a similar coil and ignition module for a 1977 Chevy Nova costs 75$(US) and both have a lifetime warranty. Before I owned this Land Rover I had never experienced an ignition module or coil failure….NEVER, on a dozen cars across the entire spectrum of vehicles I have driven.

Our current issue, while we have managed to source an ignition module for 25$(US) and a coil for just under 50$(US) the ignition modules are failing at a rate a great deal worse than the Lucas setup. Think, every 2 weeks I’m replacing an ignition module. I carry TWO spares just in case.

This is in all actuality worse than the Lucas setup. A great deal of science has gone into the conditioning of the voltage and current going into the module and coil. A lot of thought by people a great deal smarter than me has gone into figuring out what is causing the failure of the GM modules we are using to replace Lucas. We’ve come down to this, we need a coil that has higher resistance than the coil we originally sourced. So to that end we now have an ignition module AND coil from a 1977 Chevy Nova with the L6 engine. Matter of fact this is the coil used on 965 different models of cars look at the list here. There’s even 32 models of Jeep on that list! Even with all the models using this coil, this is not a coil commonly stocked at your neighborhood O’Reilly’s. That is a bit disappointing but it is to be expected. The ignition module which is the more common of failure points, is a very common GM part and available in most auto parts stores.

So if you are trying to do the same to your beloved Land Rover.

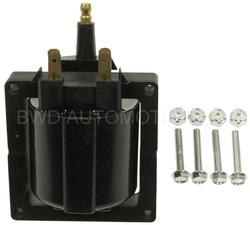
The coil is a BWD – Ignition Coil Part # E41 available for 23.99$(US) Lifetime Warranty

The ignition module is a BWD – Ignition Control Module Part # CBE4P available for 29.99$(US) Lifetime Warranty

I’ll be installing these this weekend and will keep you apprised of any additional failures and what we are doing to eliminate them. During a fit of frustration recently I purchased a new Lucas ignition module and official coil and I am prepared to put them back in and scrub this experiment. I was able to find them on Amazon.com below the cost of some Land Rover parts sites you have seen online and with my Prime membership they came to the house in TWO DAYS! That will work. It won’t work if I’m stuck in the middle of the Comanche National Grasslands 30 miles or more from the nearest parts store, so I guess I’ll be carrying a spare from here on out, perhaps even two spares.

I’m hoping to have a reliable rig for an Oklahoma Overland Group run to the western part of the state at the end of this month. If you think you’d like to go check out the Oklahoma Overland Group on the Facebook.

Thanks for reading and Happy Rovering.

250,000 Miles (Post #570) 1/23/2017

Two hundred fifty thousand miles. You can drive to the moon (238,000 miles), drive around the moon’s equator (6,786 miles) and have plenty of miles left to find a good parking spot with 250,000 miles.

That’s probably no big deal today when you are thinking about cars. I know several Japanese based autos that have clipped that. JagGuy got 340,000 miles on his Isuzu Trooper and has 300,000 on his Mercedes 300CD’s clock. Like I said no big deal for some manufacturers. But for a British made auto from the middle 1990’s that’s a big deal.

How do you get to 250,000 miles? The answer is lots of maintenance. You’ve seen the “tick sheets” for Land Rover maintenance. Most people don’t take their car to the dealership for maintenance after the warranty runs out. You are already paying 400-600$(US) a month to buy the Land Rover why would you pay 2000$(US) for a “service call”?

So after time goes by and those things get neglected suddenly you have a hose pop that should have been replaced 25000 miles ago and that can lead to even more trouble. Or how about a sensor that stops working optimally and starts to damage other stuff? Eventually you have to replace components when they fail.

Major components start to fail and cost quite a bit to repair. How about 2000$(US) for a transmission, or 1200$(US) for a transfer case. Air conditioning components don’t last forever either and are pretty expensive to get repaired.

I have long ago made my “last payment” on my car loan. As I tell my wife when I have to pay for a repair, “it’s cheaper than a car payment.” Indeed even in terrible years when I have replaced a transmission, averaged over 12 months its cheaper than a car payment on a new car.

So I will continue to drive my Range Rover until I can no longer find parts or some moron crashes into me and she is truly beyond repair. I’ll then find another and drive it until I can no longer find parts.

Thanks for reading and Happy Rovering.