Busy, busy weekend.
Lets start by saying this was a three day weekend. Meaning in America we had a federal holiday that gave us an extra day off. Labor Day. With that in mind labor was indeed what I did this weekend.
This weekend also kicked off the 2010 College Football season. For those of you in lands other than America this is like the World Cup opening weekend and your team is favored to win the whole thing. Favored right up until the team’s first snap of the ball, then you realize your team doesn’t have a chance, but you are excited anyway.
This year found us actually attending the game. A friend of my wife gave us his seats and we got to watch a football game in person. We normally watch from home as nearly every game the University of Oklahoma plays in, is televised. We had great seats, six rows up from the field on the 50 yard line. You can’t ask for better seats. (we won, defeating the Utah State University)
So, as you can imagine Saturday was all football and a little bit of house cleaning. Sunday was scheduled to be my designated work on mom’s house day. But with Mrs. OkieRover on call at the hospital I swapped it to work on the Range Rover day.
I skipped church and dragged myself out of bed at 0800. I broke out my Rovers North Coveted Mug (1 each), made some tea (with honey) and went out to the garage to tackle the hubs and axle half shafts.
My first task was to put the wire wheels on my new bench grinder. I wanted to buy the big 8 inch model but settled for the 6 inch because it’s not something I’ll use EVERY weekend. I mounted the two fine wire wheels on the shaft. I had purchased some washers and shafts but as it turned out, they were not necessary. I’ll keep them around for the course wire wheel I bought with the grinder.
The first part of the job was to get the splash shields mounted. The bolts and washers were corroded from years of use. I polished them with the wire wheel and then gave them a nice coat of Rustoleum primer.
I got the splash guards finished and then looked at the hubs. As I mentioned in a post some time ago I have a set of new bearings for the axle. I was a little wary about installing the new races but with some reassurance from JagGuy that it was easy I went about getting the new races installed.
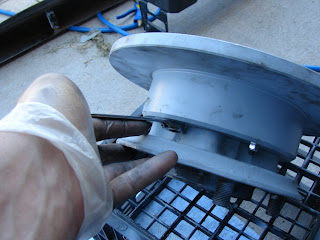
I reassembled the hubs. This is mounting the brake disc to the hub and bolting them together. Then you need to install the ABS sensor ring. I prepurchased the nyloc crown locking nuts just for this occasion. You slide the ABS ring into the holes and punt the nuts and tighten. Not hard by any stretch. The next photo has me positioning the ring. You cannot do this without tightening the bolts you see in the picture as not run down to tight.
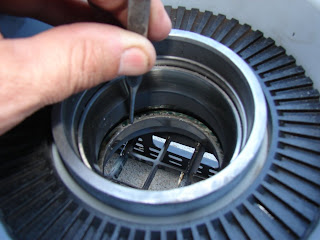
Getting the old race out requires using a punch and a hammer. The theory goes that you tap on alternate sides until the race falls out. As you may or may not know the race fits VERY tightly in the hub. I’m sure in an ideal world you would have these pressed out and the new ones pressed back in by a machine shop or the like.
My garage is not the ideal world. So I set about with the punch and a hammer to knocking them out. There are two races, an inner and an outer, per hub. As JagGuy said, its no big deal getting them out. Avoid hitting your hand with the hammer is the only advice I can offer.
You put the new races in just like you take the old ones out. The advice I offer here is striking the race about every 45 degrees as you move around the ring, slowly inching the race into place. Something to note here is having quality tools. Cheap punches will fail you on this project. Think about hitting a wooden stake with a hammer. The softer the wood the quicker the top of the stake with flare out and then splinter.
The same thing happens with cheap punches. I had the two punches my dad had in his tool chest. They are both Craftsman by Sears. Craftsman tools are replaced no questions asked. They will both be warranty replacements on my next trip to Sears along with a screw driver that no longer has a tip. The first punch was terrible and quit me about half way through the second race install. The second punch managed to finish the first hub and the second. The tool casualties are starting to mount.
The only real tip to race installation is making sure they are full seated. When you are fully seated you get a different feel from the hammer striking the punch. That is the first clue you are seated the second is by visual inspection.
So with the races installed I packed the bearing with grease and inserted it into the hub. The back side is held in place with a ring. I mounted mine with a plastic hammer very carefully. The bearings fit VERY tightly on the shaft. I know they are the same part number but in both cases only one of the two bearings fit on the inner portion of the hub shaft.
I packed the bearing spaces with more grease. I then slipped the bearing and hub into place. This took some doing but I finally got them on. You then mount the bearing washer in place and put one of the hub nuts on and tighten. I used a large set of channel lock pliers. These don’t have to be screwed down real tight. Its best you put them back the way you found them.
You then put the crush washer on and bend a flap over to hold the inner hub nut in place. You then put on the outer hub nut and tighten. I remember the tightness from the tear down. I did my best to match that.
I then packed the hub with wheel axle grease. I can comfortably say it would not take any more grease when I was done.
I applied the gasket material. There is a paper gasket included in the kit. I did not install it. Instead I just used the gray gasket material. This will probably come back to bite me in the ass. I wiped the surface as clean as I could and applied the gasket goo.
I wiped away the excess and made sure it was uniform in its application.
I installed the brake caliper and bolted it down good and tight. I then attached the brake line. I inserted the new brake shoes and got them clipped in. I will have to find a brake wear sensor plug or wire them directly. I’m not sure when the plug went missing but I remember seeing an extra somewhere.
I then slid in the half shaft. This takes a little bit of finesse but is no big deal. Get them seated as close as you can. Then take the bolts and using the same pattern you would to put on lug nuts alternate around the axle tightening until you get to the “I’m gonna need some help” point. Using a 1/2 inch break over bar, which should be standard kit in your Land Rover, use the break over bar to brace against as you tighten the bolts down.
If you remember you needed the cheater pipe to get the damn bolts off. So you can probably guess you’ll need something to get them back on there just as tight. I was running out of steam at this point and our friends were expecting us so I called it quits for the day with only the driver’s side hub bolts left to tighten and the brake caliper left to be installed.
I’m only a few more steps from having the Range Rover mobile again. On my next work day I will finish the axle. I will then install the new brake reservoir. While I have the system nearly dry I will install the new brake discs on the front axle. I understand this is not the task the rear turned out to be.
With the brake system restored, I will then remove the dead viscous coupling. I will then pray that the one I sourced used is good and install it. If everything goes well here I am on to painting the rear door by the end of the month of September. I will have to put all the electrics back together under the passenger seat. At that point I can drive the Range Rover over to the Evil German Dude’s shop and have him assist me in welding in the new floor pieces.
After those are in I need to seal them from the bottom and from the inside just like the driver’s side. I will then make a call on the sound deadening material, buy it and get it installed.
While the dash is out I’m going to remove the malfunctioning piston that prevents me from dropping the transaxle into low. I can then reassemble the carpet and interior.
I have a camping trip scheduled for the third week of October and I hope to drive the Range Rover down there.
It may be an ambitious and optimistic goal much like my hopes for a National Championship in football for my alma mater, but it’s a goal for now.
Thanks for reading, Go Sooners and Happy Rovering.


