Part 6: Welding Patches in the Rear Wheel Well (Post #642) February 3, 2024

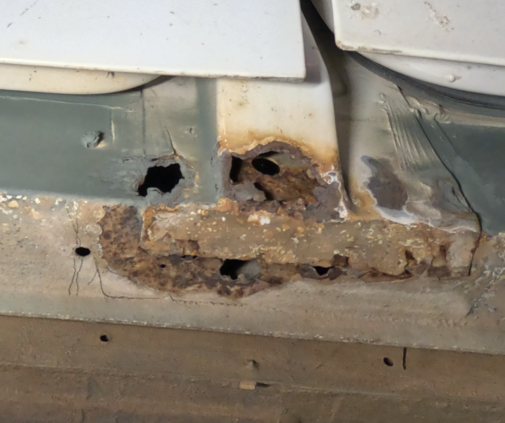
I’m getting real close to finishing the C pillar repairs. I had one final repair to finish. The patch over the rust at the bottom of the C pillar. If you know Range Rover Classics this is where the sunroof drain comes out and runs down the back of the wheel well. This is a popular place for rust to setup shop and eat your precious Range Rover Classic.

So instead of “fixing it” just like it was designed, which was poorly executed. Poorly because they didn’t protect any of the inside surfaces. Poorly because, seriously, holes in a wheel well where water, salt, sand, dirt, animal parts, and just about anything else you can imagine can hide? Super stupid. That sounds harsh, but you shouldn’t design an offroad vehicle that descended from the amazing history of Land Rovers in such a way that you can’t use it in the environments it was designed to live in.

I spent a lot of effort to shape the patch. I also devised a way to hold it in place so I could weld it there. A strategically placed bottle jack and a length of pipe. I called it the trapeze of stupidity in the video. I’ve done dumber things. This one actually worked really well.

After turning up the welder a tad, and increasing the wire speed to compensate the upside downed-ness of this welding. I saw a couple of videos where guys were welding some structural steel and they suggested uping the wire speed and voltage. That seemed to work. My problems were with the primer I painted on the fender and the patch. And at some point I think my ground was not very good. This lead to some very poor welds which I had to grind off…. several times. Eventually I got everything sorted out and the welds started holding.

Once I had the patch in place and covered in primer I took a look at the rest of the rear quarter panel. I cleaned up some surface rust and coated it with primer. I know this is only to slow the rust down but it felt good to do it.

I got all the patches on the quarter panel covered in seam sealer. Everything also got a final coat of primer. Over the primer, under the wheel well, I put on two coats of rattle can bedliner. It is my sincere hope that this will keep some rust at bay for at least a few years.

I have all the wrap up to do now including reassembling the quarter panel and reinstalling the mud flap assembly. That will be the next video. After that, I will be working on the passenger side B pillar.

patreon.com/okierover

Like and subscribe to the blog and the the YouTube channel. I hope you enjoy the content.

https://youtu.be/-LZcSk1cKwo

Part 5: Welding Patches in the Rear Wheel Well (Post #641) February 4, 2024

In this installment I continue patching the rust on the passenger rear wheel well. The patches went pretty well, all things considered. I am learning that i should probably use the zinc weld through primer. The basic primer I am attempting to use prevents me from having solid welds.

I wire wheeled off A LOT of paint to get these welds to stick. Not great considering I need paint of some kind on this metal. I have one more patch to weld on this fender. I will use the zinc primer.

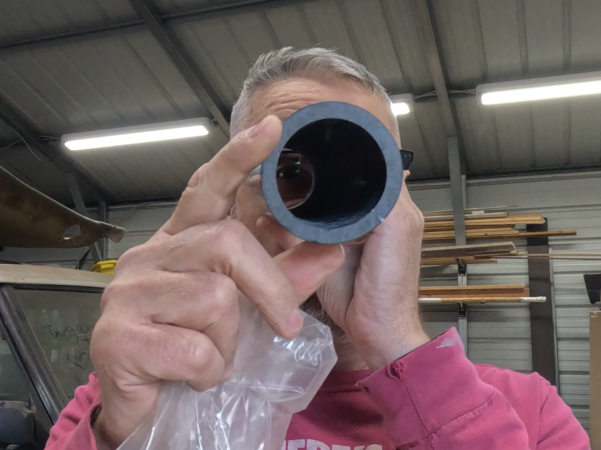
I also replace one of the sunroof drains using some tubing I bought from one of the big box stores. I’m going to come right out and say I don’t recommend this stuff. It had too many pinches in the tubing. I thought I could use a heat guy and get the tubing flexible enough to reshape the tube.

This failed miserably. What did work was using some zip ties to eliminate the pinch. How this worked was the zip ties press equally all the way around the tube. This seemed to work amazingly well. Super happy with that clever trick. So if you can’t find high quality tubing, you can use the cheap stuff and you may need to employ this trick.

Getting this tubing into the C pillar was challenging. If you are patient you will succeed. It took longer than I thought it would to get this tubing in the right place.

Think something like this.

As I mention in the video, I needed to cut a hole in the lower part of the C pillar. I decided to direct the tubing down the INSIDE of the fender well. This removes another hole in the wheel well. I will, as I mentioned in an earlier video, drill a hole behind the mud flap and using a pass through pipe thingy I will be able to send that water out while attempting to have a less rust prone way to get the water out of my Classic.

I also learned welding upside down is HARD. I had absolutely no luck getting the final patch to stick. I said in the video I would would watch some videos. Unfortunately I did not find a single video on Youtube where someone was demonstrating welding sheet metal from below or upside down.

I watched a couple of videos of guys welding structural steel joints upside down or from below. The one trick I will try this coming weekend is to increase my wire speed and maybe increase my voltage. Basically being more aggressive. Maybe if I’m lucky it won’t just blow holes in my steel.

That’s all for this week. Like and subscribe to the YouTube channel. Comment as well if you see something I’m doing wrong or could do better. I’m no expert, I’m just winging this like most hobbyists do.

Patreon.com/Okierover

Thanks for reading and Happy Rovering.

https://youtu.be/nEzSJ3lHLV8

Part 4: Welding Patches in the Rear Wheel Well (Post #640) January 28, 2024

This was the first weekend in a while that we were healthy. My son brought home Flu A from a basketball tournament at the school and then Mrs. Okierover brought home Covid. I tried to avoid both of them while still making them food and making sure they were taking their medicines. I also tried sleeping in the living room all weekend to minimize contact. It was all for naught. I got Covid on MLK Jr. Day. I missed a week of work too.

In this episode I tackle some of the rust holes in the passenger side wheel well. Turned out it was too cold to paint so I couldn’t get any primer on them.

I put a patch over the bad spot in the front side of the wheel well. This spot is where three panels come together. It was “protected” from the factory with hope and a lot of seam sealer. My original goal was to just fill the split but the steel was too thin and the MIG welds just blew through.

I got the patch welded in place without too much trouble. I think I did a decent job with this patch. I mean, I don’t have that much experience welding so every time weld I’m trying to get better. If I’m getting better, it would be considered “slowly getting better”.

While cutting out a bad seam I inadvertently sliced the wheel well in two places. These needed filling. They went as I would have expected.

Finally, I fixed the cut I made in the rear support beam. If you remember I cut through this while attempting to remove the rear floor pan. This was dumb. Thankfully it wasn’t damaged too much. I welded the entire cut closed. I think this went well too.

I had some trouble with being able to see through my hood towards the end. I adjusted the settings on my helmet and realize I need to replace my batteries. I need a few more hours under the helmet. I wish I could have tried out several helmets to see how they work. I limited myself to American Made welding helmets so there weren’t a lot of affordable options.

That’s all for this week. If you enjoy the videos Like and Subscribe.

patreon.com/okierover

Thanks for reading and Happy Rovering.

https://youtu.be/dvfHz-CrfTo

Prep for Welding, Part 2(Post #637) 1/1/2024

B pillar rust

Happy New Year everyone!!!

The plan this weekend was to do some welding. Unfortunately the welding supply store was closed. So I was unable to source the shielding gas I needed. That…was frustrating. I instead knocked out a project my wife has asked for “she claims” for 18 months. I’ll admit it was a while…but maybe only a year. In any event, the pantry portion of the former laundry room now has fancy shelves.

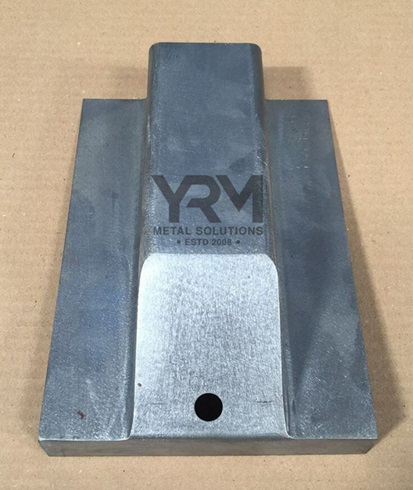
So today I did some more investigating of the rust, primarily on the A and B pillars at the sill. The B pillar is mostly rusted out. It is as bad as it looks and I’ll need to source the ready made B pillar lower portion. I’ve seen them online…but don’t remember if they are available in the US of A. I’ve found at least three businesses in the UK. Part is only about $33.00(US) the shipping to the US is the same amount. More research is needed, or I weld up my own version.

YRM B Pillar Replacement Part
YRM B Pillar for Range Rover Classics and Disco 1

The A pillar has a hole next to it in the sill. I think it would be an easy patch to fix.

So this week I’ll get some more shielding gas and I’ll be ready to do some repairing next weekend.

Once again thanks for stopping by and for watching the videos.

Like and subscribe… Patreon if you like this content and want to help me keep this site up.

Thanks for reading and Happy Rovering….

Prep for Welding (Post #636) 12/23/2023

Filler hose

In this post I explore the rust under the passenger side fender well. It was my intension to WELD this weekend. Unfortunately I absent-mindedly did not turn off the shielding gas and the tank was empty. Major bummer.

So I took time to get the fender ready. I also cut my patches. I also installed the new gas tank filler hoses and my new gas cap. How exciting! It wasn’t.

I cut the fender rust out of the part where the body mount is. Turned out it was just the outer skin that had rust. I cleaned up the rusty metal underneath and will paint it with the magic rust-encapsulating-paint before I weld the patch for the fender back in place. Why Land Rover didn’t bother to try and keep rust out of there is still a mystery to me. It’s like they WANT their vehicles to rust out. What kind of a sales strategy is that?

I’ll need to get more shielding gas this week. However there is really NO RUSH because Christmas is this week and the house will be filled with people and very little in the way of rust repair will get done.

Like and subscribe to this blog and the videos. It really does help and it is much appreciated.

Okierover.com\Patreon

Thanks for reading and Happy Rovering and Merry Christmas from the Okierover family.

Refurbishing / Replacing the Subwoofer (Post #633) 11/26/2023

Subwoofer work

Ever wonder what is inside of that gigantic custom-fit subwoofer box in the back of your Range Rover Classic…well wonder no more. I had to pull all the parts of the sound system out of the Big White Bus to investigate my rust issues.

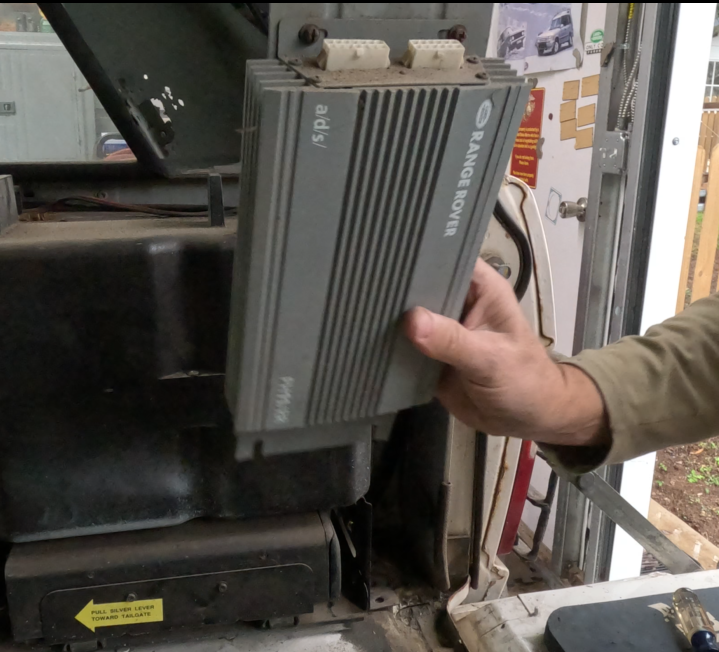
It takes a few bolts to get it out but everything is easy-ish to get to and you don’t need any special tools. Take the amplifier off the subwoofer box. Then tackle all the bolts. Once the subwoofer is out you can get to the antique CD changer. Actually in 1993 a six disc CD changer was straight up gangster. My CD changer worked for a few years. It then got a little buggy. You could get it to work if you slid it out and slammed it back in. Most of the time it started to be available at the head unit after that.

It all has to come out. I have a new head unit. I have new speakers. I don’t know if the amplifier still works. I will have to sit down at some point and try to figure out all the plugs and see if the amplifier will be part of the equation. Having a working subwoofer would be a nice addition.

Once the subwoofer is out it takes 10 screws and a little gentle encouraging and the box will come apart. It’s a relatively simple setup. There is a dual cone speaker inside and that’s it. Mine as you will see in the video is toast. the cone has disintegrated. It is at least 30 years old probably closer to 33 considering assembly line technology of the day.

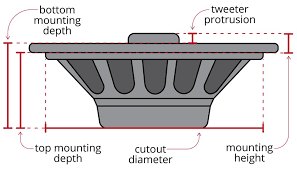
So the speaker will need to be replaced. In the video I speculate about the size but it turns out to be:

  • Cutout Diameter 6.5 inches
  • Top Depth mounting 3 inches
  • Bottom Depth Mounting 3.25
speaker measuring graphic

There are a LOT of speakers to choose from online. I went to Crutchfield.com. They don’t sponsor me, I wish they did, but they don’t. They have great customer service and the spec’s for everything are easy to find on their site.

I found a speaker that looks like it will fit.

That’s not a lot of money and 4 people think it’s pretty awesome. Mounting that is still a question, but I’m not worried. I will figure it out if that is the direction I go.

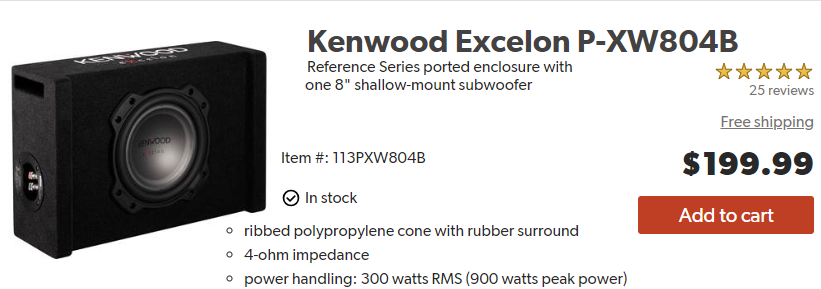
There is some debate going on in my head about replacing the old one with a NEW subwoofer. I found a Kenwood on Crutchfield that was not all that expensive.

Kenwood Excelon
ribbed polypropylene cone, sounds naughty….

It’s pretty small too. Just a little under 18x12x6 inches. I’m certain I’d have to cover the speaker cause it would almost certainly get damaged if I didn’t. I am confident it would fit in the space. But the real question outside of would it be better is…. am I really saving enough space to matter? I’m not sure I would gain anything. The space would have to be VERY creatively designed to take advantage of a few inches more here or there.

This gives us the cheaper option of just buying the speaker and figuring out how to wire it to the old AMP and the new head unit. Another plus of this operation was the elimination of the CD player gives me 12 volt switched power line back in that corner. That might come in handy, who knows.

I like tunes as much as the next guy. I even have a playlist named, “Can’t Be Too Loud”. It’s got some songs that you turn up until your ears bleed.

  • Van Halen’s Eruption
  • AC/DC Back In Black
  • Living Colour’s Cult of Personality
  • Beastie Boys Sabotage
  • Black Sabbath’s Iron Man
  • Wagner’s Die Walküre (Ride of the Valkyrie)
  • Carl Orff’s O Fortuna from Carmina Burana

There are more, but you get the picture…you probably have a list of your own. Whenever I hear these songs I turn them up to maximum volume.

Mostly today…I listen to audio books. Sooooo many audio books. It’s not uncommon for me to just drive, no music, just the window down and the sound of the engine and the tires on the road. That recharges my batteries almost as just sitting in the woods next to a fire.

There is a lot left to do to get the sound system installed. I’ve got to sort out the plugs and get everything wired up. The dash is still not installed. There is an order to putting the BWB back together…and the windshield needs to be first. I’m almost certain there is water leaking in and the last thing I want is to get his all put back together and still having water coming in.

That’s it for this week. As soon as I make a decision I’ll post it up and when I starting putting the sound system together.

Your sponsorship on Patreon would be appreciated if that is in your budget. Otherwise LIKE and SUBSCRIBE to the YouTube channel. Leave me a comment…I love talking to people about Land Rovers.

Thanks for reading and Happy Rovering.