I purchased some spray tips that resemble the spray tube on a can of WD-40. The spray nozzles were necessary to get the paint in the space between the steel panels. They worked great. Better than great, beyond what I was hoping.
After the primer was everywhere I could possibly get it, it was time for the seam sealer. This was messy, real messy. The last tube I used dried to far into the tube and I couldn’t get the caulking gun to push it out. So I cut the tube in half and applied it by hand, kindergarten finger paint style.
I sealed the underneath too. I also found a paint I had welded in that I forgot to paint the back side of. SMH. I also found another seam on the driver’s side that was rusting. I cleaned as much rust off as I could but it was just in a bad place and was impossible to get the rust out. So I painted it with rust encapsulator. I’m hoping that stuff works as advertised. I need a few years out of this rig and I DON’T want to chase rust every year.
There are some other places underneath that will also need to get the same treatment, but those are for another day. Now we are on to planning the interior and getting some wiring run to accommodate our upgrades.
Like the content? Like each video subscribe on YouTube. Heck subscribe to this blog!
In this episode. Grady and I get the Z bar welded to the floor pan panel. After the debacle of last week was finally solved, we had some new tools and great grounds to work with. These allowed for our plug welds and our panel butt-welds to hold.
I also noticed I had the heat up too high on the welder. Once I lowered that, the welder didn’t blow through the panel. There were a LOT of welds. We went through a half tank of shielding gas. And in the end we ran out of gas. So next weekend I’m going to need to get down to the welding supply house and get a fresh tank of gas.
If you remember the first video we determined we needed to cut about an 1/8th of an inch off one side. It turned out to be closer to 1/4th of an inch when I finished. We used the pinch vise clamps, some hammering, and a lot of bending to get the panel flat enough to make good welds.
Grady got to weld quite a few welds. I think I need a second welding mask so I can watch his technique and help him to get better. He did a pretty good job after he got the hang of it. Its fun for me to see him engaged and wanting to learn.
We have 2/3rds of the sides on now. Our first task will be to get the last one welded on and to fit it ONE MORE TIME. We fitted the panel and I’m 92.6% sure the panel will go in cleanly and fit properly.
That’s all for this week.
We wish you all a very Merry Christmas.
Thanks for reading and Happy Rovering. Like and subscribe.
If you follow the blog you have seen the rust damage from open cell foam in the upper D Pillar. The foam got wet and over time ate through the pillar and caused a hole that allowed water into the rear. It wasn’t likely a “stream” of water as the pillar had a cover and the foam also blocked the hole.
In any event, it had to be repaired. I went to some effort to research the removal of the rear quarter panel windows. Damaging the seal is a non-starter. Replacement seals cost in the neighborhood of $500.00(US). And there is also a chance of breaking a window.
I had the Evil German Dude over for Thanksgiving and showed him the damage. He was pretty certain that I could weld a patch there WITHOUT removing the seal and window. Using caution and allowing time for the welds to cool, he was sure that the welding would not be a problem.
Trusting he was right, I proceeded to build a patch and weld it in. The patch was pretty easy to make. You’ll need a bench vise or a metal brake to bend the steel. Well…if you have to bend steel for your patch. I got the patch in place, wire wheeled the paint and primer away and started welding.
My first welds didn’t stick. I had to work through that. Some of the issue was a crappy ground point. The other could be paint I hadn’t removed. I finally sorted that out and made the weld around the piece. I will come back with some seam sealer and make sure there are no holes by sealing them with a bead of sealant.
I was a bit surprised at how well this went. I was expecting a much more complicated repair. I’m not in love with the welds. But such is the way you have to weld thin steel. They also are not in sight so they didn’t have to be pretty…and they aren’t pretty.
The temp cooled off this week. It was 40F degrees when I finished up. Funny how two and a half months ago the temp was three times that in the shop. We got a little reprieve on Sunday and it got above 50F degrees.
I’ve been kicking around an idea if the window had broken. Building in wing window storage boxes. I could use them to pass through power to solar panels, shore power, a heating tube for a propane heater, and the most exciting, water for showers and cooking/washing hands and such. I’ve got the bug so I may build a mockup with cardboard to see if it would work the way I’m thinking. It’s maybe a project for another day. You can check out this video which served as a good portion of the inspiration. Dirt Lifestyle has two videos on gullwing windows for his Discovery II. This is the latest [YouTube], and is an improvement of the original, enjoy.
I hope you enjoy the video of my work. Like and subscribe and if you want to help through a recurring contribution, Patreon is helpful way to do that.
I have fired it up once since I parked it in my newly constructed shoppe 5 years ago. I guess I should have expected there would be “issues”. But I wasn’t expecting the issue to be this one.
Mr. Fisher came over and we diagnosed the issue. We started with checking the power at the pump. As you may be aware, when you turn the key over it powers the pump briefly. So if you just “turn on the key” and go back there to check the voltage you won’t find any. That’s why it takes either some seriously creative use of a volt meter or you get one of the bestest friends to come over and turn the key for you. We had voltage all the way through the wiring harness.
We then confirmed we have spark from the ignition system. I pulled the number 1 plug and with a screwdriver I grounded it and watched for spark. You can buy a fancy spark tester, matter of fact I think I own one. I have no idea where it is though. Spark confirmed.
So we have two of the three things (Meatloaf would say that “ain’t bad”) to make the vehicle run. Air and Spark. Now why aren’t we getting fuel.
I pulled the gas line off at the regulator on the back side top of the engine and had Mr. Fisher crank the ignition. We should have had gas squirting out if it worked. It did not. This fit with me NOT hearing the pump run when the ignition was turned over.
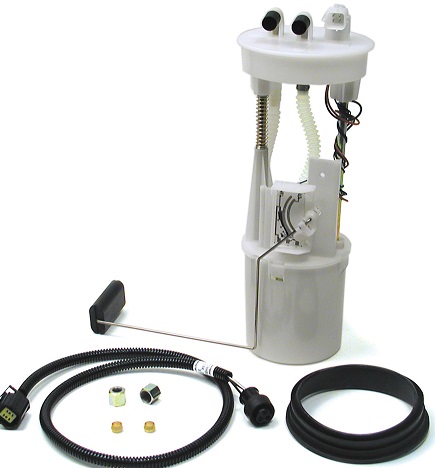
The only thing left was to pull the fuel pump and do a visual inspection. What I found was not expected. I said, “Wow.” a lot in the video. There were several parts that were obviously degrading due to being submerged in petrol for so long. There was visible rust on the steel parts as well. Generally the pump was in a terrible state. I was not aware that petrol would do that to those parts. The only gas I ever put in my Classic is 100% real gas, unless I am in Texas where they only sell ethanol (at least the last time I was buying gas there). You would expect ethanol to eventually separate and turn to water. You can read all about that on the Road Guardians website.
I will be replacing the fuel pump and have ordered the part from Atlantic British. I found some that were cheaper on Amazon. But my skepticism and need to have it delivered before next October weighed heavily on my decision where to purchase. The pictures all looked like the pumps were manufactured in the same place. Same white plastic. Same blue plugs.
PRC9409K
If you look on Amazon you’ll see the pumps look like the same ones. If I had unlimited funds or sponsorship, I’d buy one from everyone and do a side-by-side comparison.
All this “BUY IT NEW” has me thinking about what this would cost if we just fixed the pump. All you need to do is replace the pump in the collector can (that bottom part). I’ll do a post about that in the coming weeks.
So…do I drain the tank too? If the gasoline HAS turned to varnish I should probably put some treatment in there. I’m thinking I’m gonna add a silly amount of STP Fuel Injector cleaner in that tank. I can say, WHEN I get it running It will run for quite a while before I shut her down. I want to give the truck plenty of time to dislodge any crap in the fuel lines. I’m also guessing I’ll need to swap the fuel filter too.
If its not one thing, its another. It really, never ends.
Mr. Fisher also brought over his Viair Compressor. We spent some time looking at it and checking out all its features.
In this installment I finish the left rear fender panel. And by finish I mean I had to completed replace the outer fender I had previously welded up. I added a strap to attach the inner fender to the outer fender.
The outer fender’s welds were compromised because I ran out of shielding gas halfway through. The panel was 16 gauge and I swapped it with an 18 gauge. The right thing to do was replace it and “do it right”.
Now, I’m no body man and right to me is probably not right to someone who actually knows what they are doing. As I mentioned in the video I need another 10 or 20 years of welding experience to be “competent”. Over all I’m a lot happier with this replaced panel. The 16 gauge panel would not have worked. It would not have been watertight no matter what I did.
I covered everything with yet another coating of primer. I also put seam sealer in the appropriate places. This only seemed prudent as I am almost certain this will rust again. My hope is it will take at least 20 years to rust out.
I thought some of the welding went a lot better than the previous attempts. I want to say, “I’m getting better.” but I’m pretty sure I’m fooling myself. Most people could probably weld if shown how and a little practice. Welding WELL however is really hard.
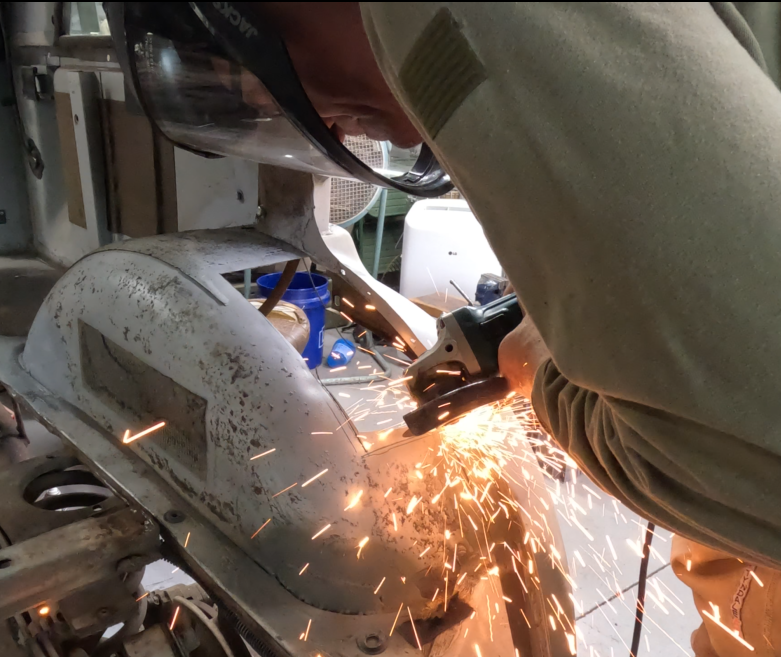
So add to the fact I’m saying welding is hard…and welding UPSIDE DOWN is another level. We did not go over this scenario in my class. I’m half tempted to take the class again and do the entire class upside down. I finally figured out the I could weld sideways that worked pretty good. Even with my new sideways technique it didn’t stop me from getting some new holes in my PPE and my skin from hot slag dripping down. My grandson Grady was horrified by the scab in the crook of my elbow. The chunk that got me on the chest made a similar hole there.
I also did quite a bit of cutting and the sparks flying back on me warmed me up a bit. Thankfully my Round House Overalls1 deflected the sparks and only “warmed” my family package. If you remember this post from December 2010, “The one where I catch myself on fire in the furtherance of Land Rovering” [Okierover] I caught myself on fire cutting the passenger side floor panel. What I learned from that was:
Blue jeans are not safety gear and are a sad substitute for PPE.
Longjohns [IBC] (aka long handles [Collins], thermal underwear, etc…) will keep the flame off you for a brief time.
Your best friends don’t want you harmed, but also want to take videos of you when you are on fire so they can tease you later.
Thanks for reading and Happy Rovering
1This is my unsponsored review of Round HouseBrown Duck Overalls. It is a solid 10 out of 10. They are made in Shawnee Oklahoma (Home of Brad Pitt) and at $60.00 a pair (on sale at the time of this posting) a real bargain.
It is not uncommon for Oklahoma to have temps over 100°F for extended periods of time. Even when I was a kid this happened some summers. The hottest temp I ever remembered experiencing was 125°F during the Combined Arms Exercise (CAX) in August of 1985 while I was serving in the US Marine Corps Reserve. We spent 14 lovely days (without a shower) in the high desert of the Marine Corps Air Ground Combat Center, also known as 29 Palms [Marines.mil] or “the stumps” as many Marines sometimes fondly remember it.
I recently got to catch up with one of my friends that I had not seen since February of 1986. We talked for hours and brought up that summer and our exploits in the desert several times.
I know we are supposedly experiencing “never before” (not since records have been kept anyway) high temps across the entire earth. I heard a guy offer an alternative theory to the climate warming crisis. He said, “What if we have been living during a historically cold temperature all this time?” That does make you think a bit…
I work in the shoppe as long as I can during these hot days. The GoPro camera usually signals that I’m done when it over heats. The last few videos I have taken the GoPro it has prematurely quit and had to be set on the portable air condition to get it back to operating temperature.
After I’ve had enough with the heat, leaving the shop on these days in July and August on the Southern plains with triple digit temperatures has me feeling a bit like Sir Alec Guinness when he emerged from “the oven” in Bridge Over the River Kwai (1957).
I’ve shown the shoppe temp in previous videos. When the outside temp is 100°F plus. The shoppe temp can easily be 110° to 120°F inside. It’s basically a giant tin oven. It desperately needs an exhaust fan to pull the hot air out. I will be sourcing one and getting it wired in as soon as my budget allows.
I’ve learned four very important lessons in my 58 years of life, that the wisdom of which needs to be passed on to others:
Communism doesn’t work.
Never get involved in a land war in Asia.
Never cook bacon naked.
And not the least of which is, don’t use an angle grinder with a cut off wheel to cut steel plate while wearing shorts and a short-sleeved t-shirt after you’ve had a couple of Cuba Libre’s.
While taking care to follow the “Safety Second” mantra, I cut the steel the night before after a crappy day at work. At least I wore my protective face shield and moved the steel stock away from flammables and the Big White Bus while I showered the entire area including my arms and legs with blistering hot sparks precisely cut the two patches.
I remembered to pack a pair of gloves and to place the fender patches in the Ford F-150 after I cut them Friday night. I was worried that in my haste to get to OKC to eat BBQ and see Mike (who is perhaps my oldest friend), I would miss out on my opportunity to manipulate steel plate using tonnes of pressure with the English Wheel because I left the steel at the Okierover Base Camp. Its happened before.
Thankfully I have awesome friends that have skills and tools I have yet to acquire. JagGuy has an English Wheel in his shop.
Image from TheShed.NZ How to Build Your Own English Wheel
An English Wheel [TheShed.NZ] which if you know anything about its function makes flat stock, curved. For the left rear fender, the last two pieces to weld up are two large arches. The first of which is the big hole in the wheel well, which is where one of the seat belt mounts (which I will have in place but will not use) go. The other is the outer wheel well arch against the outer wall.
I’m going to use his English Wheel to give my patches some curve (parabola) so they are easier to manipulate and weld into place. I’ve never used an English Wheel but am not afraid to try.
I know using the English Wheel is an “art” and people who can produce panels this way charge premium prices due to this highly skilled and labour-intensive production method. I’m not highly skilled and I don’t plan on doing anything that might pass for “labour-intensive”. Just a few tugs and pulls to get a curve. The wheeling will hopefully make my welding and fitting of the panels easier.
The temp actually cooled off for Saturday, apparently the “heat-bubble” popped. We had rain and temps in the 80s. You can watch the video of the wheeling process and the welding of the fenders.