Footwell Repair Part 3: Floor Panel Repair, Welding (Post #662) 7/13/2024

We got a big break in the weather. A cold front hit and we got a lovely lightning show along with the fireworks. And we got some cooler weather. The shop wasn’t crazy hot today and won’t be all weekend. So I’m going to take advantage of it and get some work done.

In this post my goal was to get the floor pan welded up. I first had to fix a small patch to the bottom corner. I made a template and got the steel cut. It welded up pretty well. I was pretty happy with the results.

Then I started on the floor panel. I first drilled some holes for the plug welds. This reinforced my need for a drill press. I really want a drill press.

Due to the odd shape of the floor. My panel does not fit very well. Off camera I tried several things to get the panel to line up and contour to the floor. I didn’t have much success. And getting the panel to stay put while I welded, well, I was trying to hold it and weld it. I struggled greatly.

So I decided to put a few self-tapping screws in the panel. These held the panel as expected. I put my hand-made plug weld bit to good use and started welding. I had some success all across the bottom. I didn’t have much luck with the welds near the transmission tunnel but I did finally get some welds to stick.

At this point I realized my welding helmet stopped darkening. This could have gone really badly for me. I did weld two plugs without darkening. I’m glad I noticed, because that kind of eye damage is the real deal.

At this point I’m going to used the self tapping screws to pull the two panels together. I’ll make the plug welds in the holes and then pull the self tapping screws and fill those with welds. At least I have a plan and I am relatively confident this will work.

I’ll then fill the gap on the bottom side with seal sealer. Paint everything with a couple more coats and then I’ll seal it all up with rattle can truck bed liner.

Thanks for reading and Happy Rovering.

https://youtu.be/jHhHI75723A

Footwell Repair Part 2: Floor Panel Repair, Well Sort Of (Post #661) 7/6/2024

What a day.

I started out with all the intention I could muster to complete the floor pan. Unfortunately Fate had another plan for the day.

My plan started out solid. Paint the panels and while it dried see if I could get the Scion started and moved. The Scion as you may (or may not) remember is my son’s first car and he was still driving it until he was rear-ended by a mid-90s model Chevy pickup. The truck was moving at 35-40mph when he hit Rooster sitting still in bumper to bumper traffic. The pickup was completely disabled. The Scion had it’s rear tucked under and was touching the tires.

The though was it wouldn’t take that long to get the wheel wells pushed off the tires. I was wrong. The more I fought with it the hotter the day got and I finally reached my limit. So I went inside to cool off. I was watching the Germany-Denmark match when I got a call from Mrs. Okierover telling me the Honda Pilot with all of the grandchildren in tow would not start.

There is a whole long drama about a forgotten cell phone and a melt down of worry and a lot of really important details about how the battery got run down were left out. The names have been changed to protect the innocent.

Here we go.

  • Grandchild #1 left her cell phone at bathroom break an hour back up the road.
  • My oldest son who was following along in his car take said grand back to her phone.
  • Grandchild #2 melts down with worry.
  • Mrs. Okierover tells him to go sit in the car and calm down.
  • Grandchild #2 thinks he starts the car but places it in accessory mode and proceeds to sit in the car for more than 30 minutes.
  • Dead battery.
  • Not confident of the traveler’s ability to purchase and install a new battery I begin googling likely reasons of dead battery not aware of the 30 minute accessory episode.
  • Eventually Answers Online mechanic calls wife and diagnoses dead battery.
  • Oldest son returns and we attempt to jump battery.
  • Battery is buried under the air intake and only the positive is visible.
  • Plastic parts removed we finally ground to an engine lift point.
  • Car is started.

I learned a lot watching Law and Order: Criminal Intent and I use all those skills to interrogate everyone after they all arrive home. I had the battery tested and it was good, just needed a charge. I also watched a video about placing a new mount which is easy to reach for jumping. So I installed that M6 1.0 bolt and marked it for future reference.

So long story longer, the day was a complete loss. The following day I did get the Scion sorted out and back to running thanks to a sawzall (aka reciprocating saw), a floor jack, a 4 pound hammer, and gravity.

Next week end we’ll get more done ON THE BIG WHITE BUS…hopefully.

Happy Independence Day.

Thanks for reading, like and subscribe, and Happy Rovering.

https://youtu.be/gHdUjYCurx4

Diagnostics, Not Just for Breakfast Anymore (Post #490) 4/24/2014

Florida Orange Juice Growers Association had a slogan in the 1970’s, “Orange juice, it’s not just for breakfast anymore.” It was used to encourage people to drink orange juice during the day, not just at breakfast time. It’s clever and a lesson for us. Diagnosing a problem should not stop with only one solution, keep diagnosing through the problem.

Diagnostics is the root of what we do to fix our Land Rovers. If you can’t diagnose the problem you can’t fix it. This was made painfully financially clear to me last night. Continue reading “Diagnostics, Not Just for Breakfast Anymore (Post #490) 4/24/2014”

Helpful Tips for My Helpful Tips (Post #404) 10/21/2013

Ken Arciga of Los Angeles, California, sent me an email recently. He wanted to thank me for the site and to share some comments back with me on things he’d learned and tried when working on some of the same projects for his 1995 Range Rover Classic expedition project vehicle.

He has many of the same issues I have with the fuel economy and is yet another “old Rover” guy looking to swap in a diesel. He uses his Rangie in typical fashion to drop off the kids but at 4$(US) a gallon its expensive.
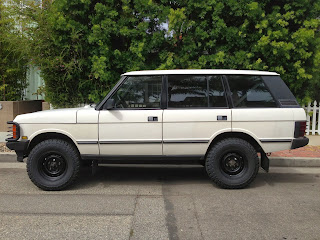
I must say, excellent color choice 😉

Before we get to the email, my first observation, Ken has the cleanest engine bay I’ve seen in a LONG time. Ken, you’ll have to tell us the secret to that in another email. His email after the jump…

Hi Eric,

Pleasure to meet you, thanks for putting up your site and sharing. Wanted to share notes on a couple of things I just went through:

1. STEERING SHAFT – Looking at your picture, my steering shaft was also put in the same way your old one was, is the part with the rubber band (crash/break away joint?) was on the steering pump side. So that is the same direction I put in my new one. However I had my truck in for alignment and the independent dealer noted my steering shaft was installed backwards!
Sure enough I looked in the manual and it is backwards – that rubber band part is supposed to be on the steering wheel side. I bet it was probably put in either way as these manuals aren’t always accurate.

2. 2ND BATTERY – I kind of did what you did with my P/S pump reservoir and bracket, however for the air box I just drilled a couple of holes to move it over and was able to get the 2nd battery to fit – with the HORN OFF.

3. CC VACUUM PUMP – I ended up not wanting to go through the work to relocate my cruise control vacuum pump unit (my cruise control isn’t working either) but the battery was pressing up against it which I didn’t want – so I ended up taking a little metal off the radiator bracket so the battery could be positioned over enough to give the CC Vacuum enough room.

Anyway thanks for your info, reading up on some of your stuff that I still need to tackle!
-Ken

Steering shaft. My Range Rover was a front end wreck before I got it. When it was put back together there is a good chance this was put in backwards. With that in mind, there’s probably a very good reason one way is preferred than the other. Knowing my OCD will not let that stand, I’ll probably switch mine to match the manual. Great find.

Bracket. Nicely done. I think the bracket I used was from a Discovery I. I read that online quite a while ago. So I just went down to Rover Cannibal and picked one up. I like Ken’s bracket, simple and functional.

After getting such high praise and being a generally curious guy (and seeking permission to publish him) I followed up with another email. He sent the above picture of his excellent Range Rover and the following description of things he has already dealt with. He wants to take his Range Rover to Peru someday and has thoughts of a shake-down expedition a little closer to home in Baja California.

Here is what it looks like so far – I started with suspension (OME 2″ springs, nitrocharger shocks), front radius arms and adj. pan hard to get steering back, wheels, tires, P/S pump (PAIN in the butt, Cardone rebuild didn’t work), gearbox (Meridien – LOOOOOOOSE but I tightened up) and shaft, got the 2nd battery in but saving up for the kit to wire it, oil pan gasket and probably doing the head gasket next (leaking of course : )

Just finishing up the fluids – have the trans pan kit and fluids, transfer case to do, just got my LR grease for the swivel housings. A ton more plans.

I don’t know how to weld but contemplating learning so I can build my own bumpers and skid plates – really a big part of this is to fix stuff and to learn on a vehicle I’ve always wanted since I was a teenager.

Rack, lights….this list goes on!

Anyway thanks again for sharing your stuff, only people that dig into the nuts and bolts I think can really appreciate the details!

Ain’t that the truth?!?
Like myself, I imagine he has expedition dreams on a domestic beer budget. While I am worried about breaking down in my own STATE! he is contemplating a long trip to another continent. Excellent.

Thanks for contributing Ken. These are great tips and I felt they had to be shared. Thanks for letting me put them up for every one.

Thanks for reading, and Happy Rovering.

Batteries? We don’t need no stinking batteries (Post #299) 8/22/2012

This weekend was mostly unpleasant in the Honda side of the stable. We had not one, but two batteries fail in our Honda cars.

I mentioned to my wife while we were on our 3800 mile trek of a vacation, that the battery in the 2007 Honda CRV would need to be replaced. I had a morning in Montana when I started the engine that it gave that, slow rev sound when starting. We were lucky to make it home without swapping it out.

But that was not to be this past Saturday morning. I was making breakfast, and as it turned out we were out of eggs. My son, Diet Mountain Drew called and told us the Driver’s Education place doesn’t take checks, cash or money order only. So Mrs. OkieRover jumped in the CRV and drove cross-town to pay for the defensive drivers course.

On her way home she stopped at Braum’s to pick up eggs. About the time I had decided, Mrs. OkieRover wasn’t going to come home…ever. She called and told me the CRV would not start. So I ate my plate of hashbrowns, no eggs, and went to get her.

We jumped the CRV and drove home. I grabbed an 8mm deep socket and headed to O’Reily’s to get a new battery. I bought the last one, they had. (This is important for the second half of the story so try to keep up.) I installed it right there in the parking lot. This saved me having a core charge and the hassle of having it reversed on my ATM card.

So a few hours later I have a call from Diet Mountain Drew, and as you may have guessed, the Civic would not start. My eldest daughter was en-route to him, but instead he got a jump from his friend Justin.

So I now had another battery dead. I had to go to the grocery to buy sandwich fixin’s for my newly found biologically related OLDER brother (more on this later) and family to come over for a visit. When I came home I jumped the Civic and drove it to O’Reilly’s. As it turned out…they didn’t have any more batteries for that model. Someone had bought the last one. (rolls eyes, heavy sigh)

I was told there was one on the south side of Norman so I drove down there to buy it. I didn’t bring any tools. If HAD remembered, the 8mm deep socket would have been WRONG! They started using 10mm sockets on the 2008 models.

The kid at O’Reily’s opened a drawer full of sockets and said that’s what we got. What they didn’t have in the drawer was a 10mm deep well socket or a 10mm wrench. They had an 11mm wrench but no 10mm. I wound up buying a set of pliers. I swapped it out and was done.

The two batteries were OEM original equipment delivered with the cars. That puts the CRV at 5-6 years old considering the manufacturer date and the Civic’s at 4-5 years. For a battery in Oklahoma with 120 degree summers and 8 degree winters, not too bad.

I didn’t need the 100$(US) each hickey for the budget but what else are you going to do? Ever push started an automatic? Yeah, me neither.

PS. We swapped a third battery in my eldest daughter’s Ford Explorer. It died on Monday while she was in line to pick up my grand daughter from school. We had a time of it swapping it out. The negative battery connector was too stretched out. We had to cut off the bolt for it had rusted and corroded. Nothing more exciting than generating a lot of sparks with a cutting wheel over a battery. It says expressly to avoid sparks near the battery. So a nice volume of sparks is always entertaining.

Batteries? We don’t need no stinking batteries. 

Thanks for reading and Happy Rovering.

The Truth is Revealed!!! (Post #140) 4/21/2009


From Jalopnik:

As we expected, the Raser Electric Hummer H3 is a plug-in, extended-range electric vehicle (EREV) utilizing a 200 kW motor to drive the wheels and a turbocharged Ecotec four-cylinder to power a 100 kW generator to charge the batteries and run the e-motor.
If you’re good at math you immediately see the problem here. For the first sixty miles the Raser Hummer runs in all EV mode and from there it will run on a constantly operating generator, resulting in an asymptotic decline in average fuel economy. It does get the dramatic 100 MPG fuel economy the company claims — as long as you don’t go further than 60 miles in a day.

That figures…fuzzy math to get people excited about a product. Reading on in the article you will be informed that the Raser gets 33mpg. I’m pretty sure there are diesels that can get 33mpg in an SUV if you put in the money they did to design a vehicle. Matter of fact I’m sure of it. Hell even I COULD design one for that kind of money.

I can imagine several captions for Arnie in these pictures.
“What the eff, I told the people of Kalifornia this was awesome.”

So where is the 100mpg Discovery? Still in my head dear friends.