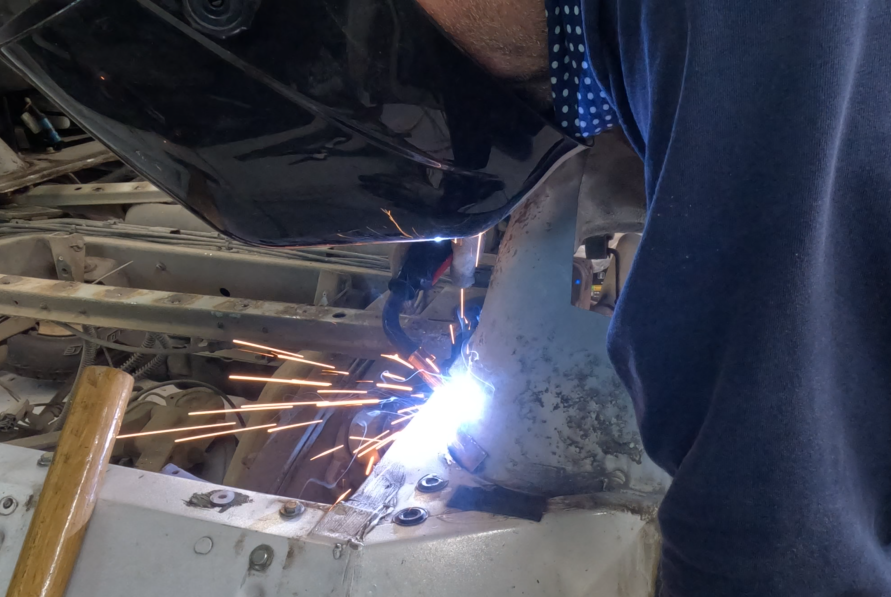
Footwell Repair Part 9: Seam Sealer (Post #656) 6/3/2024

In this installment I apply seam sealer to the most recently welded “L”. Seam sealer was not how I wanted to seal this joint up. I wanted it to be welded closed. That is just not possible. It wasn’t originally built that way. I can only hope the seam sealer I’m using will last long enough for me to quit this Overlanding Hobby.

I also look at the floor patch I’m going to need to build. I talk about the two structural bends in the panel. I saw the guy on Make It Kustom [Youtube] build a jig and a tool to make these kinds of bends. You can look through his videos to find it. I’m going to think long and hard about this before I tackle this problem.

It might be fun to build the jig. I will need to buy a router bit to get the jig in the right shape. I’ll probably need to build a special air hammer bit like he did too. It would be a one off fix. I don’t think I will ever tear this apart again.

It’s a short video and I know it’s über riveting content watching me smear seam sealer. In my defense I didn’t have time to produce anything else this weekend. Saturday we visited the Evil German Dude and his lovely wife. Paparazzi Ford was there too. The Evil German Broad made brunch for us and we all got to catchup on the latest happenings and see their almost finished “cabana”. That’s what the county commissioners called it for tax purposes.

It’s an amazing space and it took a lot of forethought, planning, engineering to make it as awesome as it is. Several things I saw had me comparing how much time I’ve spent thinking about the future state of the Big White Bus. I know I’ll have some great ideas that will need additional thought and probably re-engineering to get them right.

I picked up a parts washer from EGD too while I was there. So that’s pretty cool. That’s all for this week. Like and subscribe to the blog and the Youtube channel.

Patreon.

Thanks for reading and Happy Rovering.

Fender Repair Part 5, MORE Crappy Welding of the Large Fender Patch (Post #622) September 2-3, 2023

Super happy

In this installment I finish the left rear fender panel. And by finish I mean I had to completed replace the outer fender I had previously welded up. I added a strap to attach the inner fender to the outer fender.

The outer fender’s welds were compromised because I ran out of shielding gas halfway through. The panel was 16 gauge and I swapped it with an 18 gauge. The right thing to do was replace it and “do it right”.

Now, I’m no body man and right to me is probably not right to someone who actually knows what they are doing. As I mentioned in the video I need another 10 or 20 years of welding experience to be “competent”. Over all I’m a lot happier with this replaced panel. The 16 gauge panel would not have worked. It would not have been watertight no matter what I did.

I covered everything with yet another coating of primer. I also put seam sealer in the appropriate places. This only seemed prudent as I am almost certain this will rust again. My hope is it will take at least 20 years to rust out.

I thought some of the welding went a lot better than the previous attempts. I want to say, “I’m getting better.” but I’m pretty sure I’m fooling myself. Most people could probably weld if shown how and a little practice. Welding WELL however is really hard.

So add to the fact I’m saying welding is hard…and welding UPSIDE DOWN is another level. We did not go over this scenario in my class. I’m half tempted to take the class again and do the entire class upside down. I finally figured out the I could weld sideways that worked pretty good. Even with my new sideways technique it didn’t stop me from getting some new holes in my PPE and my skin from hot slag dripping down. My grandson Grady was horrified by the scab in the crook of my elbow. The chunk that got me on the chest made a similar hole there.

I also did quite a bit of cutting and the sparks flying back on me warmed me up a bit. Thankfully my Round House Overalls1 deflected the sparks and only “warmed” my family package. If you remember this post from December 2010, “The one where I catch myself on fire in the furtherance of Land Rovering” [Okierover] I caught myself on fire cutting the passenger side floor panel. What I learned from that was:

  • Blue jeans are not safety gear and are a sad substitute for PPE.
  • Longjohns [IBC] (aka long handles [Collins], thermal underwear, etc…) will keep the flame off you for a brief time.
  • Your best friends don’t want you harmed, but also want to take videos of you when you are on fire so they can tease you later.

Thanks for reading and Happy Rovering

1This is my unsponsored review of Round House Brown Duck Overalls. It is a solid 10 out of 10. They are made in Shawnee Oklahoma (Home of Brad Pitt) and at $60.00 a pair (on sale at the time of this posting) a real bargain. 

Working in an Oven (Post #620) August 25, 2023

In my last post I told you it was hot outside. That’s a no brainer to 1/3 of the country right now living under the heat dome. I didn’t take a picture of the thermostat on August 19th but Oklahoma City set a new highest temperature for the date. At the weather station in the neighborhood behind the house, it measured 107.7°F (42°C) around 1:00pm on Saturday the 19th and a similar 107.6 for the following Sunday the 20th.

Historical

If you’ve never been in this kind of hot outside, its hard to describe. Dangerous is a good word. Dangerous like, if you screw around and exert yourself too much you could die. Heat Stroke and Heat Exhaustion is hovering nearby. I’ve had both, my Yelp review, 1 star, would not recommend.

So when I got home from the Evil German Dude’s house, I went out to the shoppe and the needle on the thermostat was about where I indicate on the pic below. Let’s just call that about 125°F (51.7°C) so I decided it was going to be a “make and mend” day [Wikipedia]. And it was going to be spent in the cool air conditioning.

125

The good news for this weekend is it looks like the heat bubble popped and the temps will come down significantly this weekend. Back to a range this old fat man can manage.

forecast

I’ll try to bust out another welding video Monday or Tuesday. I’m disappoint I couldn’t keep up the momentum of publishing a weekly video. If I had worked in the shoppe last week you wouldn’t have gotten a video anyway, because I would have likely been in the hospital.

Thanks for visiting and Happy Rovering.

Patreon

Fender Repair Part 2, Welding Patches (Post #618) August 5, 2023

Welding the corner

Today started out “cool”. At least it was cool for an August on the southern plains. The temp was lower than I thought and clouds covered the northern sky and looked to be moving south. This usually says we are going to get a break in the hot temps. We’ve been 24 days without rain. But with all things weather in Oklahoma, a full cloud cover did not offer any relief from the heat.

Regardless I need to make some progress on the Big White Bus if I’m ever going to drive her again. So after a little bit of trimming of the hedgerow between my neighbor and our house I got to work. Sticking with the theme of welding for this summer, repairing the rust in the fender seemed like a great idea.

I had four places in the fender that needed repair before I started today. I am now down to two. I repaired a small rust spot and repaired the corner of the fender.

I fixed one spot with a simple rectangle and welded it up in short order.

The corner was a complicated piece to fix. The patch for the corner was somewhat shaped like a trough? I don’t have the tools to make that happen. I tried hammering a piece of 16 gauge into a trough but really didn’t have any luck.

I got a bit of inspiration and decided that if I put the patch in and shaped it like one of the complex sides I could perhaps hammer it to fit the other complex shape. So with a bunch of vise-grips I got the patch in place and went to work with the hammer. I worked from the back of the piece to the front and continued until it was in the right shape. To say I was surprised it worked that well was an understatement.

I tacked it into place and began attempting to weld it in place. While not a perfect job, I think it will work and will keep the water out of the truck. I welded both the inside and outside of the patch. This was mostly in a vain attempt to make it a water proof solution. I know I’m fooling myself that it is.

So the final step in the fender repair well will be to give the entire underside a healthy coat of bedliner. I will do this on all four corners once I am done with the repairs.

I am still trying to source the bed panel. There are some in England, but I haven’t found one on this side of the pond yet. I have a Facebook contact that might do a bulk purchase and have some shipped over. I am hoping this works out. I am pretty sure I could order the panel and the support pieces but the shipping is ridiculous. Like, more expensive than the parts.

There were some issues with the video. The sound decided not to record on two sections. No camera changes were made…just no sound. I did a voice over for those sections. Also the shop was too hot for the GoPro to work and after two segments it shut down. I stuck it on the portable air conditioner to get it back to operating temp twice.

There are the last two sections for this fender, the “big hole” and “the strap” as I am referring to them now. Once those are done this fender is COMPLETED! Progress will have been made!

Thanks for reading and Happy Rovering.

D Pillar – Painting? (Post #602) 10/3/2022

D Pillar Work, Interior trim painting…allergies

I got out into the shop and was working on some peripheral projects over the weekend. Peripheral because they don’t directly get the Big White Bus back on the road for driving. These are the cosmetic fixes, plain and simple. The primary project line is getting the motor back to 100% and making it reliable. I completed the repair of the heater fan blower motor. That disabled the motor due to the coolant hoses being removed.

I did start the motor about a month ago. Surprisingly she fired right up. I was really happy about that. I have not addressed the original issue with the reliability of the motor which is the ignition system. I’m 94.67% sure I’m going to replace the distributor with a Davis Unified Ignition (DUI). Its an all in one unit built in Memphis, Tennessee. Seeing the price today makes me wish I’d have bought it a year ago. The price has gone up about 50$(US). Although waiting has allowed me to start the one year warranty when I’m actually driving her.

All other projects from the list….linked here [Okierover.com Blog] not counting the replacement alternator, which I believe is where my vampire batter drain is coming from, are not keeping me from driving her.

I’ve ordered Knightsbridge seat covers. I finally talked myself out of putting leather back in. The estimates I got from local car upholstery companies were more expensive than ordering new leather…..customized with embroidered family crests on the headrests and my face digitally embroidered on the seat backs. Just kidding, but seriously, super expensive. So I ordered seat covers I’m not afraid to get muddy and dirty.

My new radio and speakers have arrived. I’ll need to watch the install video, call tech support 16 times, and finally give up and have the Evil German Dude or JagGuy help me install it. I’ll post something about that when I get closer to installing.

Still a couple of interior trim pieces that need painting. I am not going to remove them, I’m going to paint them in place, its just not worth the effort to remove them. The door cards came out without much effort and I need to wash them down, tape them off, and paint them. Perhaps next weekend.

I know this post was about the D Pillar so let me close with that. I have the welding repair still yet to do. As mentioned in the video, I used a palm sander and 100grit sandpaper to remove the glue from the beauty cover. It formerly had vinyl wrapped on it.

I’ve cut out some closed cell neoprene foam to replace the rust inducing open cell crap they delivered the Range Rover with from the factory. I’ve decided to start with painting the beauty panels. Rattle can style…can’t get much more redneck than that. I’ll show the finished product when I get it done.

Thanks for reading, watching, and Happy Rovering.

Painting My Dash (Post #600) 9/19/2022

6 minutes of rambling about painting and rust.

My dash looks like hell. The sun has really taken it’s toll on the plastic. Several places are starting to turn into dust. It also is no longer uniform in color and some pieces aren’t even close to the original color. That color was/is Bokhara Green. Named from the color often found in oriental rugs from the Bokhara district of Turkestan. Traditionally made by the Turkmen tribes, the rugs were made almost entirely from locally obtained materials. Using wool from the herds and vegetable dyes, or other natural dyes from the land to create the Bokhara green color.

In my extensive research (30 minutes of distracted Google searching), I could not find a paint code I could take to a paint store. Nor could I find a can of paint on my side of the big pond (the Atlantic Ocean). You can’t ship paint, believe it or not, its flammable (the more you know…).

Before we get too far into this post…a disclaimer:

I have no idea if painting the plastic parts of my dash is going to work. I did not do any extensive research on best practices or if the products I had available would even bond properly with my very sun damaged dash. Undertake this at your own risk.

With OEM Bokhara Green unavailable, I started looking for colors and stumbled across Rust-Oleum Specialty Flat Earth Brown Camouflage Spray Paint [Ace Hardware]. I originally found the green color but once I saw the brown…I knew that was it.

I painted the dash pieces and have decided that the “flat” and “powdery” nature of this paint is going to be difficult to clean up later. Dust and whatever that will inevitably find its way on to these parts is going to be hard to wipe off. So I decided to experiment with coating the paint with a matte clear. It will also help with keeping the sun off the plastic. UV protection is right there on the label.

I stopped at the store on the way home and picked up the Matte Clear. I tested it on a piece of trim. It dried to a matte finish. This is a second wet coat in the picture.

Un-coated above, Matte finish below

I’ve got a bunch more work to do. I found some more rust on the floorboard in the cargo area. To get this fixed I’m going to need to cut the floorboard out and patch it. The floorboard is supported by a piece of steel that is very rusted and failing in several places. To do this right, I need to replace the steel that is failing. I don’t know what that will entail at this time.

Rusty hole in the floorboard in the cargo area.

I also popped for this ridiculously expensive rust paint.

Hopefully this will magically do what it says it will do.

This paint was insanely expensive. Like 160$(US) for this gallon. I’m not going to lie, I’ve got high hopes for this stuff. Everything I’ve painted on this Range Rover has already begun to have surface rust. I see these types of products used on the YouTubes and TV shows and I’m hoping it works as well as it appears to in the magic of television and the interwebs.

To replace the rusted bits, I’m going to check with Mickey at Mickey’s Garage [Mickey’s Garage] as he indicated on the Facebook that he may have a donor vehicle that I could perhaps get some parts from.

Every one of these “new discoveries” just postpone the day I will get to drive the Big White Bus for pleasure again. It’s frustrating, but it is what it is. I need to fix this rust. The things I want to use this vehicle for will require the flooring to be fixed. No reason to spend a few hundred dollars on building a bed and drawer solution if its just going to get ruined when water gets inside. It’s fun to fix stuff…right? Am I having fun? I’m not sure yet.

My friend the Evil German Dude gave me some excellent advise recently. “You’ve got to leave work at work, and put things behind you so you can go out to the shop and do things you WANT to do.” He’s right, I’ve been very distracted by home repair, nursing our dog back to health again, and I have neglected myself and my wants and needs.

Thanks for reading and Happy Rovering.