In this episode I change the oil the my Range Rover Classic. My grandson Grady came over to help so we tried to make this mundane task fun!
The good news is we got the Big White Bus running and drove it out of the shoppe! This was huge. It’s been a while and to see her running and driving was pretty awesome.
Not much to say about the oil change, I done this somewhere around 73 or 74 times. Every 3,000 miles, or in this case, after sitting for 4 years. I know, I know, but it all worked out. It’s got fresh oil for now and we’ll be starting and running the Range Rover Classic every week from here on out.
We also gave her a bath. 4 years of dust had settled on her and it was badly needed. Also helps me keep a cleaner shoppe.
That’s about it for this week. Hopefully Mrs. Okierover has won her third straight Oklahoma Senior Games Over 55 Women’s 3v3 Basketball tournament. With a win, they advance once again to Nationals. I’ll report back next week with the results.
Like and Subscribe. Thanks for reading and Happy Rovering.
Now that I have the Range Rover flopped in the shoppe I can start on the rust abatement. But first, I thought I should get some oil and some other fluids and do some fluid refreshing. That was a great idea if I had done that BEFORE I started the Big White Bus. But the fact I was doing it AFTER I ran the engine, -2 points.
I loaded up one 5 gallon barrel of oil and headed to my favorite O’Reilly’s. When I got out of the truck my folly was apparent. I had successfully done an Exxon Valdez [Wikipedia] imitation. The metal barrel had rusted through the bottom and dropped 5 gallons of used oil all over the back of my F-150 and on to their Prince William Sound parking lot. I ran in and bought two bags of kitty litter/oil soaker stuff and with the help of one of the guys we spread all that all over their parking lot. I haven’t been that embarrassed in a long time.
I finished up the clean up of the back of my F-150 when I got home and started getting the rear passenger wheel off to start the investigation. The video shows I had a mostly optimistic view when I started scraping the rust. In comparison…the passenger side is no where near as bad as the drivers side wheel well. The rear window is another issue entirely but let me attack these one at a time.
I’ve got two holes SO FAR. I still have to get the wire wheel out and take the rubber back to metal where there are brown spots. The worst looking SO FAR is the bottom of the C Pillar is rusted out. The reason for the rust there is the sunroof drain hose exits there and the crappy plastic grommet did not keep water out. And it is entirely likely that there was nothing inside the C Pillar that would pass for paint. So that was an obvious place for rust.
I’m going to replace the sunroof drain tubing and possibly fit a “Hose Barb Thru-Bulk Head Hex Union 90 Degree L Right Angle Elbow Barbed Brass Fitting with Flat Washer Gasket Water/Fuel/Air” fitting. Something like this….
I’ll add a rubber washer to assist in keeping the water out. I’ve got to measure the tubing and get the right one ordered. They can be found on Amazon.com. Not sure if they are using ID (inside diameter) or OD (outside diameter) to determine if I get 3/8″ or 1/2″.
This may be complete folly but what the hell right? If it works, I’m a genius. If it doesn’t work, I’m still a genius, just a terribly misguided one. Half of me says extend the drain line to behind the mudflap. It would not be that hard to add a little more distance to the hose and NOT put it back in the same poorly designed place. I mean seriously, lots of water and ice and mud and road salt and roadkill chunks (mostly opossums and armadillos and skunks) and all kinds of crap fly off the tires at extreme tangential velocity [Study.com]. The fact that plastic gromet is even able to not be dislodge is a miracle. So…let’s try to make it better!
The headline came out also so I could get the sunroof drain. It had to come out anyway, because it needed to be replaced…again. This will be the third and final. If this is needed again while I own this rig, it will be painted and forgotten.
More next week. Like and subscribe my Youtube channel. Send me a comment too…I love to converse with you.
If you follow me on the Okierover Facebook Page you read that I needed to replace my oil sump gasket. And as I predicted the weather did NOT cooperate. It stopped snowing at 1030 that morning but the wind was blowing 20-30 mph all day. It was very chilly in the garage.
If you are from Oklahoma or drive a domestic automobile (Chevy, Ford, Dodge, just kidding no one drives a Dodge) you can translate oil sump to oil pan.
I had trouble with the term too. Try Googling “oil pan gasket” when your British motor car has all their parts listed as “oil sump”. The same thing happens when you are searching the RAVE manual looking for an oil pan. Thankfully when I ordered the part from Rovah Farm it was easy to find.
Back to the leak, the Big White Bus has recently been leaving a nice puddle of oil when she comes to a stop. I know all the jokes about British cars and leaks. If you don’t see a leak, it’s probably dry. Well, I don’t care for leaks. I do my best to find the leaks and eliminate them. Like the steering box, it leaks like a sieve. I should have a rebuilt unit next week. And I will have it installed by the end of that Saturday. That will be the last of the petroleum based fluid leaks. It only took me 3 (three) years!
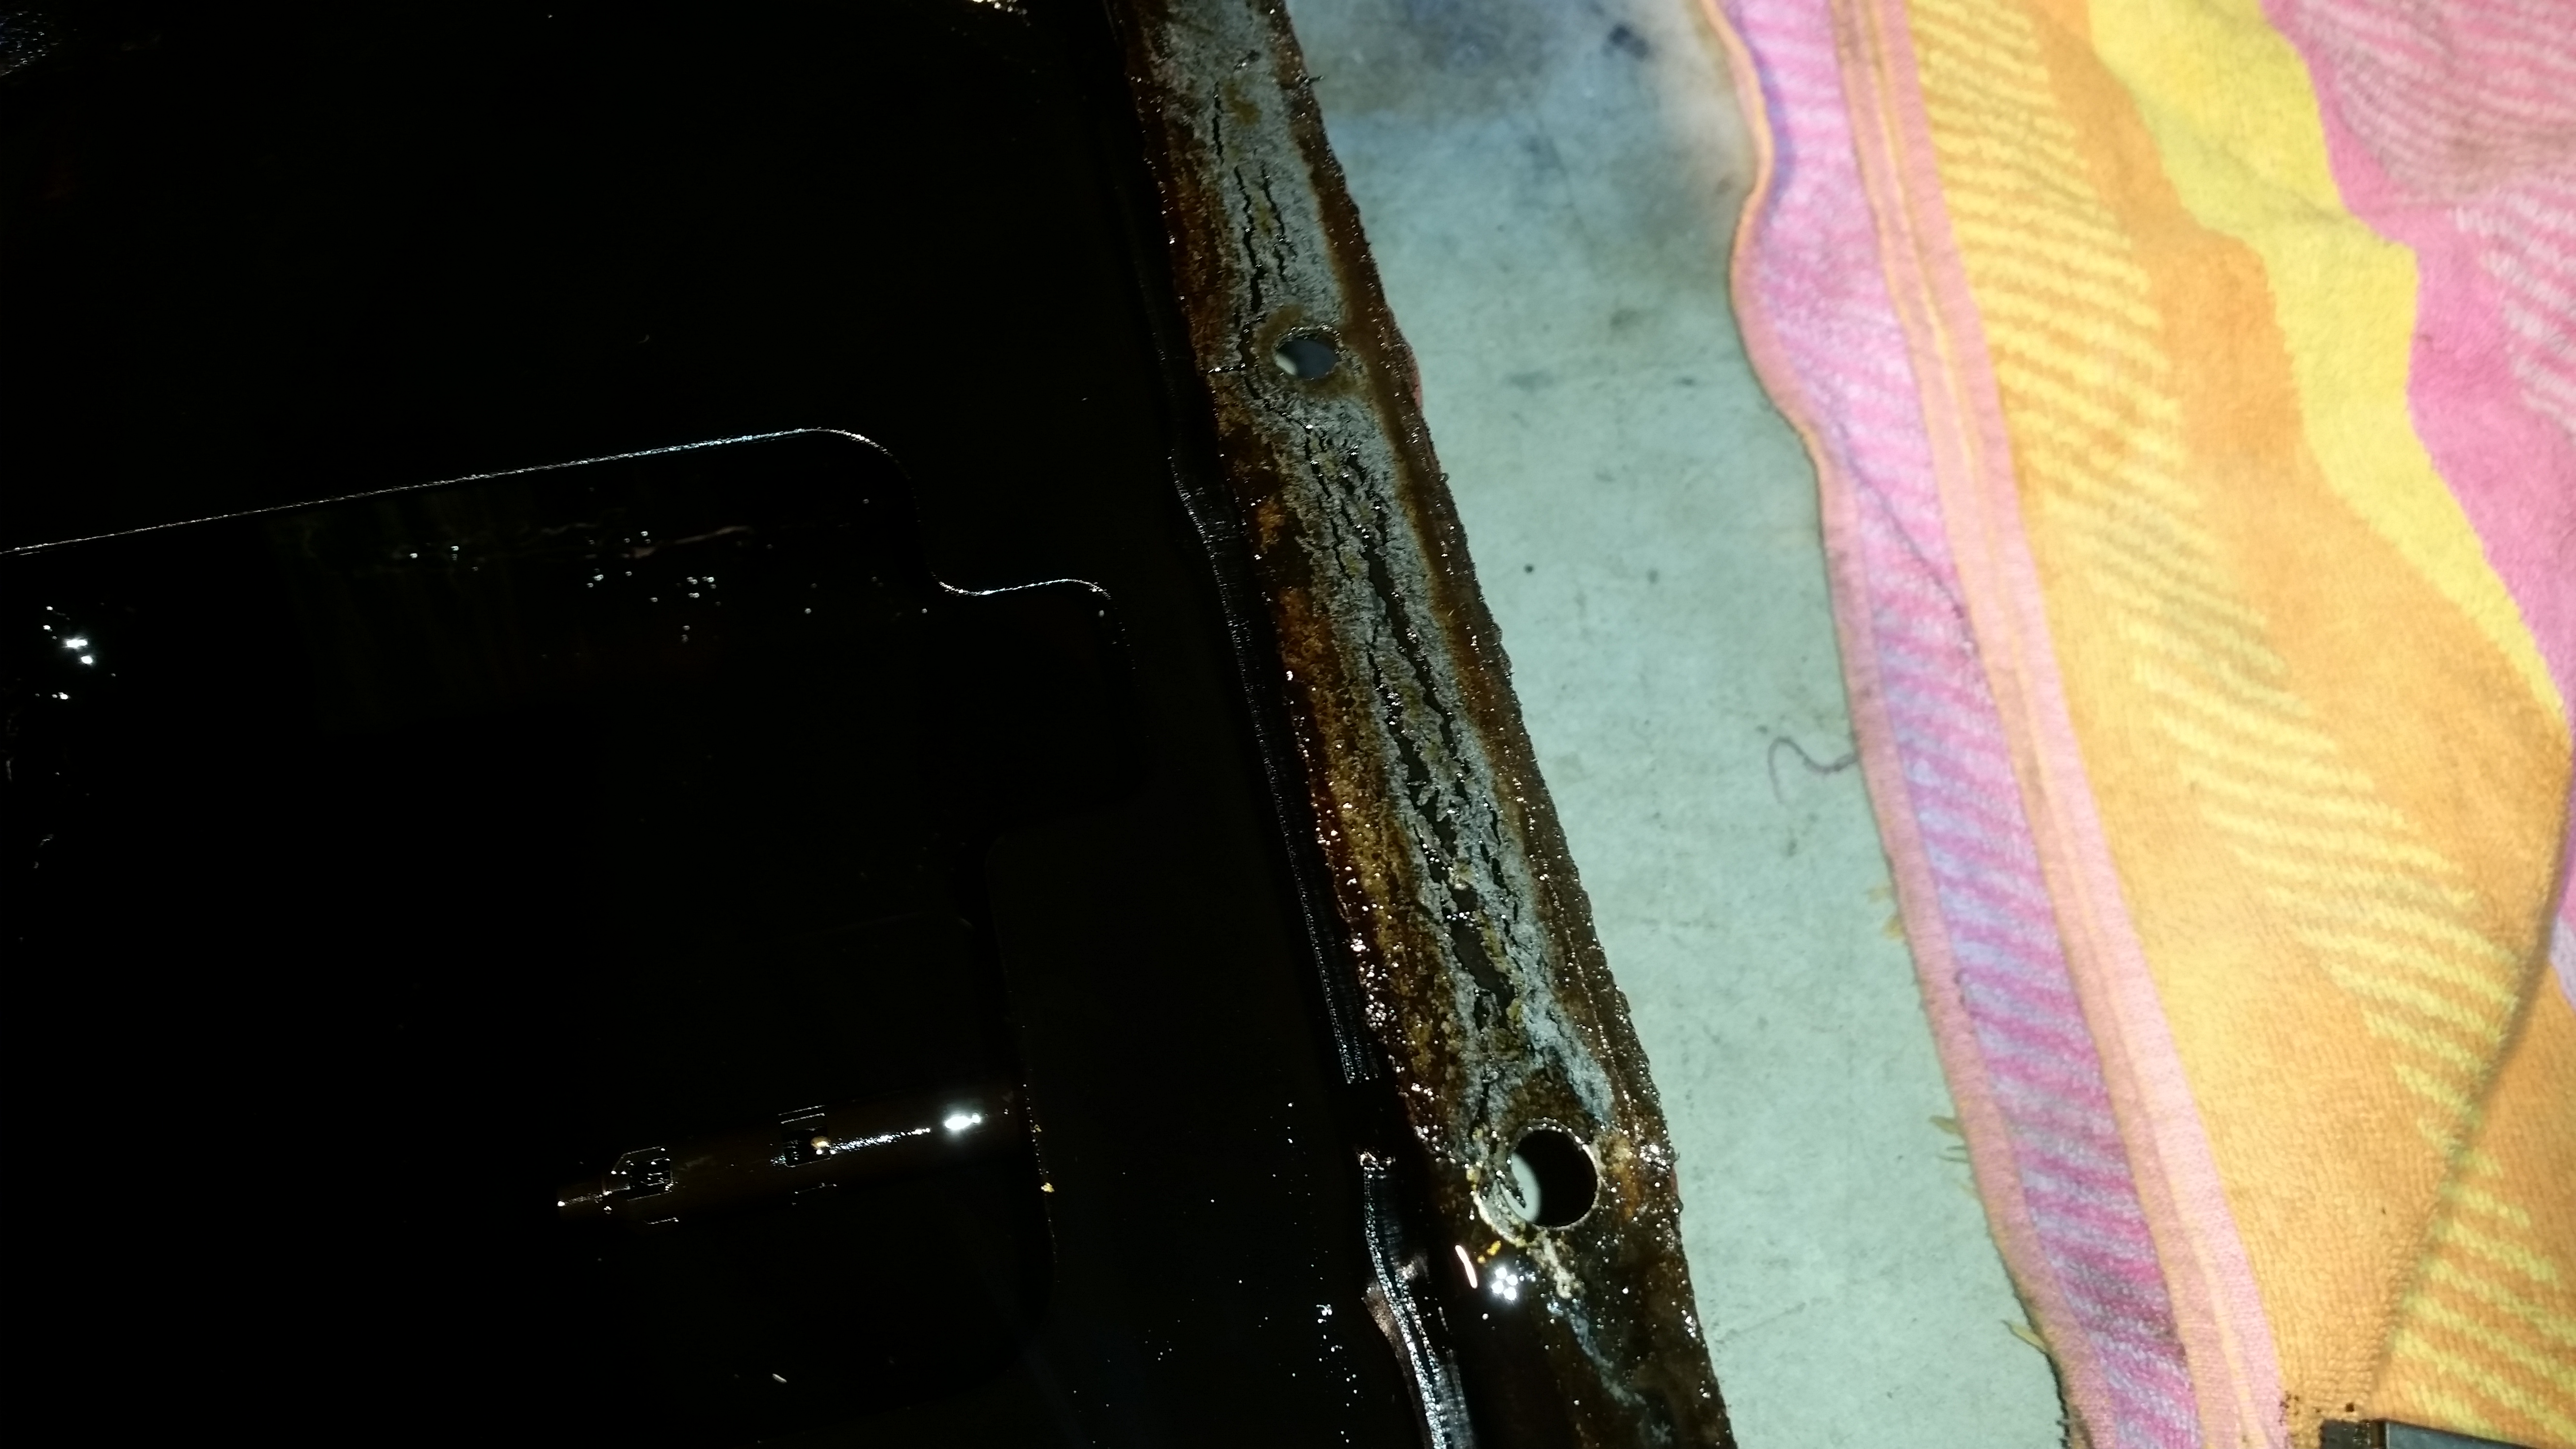
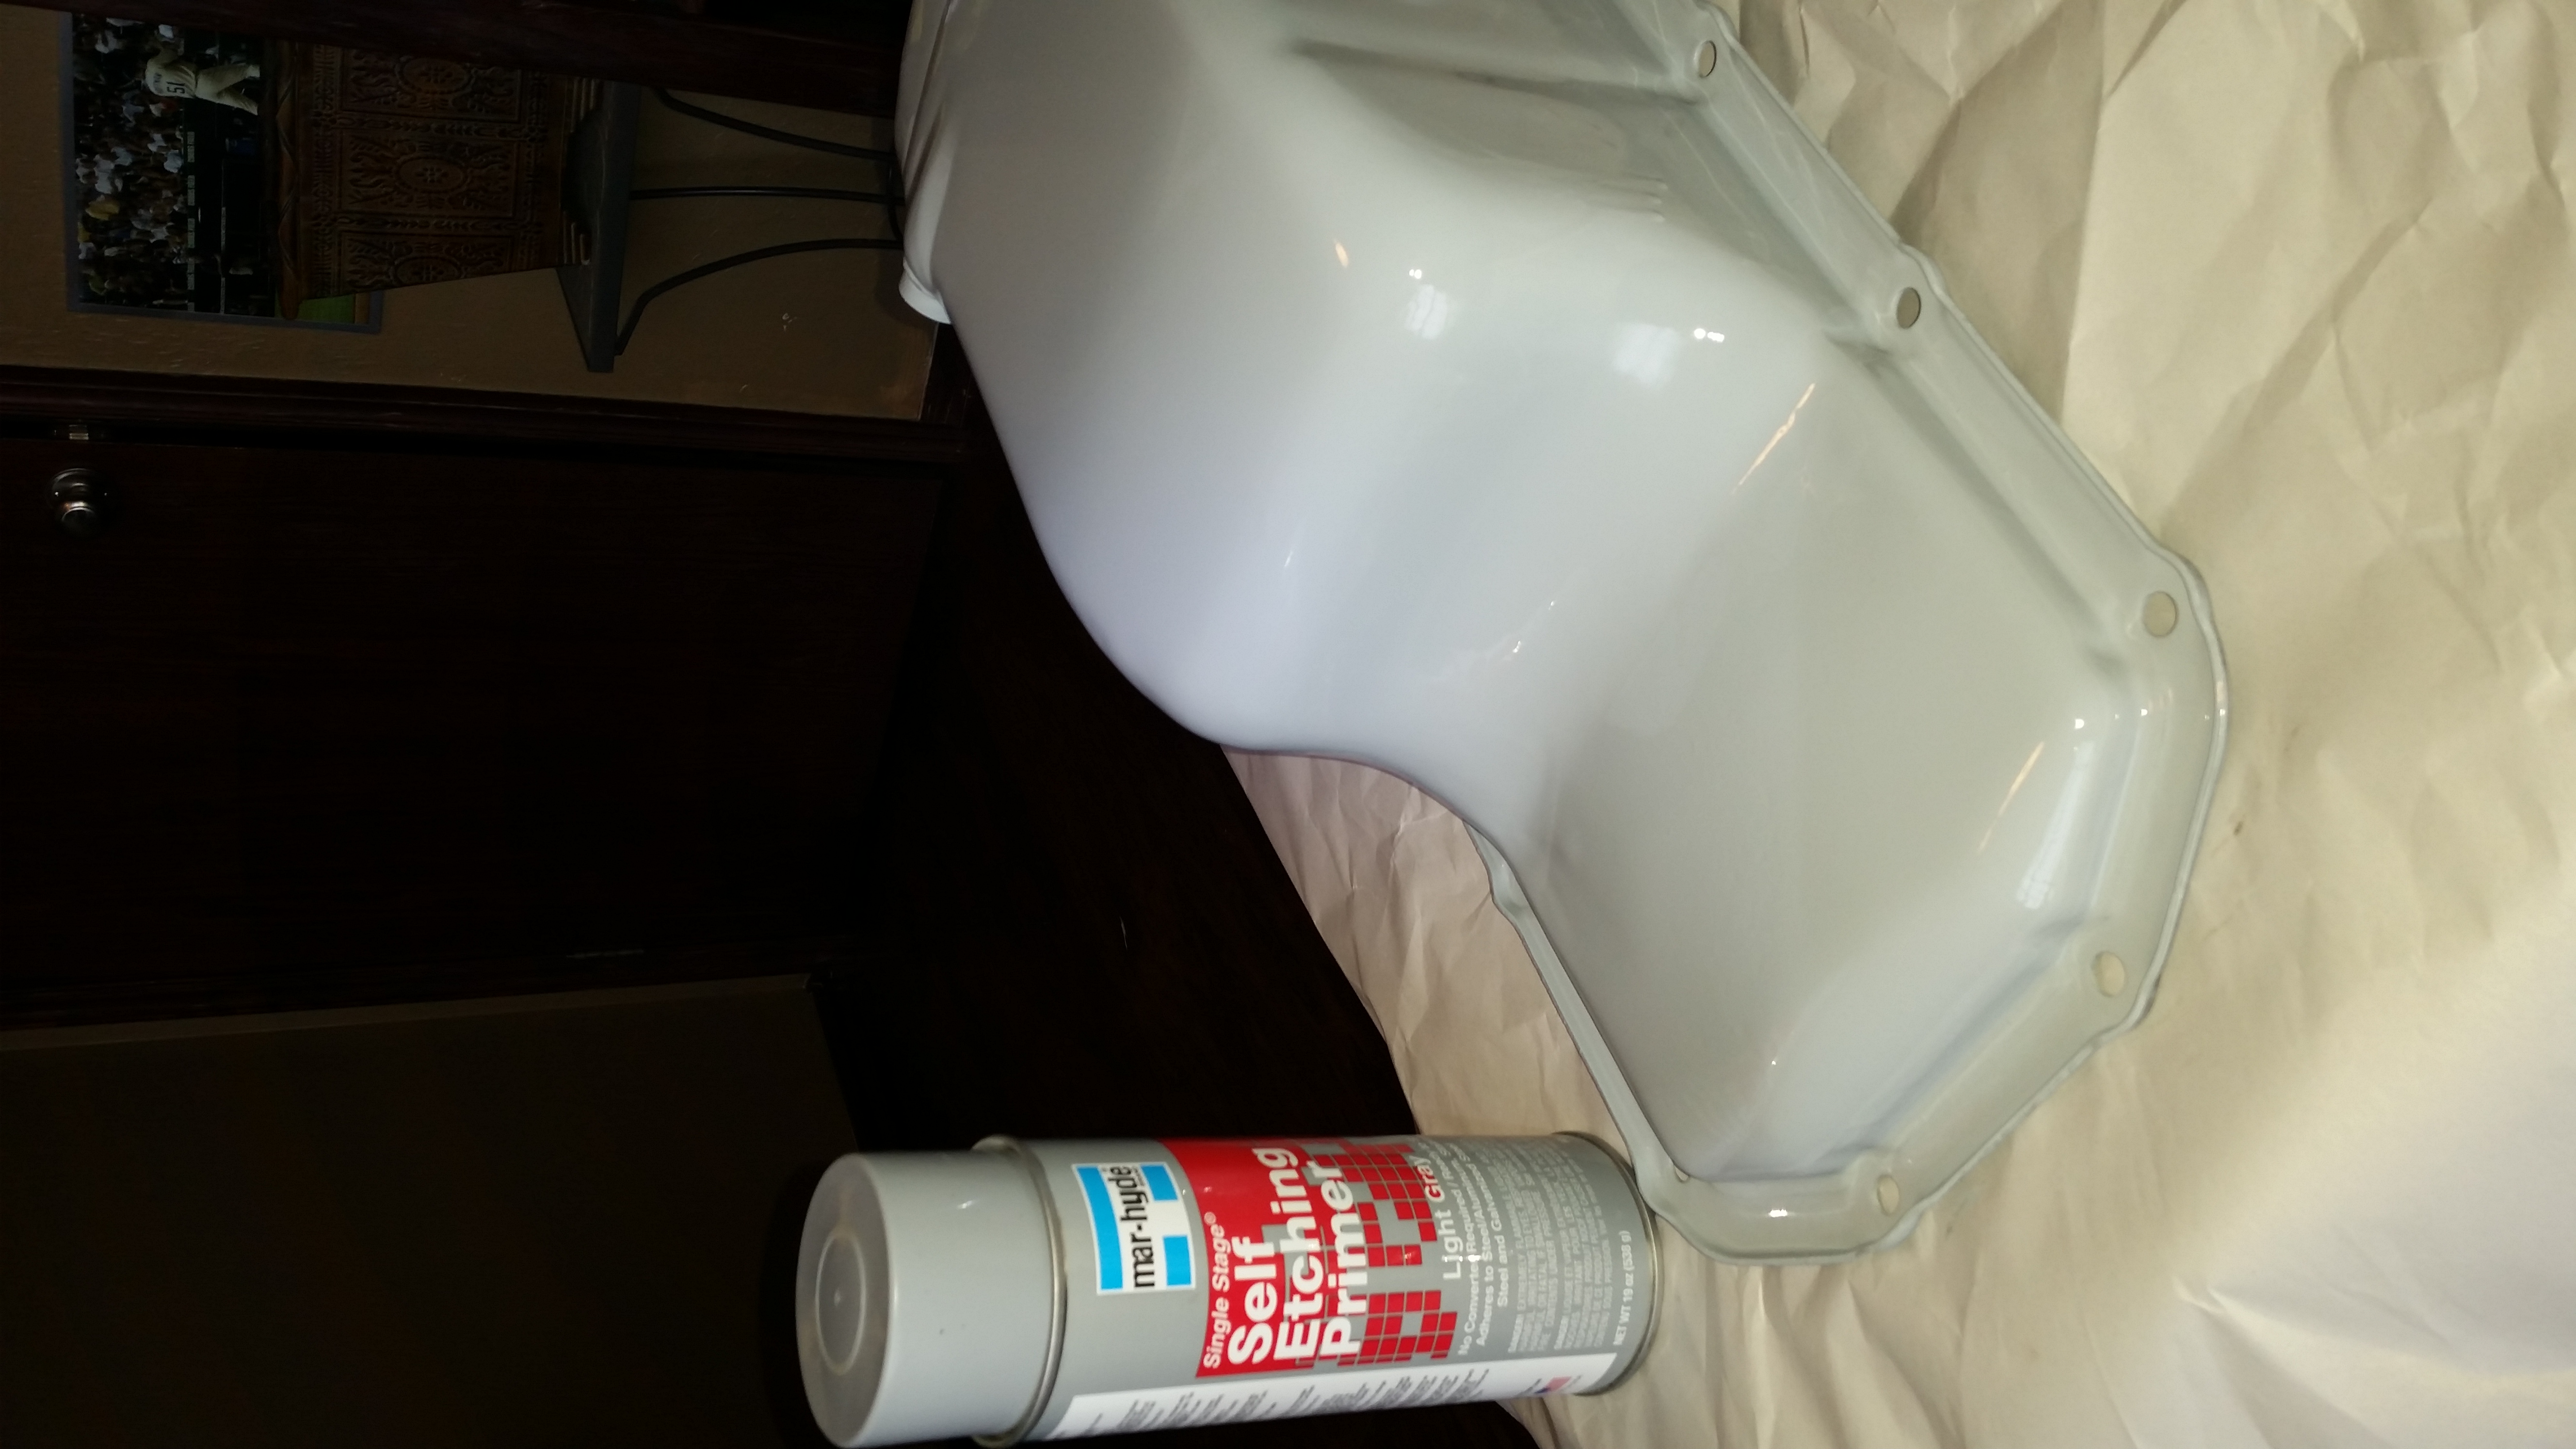
The sump dropped away from the block. Labeled for your reference.
The source of the leak? the oil sump gasket or to be more specific, the LACK of a gasket. I am the second owner of this motor. As you can see below, someone used Permatex Ultra Gray for a gasket. First, Ultra Black should be used, not Gray, and there should be a cork gasket completing the seal. If you have done this I’m not criticizing, I’m just pointing out now you probably know why it’s leaking.
That is a bit too porous to hold oil back.
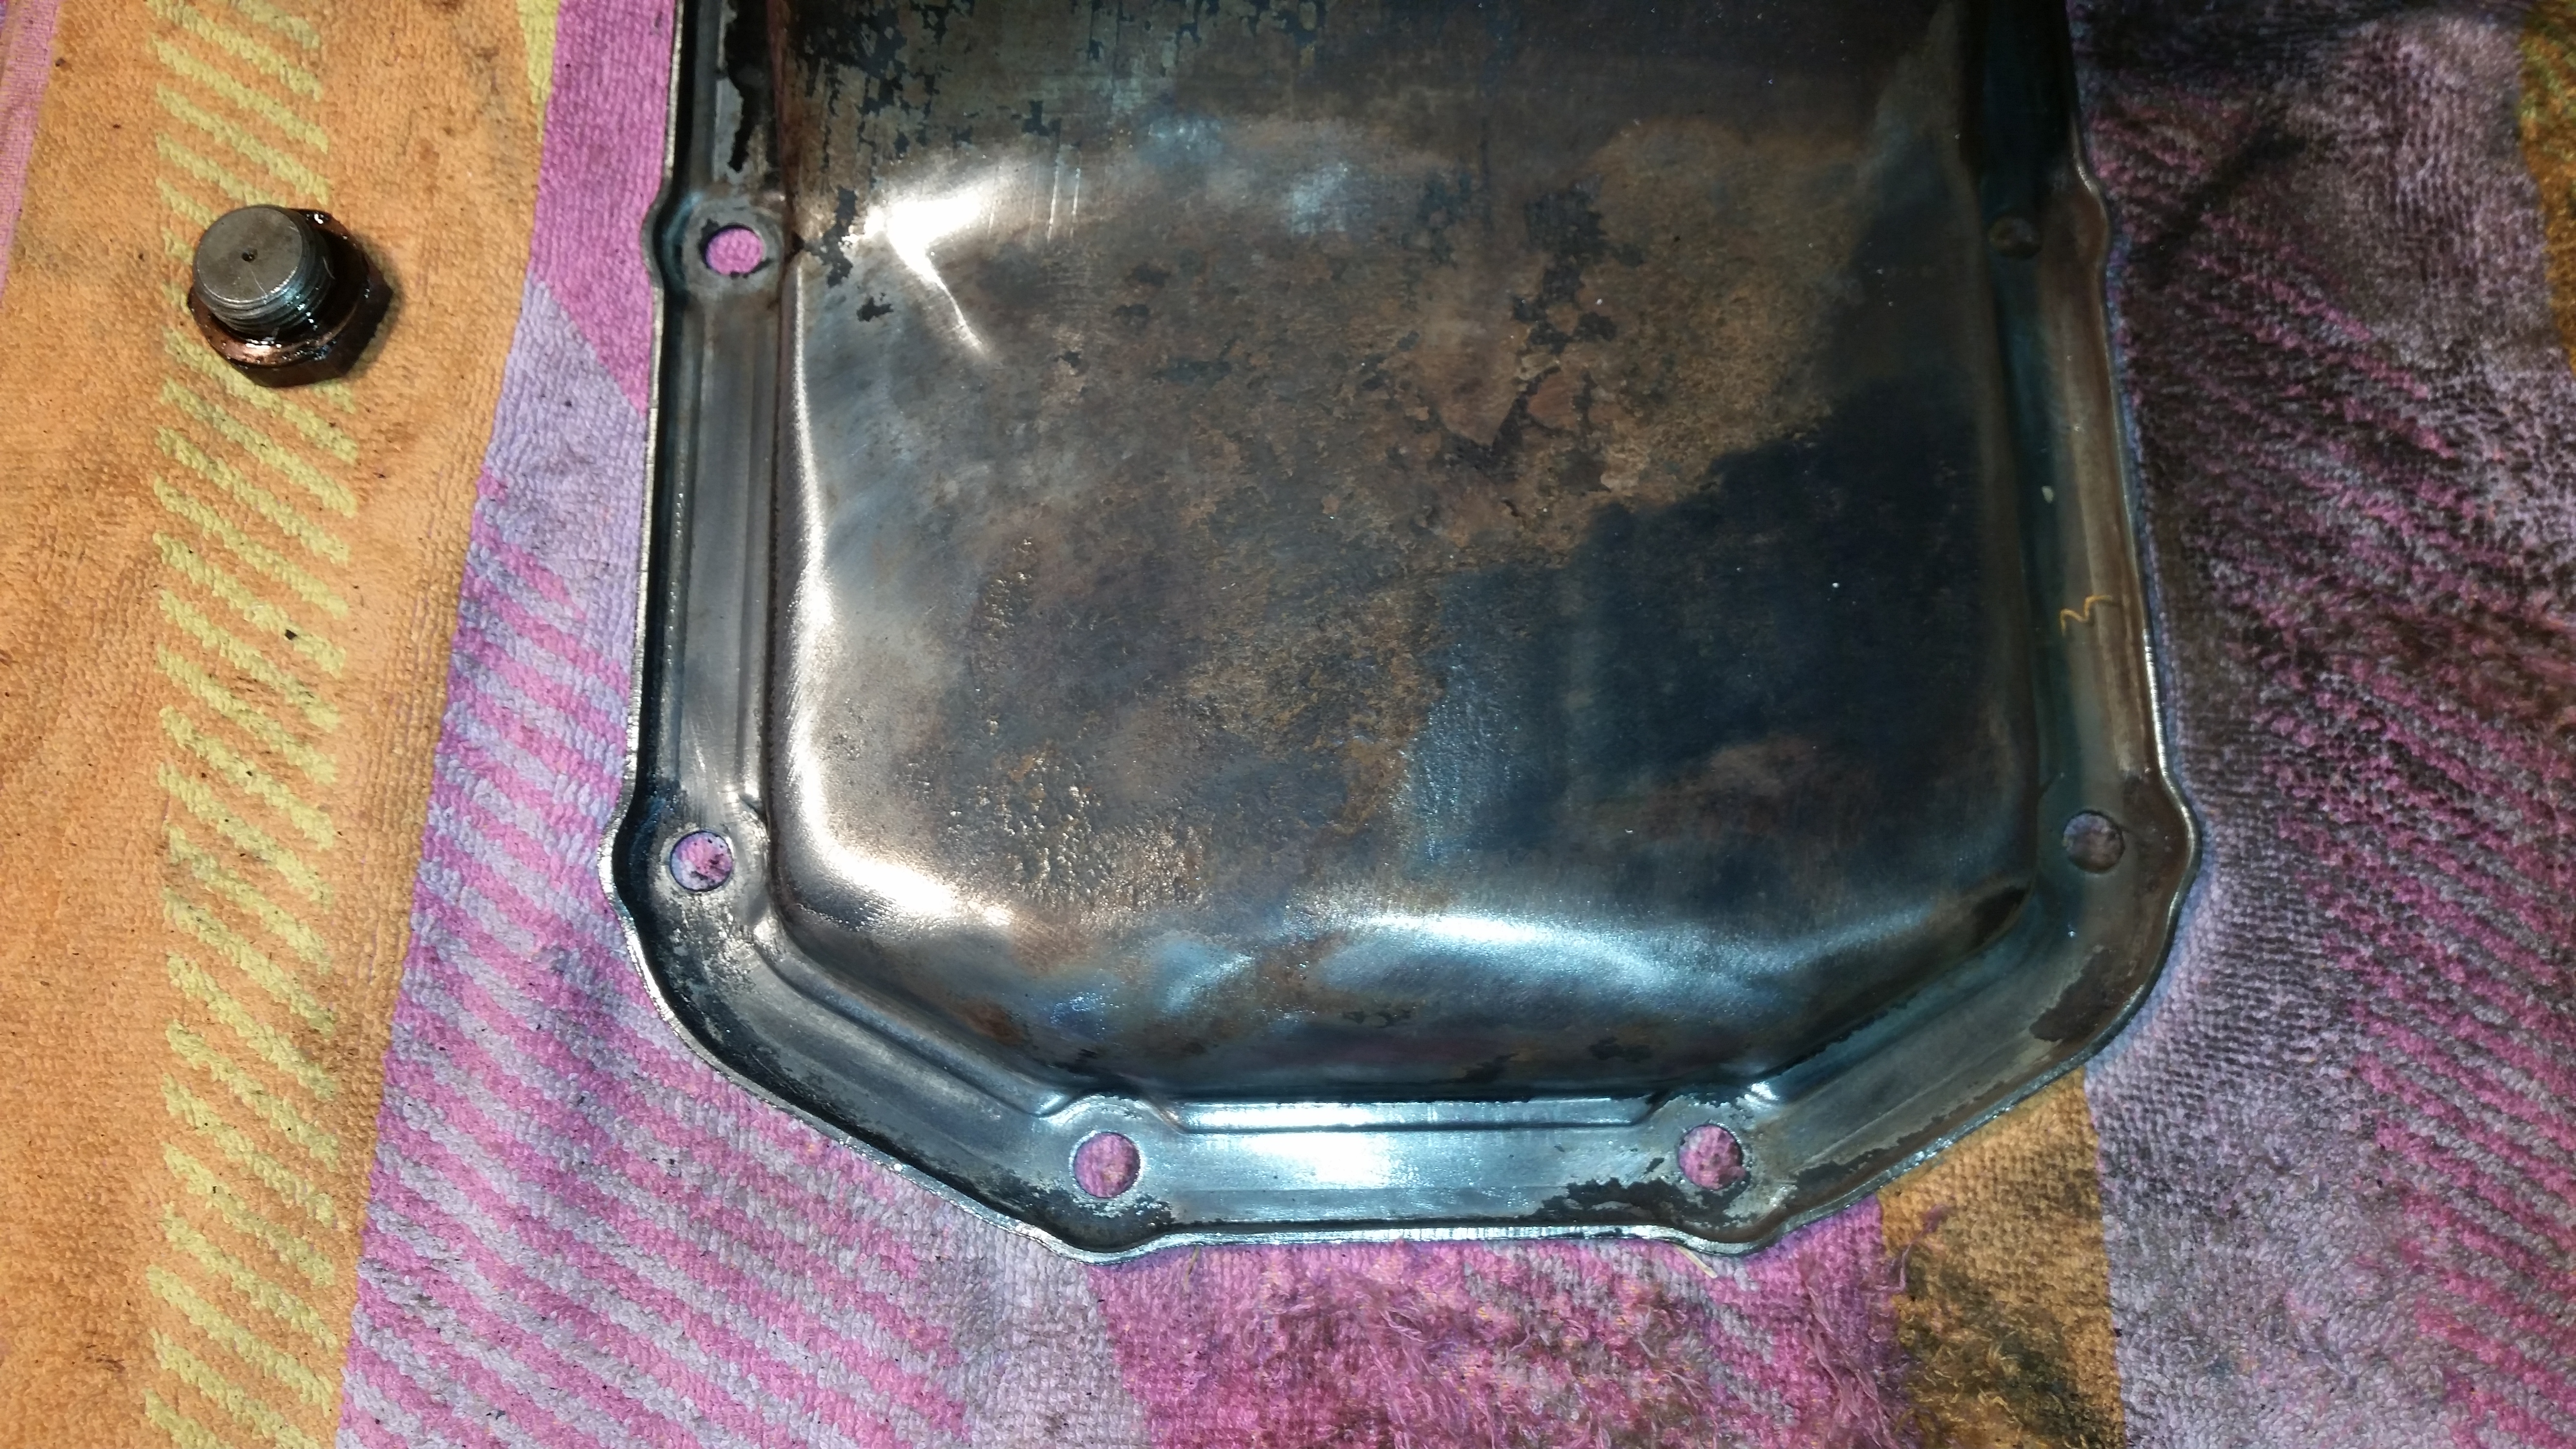
My oil pan sump had to be removed and serviced. There was rust and chipped paint and what was left of the “gasket” had to be removed prior to putting a new one in. I was surprised that something that has had so much leaked oil on it could rust, but it did.
The oil sump with a bit of the rust removed (on the right).
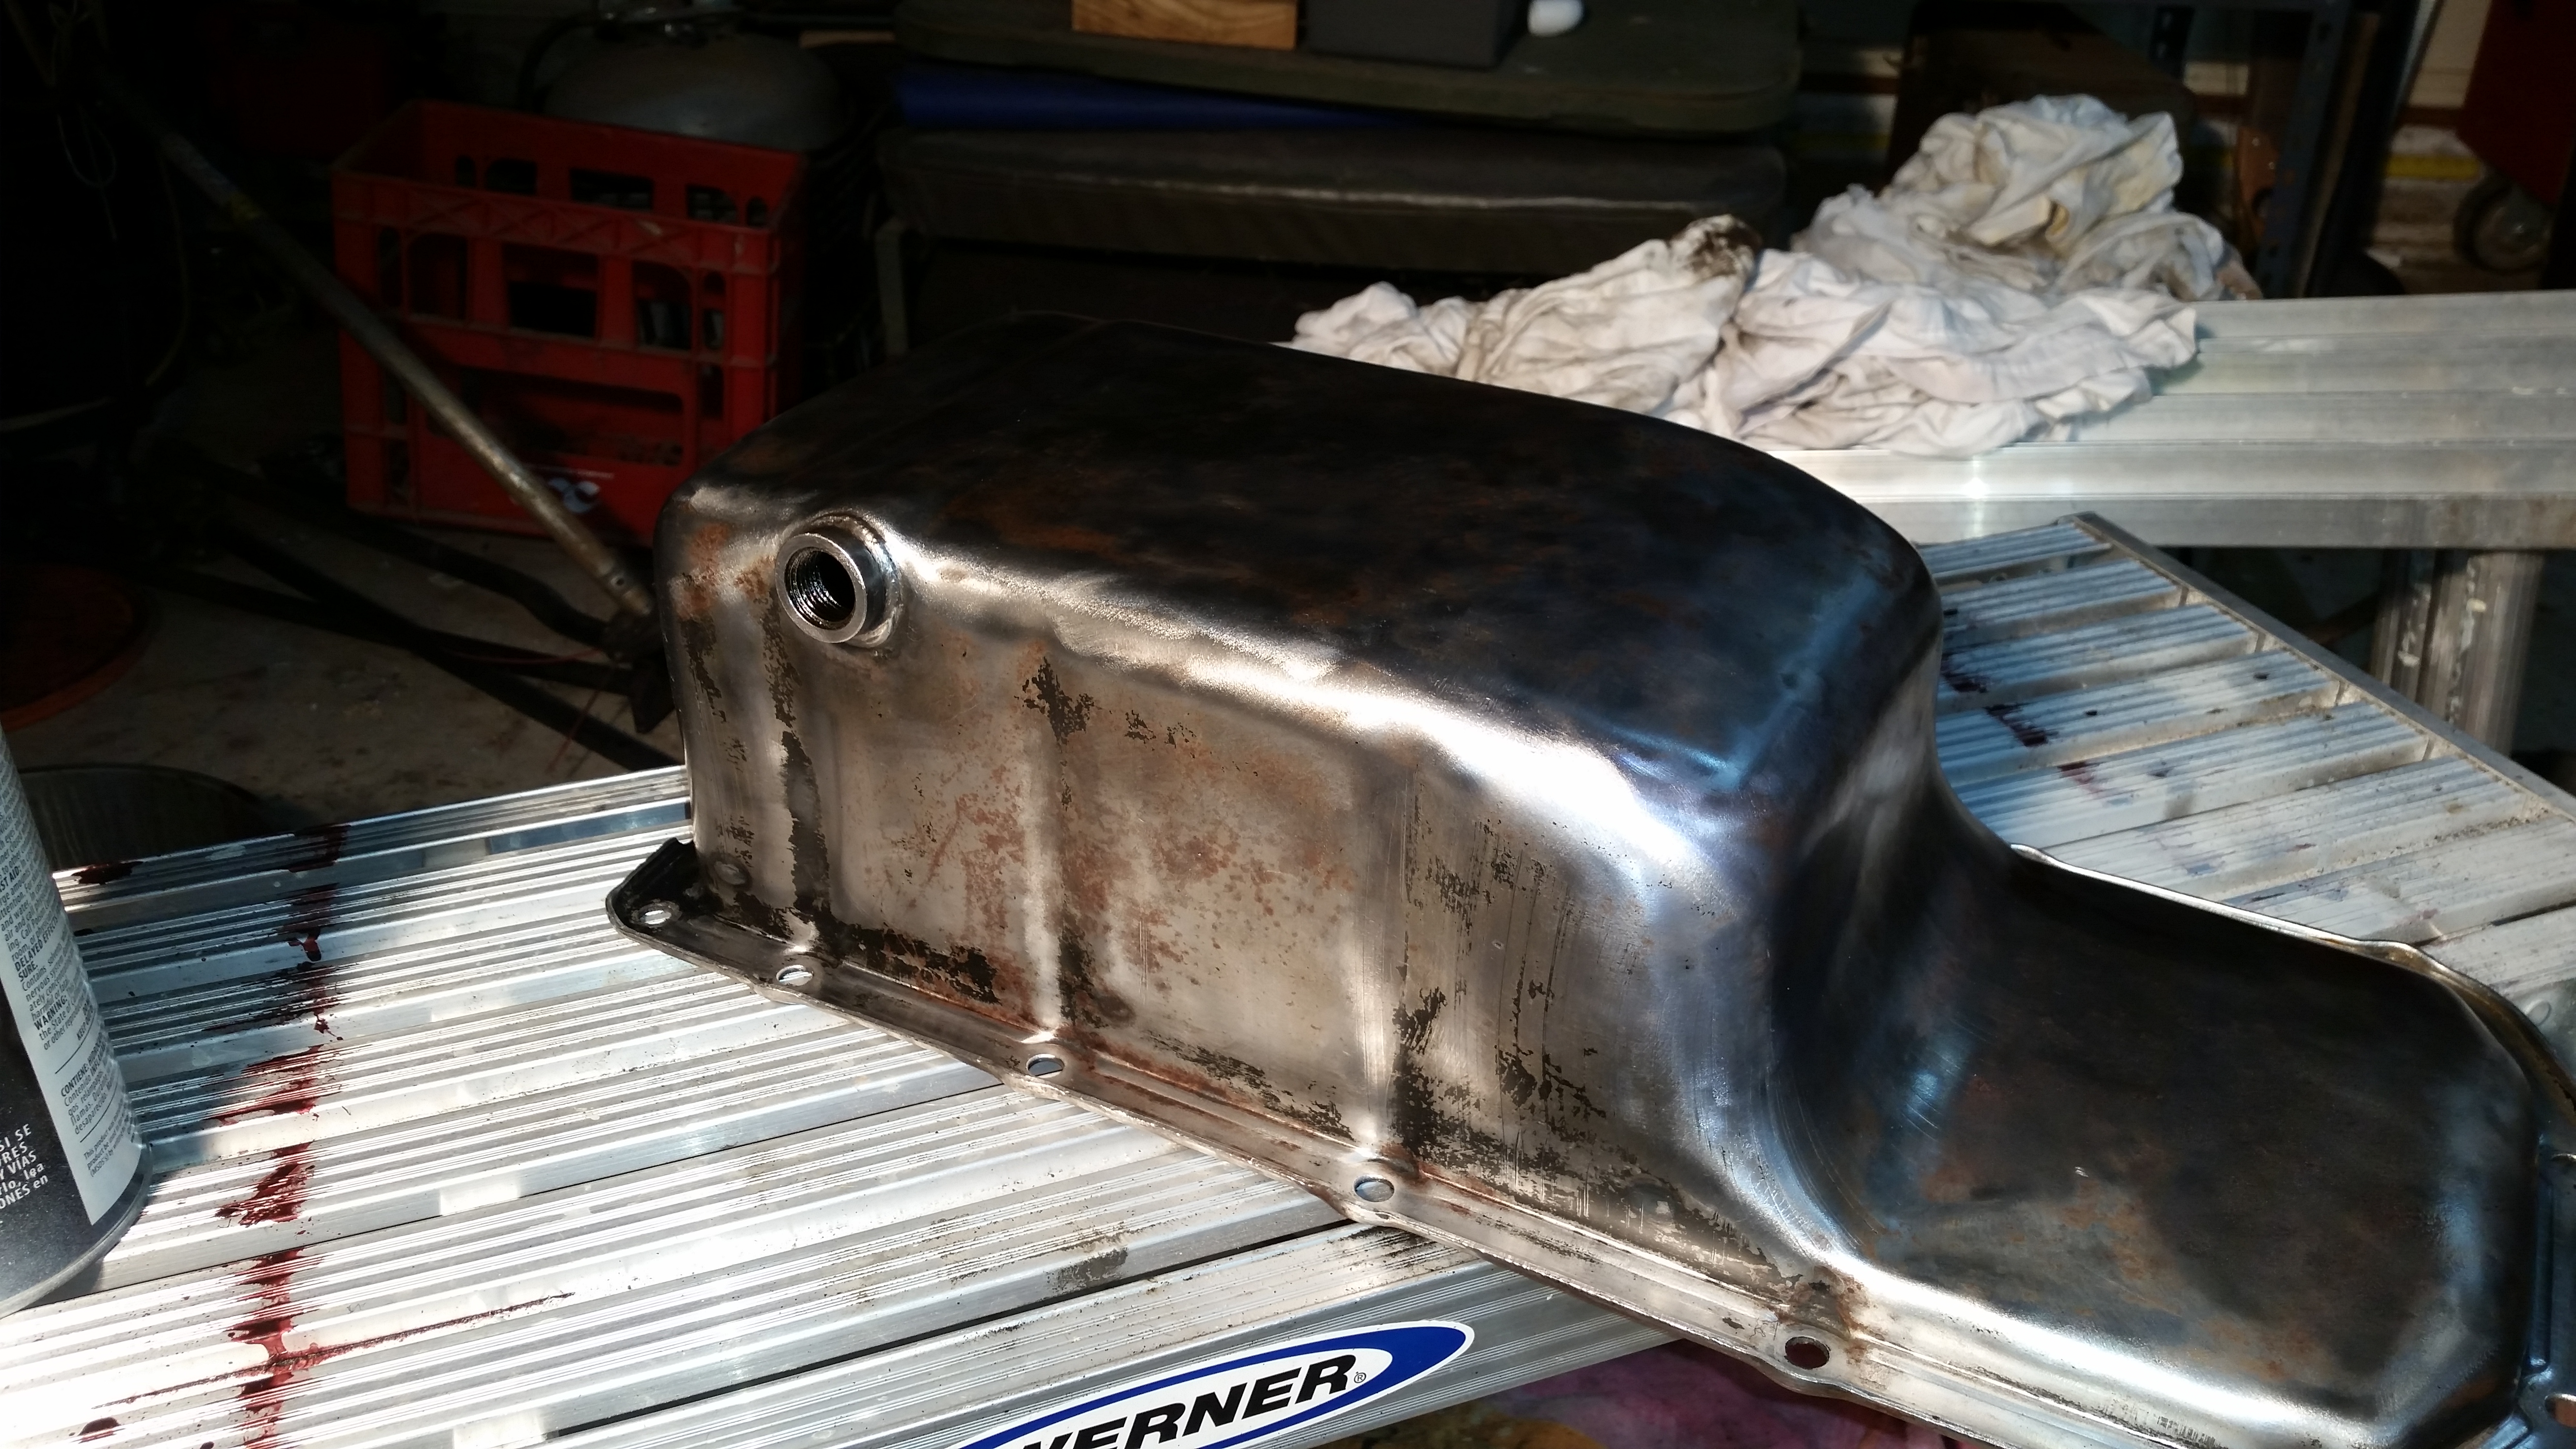
I got the trusty angle grinder out and hooked up a wire wheel and scraped off the rust and the factory paint (black). The challenge was getting the oil and grime off. I used brake cleaner, a lot of rags, and in the final stage before painting I used some pre-paint grease remover.
Ready for paint.
While I had it off I cleaned some of the grime and muck out of the sump. I used a flat razor scraper. I was careful to make sure I left no “chunks” in there. Short of a sand blaster there was no way to get all the baked on muck out of there. My sand blaster cabinet is not big enough.
The sump was ready to be painted. I got the Mar-Hyde Self Etching Primer from inside the house where it was being stored at a temperature that allowed it to be used. I painted the pan with the first coat and then brought the pan into the house and into my office to dry. I gave it an hour to dray and when back out to clean up the underside of the motor. I also swapped out the last poly bushings on the radius arms.
I don’t know why WordPress won’t let me rotate this picture. Fresh paint looks good.
I put the second coat of paint on and after some waiting I started to put it all back together. The first thing that is required is getting the Permatex Ultra Black gasket maker on and letting it set up. I did this in my office. I wasn’t even sure if it would setup in my garage at 30 degrees Fahrenheit. Once it set up I put the cork gasket on and lined it up. The Permatex acts like an adhesive at least enough to secure the gasket from moving during install.
The next challenge is to get the sump back in place and bolted up to the block. Take your time and don’t rush. The cork gasket can slip and if you break it, you are done. After it is in place you bring the bolts up to snug. The manual calls for you to tighten it to specific torque settings. The idea here is that you don’t crush the gasket.
From the manual you can see that is not a lot of torque needed. I don’t have a torque wrench that I could get my 13mm sockets on. You have to use narrow walled sockets, etc… in short my tool chest is inadequate for this. So I was careful when I was tightening them. A note here, the rear bolts are not labeled but I assumed it was the ones on the row nearest the transmission tunnel.
I finished up the oil change and and then the moment of truth came. I got the oil up to temperature and watched for leaks. None were found. I drove the Big White Bus to church the next day and still no leaks. I’m going to mark that down as a success. I will of course be watching it for the next week.
On the Okierover Difficulty Scale this job is a 2 (two). You will have the oil sump off, you will get oily and dirty (and not the good kind). You also have to remove the sway bar to get the sump out. If you aren’t going to clean it up you can skip the removal and just clean it up while under the engine.
Thanks for reading and Happy Rovering.
PS the Oklahoma Land Rover Group is still on track to #Hibernot and take on a section of the Oklahoma Adventure Trail. If you are interested check out the details on the Oklahoma Land Rover Group on Facebook.
The Big White Bus has been idling a little rough lately. I will look in to that a little more as we get closer to S.C.A.R.R. This year I plan to swap my spark plugs, wires, and my distributor cap. Getting the correct cap is 99% of the maintenance. Some of the pattern parts are not very well made.
I also still have the torque converter issue. I’m not sure what I’m going to do about that yet. It will be a very expensive repair.
I need to correct the oil leaking from the engine. I will order a gasket set for the oil sump (pan) and for the tappet covers in the coming week. I bought a set of ramps so I can clean off the bottom of the BWB at a car wash.
I also have what is possibly a bad tie rod end. I hit a seam on the highway and the shaking from the front tires was very, very bad. I had to slow down and get off the highway to get the truck back under control. I will be looking in to that this weekend for sure. I’ll need to get Mr. Fisher to assist while I investigate under the Rover.
I’ve gotten a lot of emails and messages this and last week. I really love to help when I can. Unfortunately sometimes I don’t have the answer. That really bothers me because I like to know as much as I can. So if you’ve contacted me, and I couldn’t help, please send me an email back so I can learn how you got it fixed.
I want you to plan on going to SCARR if you are able. I promise you will have fun.
I worked on a new video today. I swapped a CV joint and some seals. I’ll get it up as soon as I have it done.
Here’s a teaser.
Otherwise not much is going on. I have the gas mileage up to 13.5 mpg on average. I did learn today from the manager of the AutoZone store that Castrol 20w50 is being discontinued. I’m not sure if this is true or not true, but he had the 5 quart jugs on sale for 8$(US). That’s really cheap. I bought a jug in addition to some new 80w90 for my differentials.
If it is indeed true I’ll have to swap back to 10w40. No harm in that. I wonder if it will affect my gas mileage?
Well that’s all for now. Thanks for reading and Happy Rovering.
If you read “Sometimes Things Don’t Go Your Way” you saw that I thought I had a failing water pump. The “new” water pump was only a few months old so it was quite out of the ordinary for it to be failing. I took the Range Rover to Mickey’s Garage on Monday to have it looked at. It turned out it was not the water pump.
So the sound I heard was definitely a failing bearing. It turned out to be the belt tensioner pulley’s bearing. The pulley is attached to the water pump by a bracket that mounts directly to the water pump. So any noise from the pulley would be transmitted up to the water pump housing. That’s where I put the screw driver “stethoscope” to confirm it was the water pump and not the NEW power steering pump I just installed.
I have a video of the sound. You can hear it as I rev the motor. It’s the prrrrrr sound as the engine winds down.
Mickey’s wise words, “I would not drive that to S.C.A.R.R. without replacing it.” had me stopping at Rover Cannibal on the way home Tuesday. I went in and talked to Ryan. I told him what I needed and he said what I already new, “Those are getting hard to find.” Indeed this is the case. He called “KC” over and together we went up stairs to the bin. KC’s knowledge of where everything is located in that warehouse is impressive. I explained to him that there were two types of pulleys used on the Range Rovers. Once we got to the bin I showed him how they were mirror images of the other. I found a good one and was ready to get out. Once again Ryan and Rover Cannibal had what I needed.
I determined to place the pulley in my spares box for the trip. The growl has been going on for a while and I was not in the mood to swap another part last night. I called Mr. Fisher over to help but at the last-minute decided that if it did fail all I would lose is the belt and I have a spare in the spares box.
I knocked the grease and surface browning off with my wire wheel. I painted it up and have it ready to pack.
S.C.A.R.R. is this weekend and I have only one other task to complete. I must do an oil change this weekend. I hit 206,000 miles and that 6 is divisible by three so 3 thousand miles have passed. Time to put in some more Castrol 20w50 and a new Wix oil filter.
I’m working on a way to service these pulleys. The bearings are behind a cover in the center of the pulley. If this housing can be removed and replaced, or reinstalled, it would allow for repacking the bearings with grease. More investigation is warranted. Thankfully I have a damaged one I can practice on.