Taking stock (Post #217) 11/9/2010

With the major milestone of driving the Range Rover last weekend, it is time to take stock of where I am in regards to the Restoration Project Part Duex. I went back to the original post describing the beginning of the Restoration Project.

I’ve struck the projects I’ve completed.
Projects

  • Brake discs
  • Brake reservoir
  • Bushings
  • Viscous Coupling
  • Rust in the bed
  • Rust on the lower tailgate
  • Rust in the front footwells
  • Broken axle
  • Transaxle shifter solenoid partially done
  • Complete fluid service partially done
  • Rusted floor pans
  • Power steering hoses
  • Tires
  • Sound system
  • Door locks
  • Head liner
  • Transmission problems

Not vital but needed eventually.

  • Springs and shocks
  • Air conditioning
  • Sun roof

I’ve dropped the CV joints and the drive shaft seals. The CV joints will probably fail nut for now they don’t seem to be an issue. The drive shaft seals are part of this and I’m just going to wait until I have to do the CV joints before I do the drive shaft seals.

I’ve done so much and I’ve gotten a lot of the BIG projects done. Tires and the transmission problem will be done by professionals. The air conditioning will be filled by a professional but the components will be swapped by me.
Door locks will require some electrical magic.
The headliner is pretty easy.
The sound system is going to be part electrical magic and part Frankenstein project.
The sun roof is most likely a mechanical problem.
Springs and shocks will require a special tool (spring compressor).
Power steering hoses will be custom made by a local hose shop and that will allow me to get braided hoses which I hope will last much longer than the ones offered at the internet vendors.

Hopefully no more projects will raise their ugly heads. Hopefully, I will be able to get the projects that might keep the Range Rover sidelined done before any potential bad weather comes our way.

Thanks for reading and Happy Rovering.

I drove the Range Rover!! (Post #216) 11/8/2010

Saturday was a great day. Well on the Range Rover front anyway, on the football front it sucked. Saturday I decided that I would drive the Range Rover and test out all the stuff I have repaired and been working on for so long.

First things first, I needed to bleed the brakes. I had bled the brakes before when my neighbor Mr. Fisher came over and helped me. But for some reason I did not do the high side on the front calipers. And the air moved around as it is want to do and we had no brakes.

I was in a spot, as all my children were gone and Mr. Fisher was on his way to Stillwater to see the Pokes play football. So the only person left was Mrs. OkieRover. Mrs. OkieRover is a wonderful woman. She is awesome at being a mom. She is probably the best nurse in the Norman Regional Hospital system. She is really, really patient and puts up with nearly all of my crap. But one thing she is not, is mechanical.

Cars are still magical metal boxes that take you from one place to another place. Getting her to help me was asking for me to have patience with her. That is not really a card OkieRover has in his deck.

So with challenges facing both of us, I asked her to help and she agreed. We started off rocky with her not coming out to the garage in a timely manner. Then I was reading the instructions for the umpteenth time when she popped off from the driver’s seat, “I thought you were ready to go?”

I handed her the instructions and asked her read them and tell me what we were doing first.
She read them and said, “I have no idea.”
So I gently said, “How about you let me make sure I do this right.”

My first instruction, “I’m going to tell you to turn on the ignition and then press the brake.”
“Okay, ” she said.
“Okay, turn on the ignition.” I said.
She turned on the ignition and then went to cranking the the engine for start-up.
“NO!” I shouted.
“You said turn on the ignition.”
“Yes, yes I did. I said turn on the ignition. I didn’t say anything about starting the car.”

So that’s how it went. I was more careful about my instructions and we worked through each procedure and finally I found the massive air pocket in the upper circuit of the front calipers. A few more turns of the bleeder valves and we were done. I told her thank you and told her I was taking the Rangie on a drive.

So I removed all the interior parts I had stacked all over and confirmed all the connections on the electrics and did my “pre-flight checks”.
I tweeted my intentions and asked for luck. I fired her up, backed her out, and began with a test of the viscous coupling. I turned her hard into a left hand turn and circled the cul-de-sac. No chirping. VC seemed to be working.

I then started off down the street. I was very happy. Sadly I had NO ONE TO SHARE IT WITH! My neighbors were all gone. No one but me and my wife knew I was driving.

I drove a few blocks and then stopped. I put the transfer case in to low and moved through 3 of the 4 forward gears. I stopped and slid her back into high and headed for the 7-Eleven. Brakes worked, transfer case worked, so far so good.

I turned on to Porter and hit her hard to get her moving. I let off the accelerator and didn’t dive to the right, she stayed true. I punched the accelerator and she didn’t pull to the left. I tried it several more times. And oh man how great that was. The bushings worked and corrected the very exciting wandering all over the road the Range Rover had recently been known for.

I pulled up to the 7-Eleven and decided I would put some fresh petrol in her. I filled her up, jumped in and fired her up and drove her home. I listened to every little sound as she rolled down the road.

I have decided that the exhaust will need to be changed. I don’t know where the sounds are coming from but the exhaust sounds like crap. I need to get a better solution for that. After riding around at lunch in a colleague’s Dodge Magnum, I’m getting to like the tuned exhaust sound. I’ll be looking into that as I get closer to having the money to do it.

With the passenger side floor cut and absolutely no floor insulation there are a lot of sounds you normally don’t hear. The ticking of the exhaust, the bald tires rolling on the pavement, and lots of others. The most annoying was the warning tone from the transaxle.

As you know I “fixed” the solenoid so it no longer hampered me from shifting into low range. But in doing so I’m guessing there is something causing the warning tone to tell me I was not in neutral. Everything is connected. So I’m not sure what causes the warning tone to sound. I fiddled with the connections and the electrics there in the transaxle and transmission shifter. I guess I’ll be hitting up the message boards tomorrow for some technical assistance.

I got her home and sorted out the garage and rearranged some things in anticipation of the next project. Whatever that will be. I was not ready to start the warning tone solution, but I fiddled with it again to no avail.

I decided that I would put the carpet and sound deadening pads back in the rear of the Rover. I sorted all those parts and cleaned them with the shop vacuum and cleaner where necessary. To keep the spongy pad from holding water next to the metal panels in the wettest areas I cut the pad away. This resulted in 3 inches being cut off the rear most of the pad. This will leave the water trench, that rusted so badly, without any spongy pad to sit there with water in it.

I put the carpet back in and buttoned it all down. I cleaned the rear seat with leather cleaner and then gave the seat a good soaking with conditioner. The leather is quite dry in several places and with out a LOT of attention it will be gone soon.

You can see in this picture that I have the passenger seat unbolted, that is to have it out of the way for the floor board welding. I am not sure what the white area is on the middle of the rear seat. This picture was taken before I cleaned everything and conditioned it.

I have the center console out due to the sorting of the shifter electrics and the pending floor pan welding project. It was broken in the same places as before. The breaks are in the joints between the back area and the front are that covers the shifting mechanisms. I got the Dremel out and cut a channel for a 16 penny nail. The joint has no support and I figured if I used something to link the two sides and to strengthen the joint it might last a little longer. At one time I kicked around making a new console out of fiberglass. But that is a really, really ambitious project.

With some Gorilla Glue I proceeded to cover the seam and the nail. You can see that here and the carpet back in the rear.

Here is a close up picture…

Gorilla glue has an expansive property to it. It foams up like that so you have to be careful how you use it. I have used it and it expanded out and all over the counter, the floor, pretty much lots of places you wouldn’t want yellow glue. So if you use it be careful.

Everything is getting a fresh going over with a rag and cleaner as I reinstall it. My daughter RovErica spilled a lot of drinks in her before I took the Range Rover off line and grounded her. Grounded the Rover not RovErica that is.

So the next item for attention is the shifter electrics and then on to welding the floor pan. I will then get some Dynamat or a similar product and get the front wheel wells finished and the carpets back in her. After that I will have to get the money together to have the windshield pulled and the seam and replaced and sealed to prevent the water from getting inside and starting the rust all over again.

We ended the night Saturday at the Marine Corps Ball for Fox Battery 2nd Battalion 14th Marines and over all had a great weekend.

I have another 4 day weekend coming up with Veteran’s Day and with another Marine Corps Luncheon on Friday. I plan on getting some more done on the Range Rover and if I sort the shifter electrics I’ll hopefully be welding on Saturday. Otherwise I’ll be getting the power steering hoses off and to the shop for a custom replacement.

Thanks for reading and Happy Rovering.

Sick…again (Post #215) 11/04/2010

I know you are out there wondering “why no post from this last weekend, what a freakin’ slacker”. Well I’ll tell ya, I have been sick, again or maybe even still sick. I’ve been fighting sinus problems for more than a month now. Now its official, I have a sinus infection.

I managed to start Saturday by putting a few nagging tasks behind me on the Restoration Project. I first relocated the retaining clip for the tailgate springs. In its present location it was rubbing off the paint I labored so hard on the week before. I also removed the tires in preparation for another round of brake bleeding. I also hooked up all the electrics underneath the passenger side seat. I also sprayed some 3m Undercoating to seal the holes in the cargo area. And I got all the tools that were scattered all over the garage, put back in their places. All of this was so I could test out my handy work on the suspension, brake system, and viscous coupling with a short drive.

My goal for Saturday was a drive. As fate would have it though I was asked by my wife’s best friend’s husband if I would like to use his wife’s ticket to attend the University of Oklahoma vs the University of Colorado football game at Oklahoma Memorial Stadium. Allen “The Cable Guy”, is a hoot to tailgate hang out with. He informing me that the ham he was bringing was smoked for 8 hours in his smoker, and a promise of a ride to and fro, I accepted.

By Saturday mid-morning my head felt like someone had driven a chisel directly into my brain with the entry point between my eyes. Normally, I would have said no thank you I need to rest and recuperate. But I was thinking a handful of Advil and a couple of beers and I’d be good to go for a football game. Hell, I’d felt like this all week, how would today be any different than yesterday?

I had a haircut scheduled for 13:00 and wife my wife’s advice I stopped in at the Minor Emergency Clinic at the Healthplex for some drugs. Normally, I would have attempted to see my preferred physician, Dr. Karl Langkamp. The name almost impels you to say it with a hard German accent punctuated with an exclamation mark.
Doc-tur Kaarl Lang-KAMP!
But, Dr. Langkamp is not a first generation German emigrant like my friend The Evil German Dude (EGD) whom I’ve written about several times. The good doctor, is a gentle and jolly man, sans German accent. To get back to the story, Dr. Langkamp does not see patients on Friday afternoons and I didn’t think I was all that sick on Friday. I was at that time, still holding out hope that I would defeat the infection.

So after I got my hardcore Marine Corps style haircut, I went to get some treatment for my sinus infection. I filled out the forms, saw the doctor, got a few prescriptions for treatment of a chisel-to-the-forehead style sinus infection. I had to fill them away from my regular pharmacy (chemist) as well, they close at noon on Saturdays.

With pills in hand I arrived home just before Allen “The Cable Guy” was due to pick me up. With Mrs. OkieRover, THE REGISTERED NURSE, by my side she gave me instructions about the pills.
“Take the antibiotic now. You can start the Prednisone and Respa C&C tomorrow. That way you can have a few beers tonight.”
So I popped the first dose of Azithromycin, 500 mg, 2 tablets, as instructed and went to the game.

I have taken this pill many times. Why I can’t remember that I have to take it WITH FOOD is still a mystery to me. In any event you would think your wife THE REGISTERED NURSE, would have mentioned that I not take that on an empty stomach. She didn’t.

So we get to the tailgate and I start to put my drink on. I had 4 hours to game time and a six pack to nurse. I didn’t need to get blind, stinking, drunk, I just wanted to have a nice buzz come game time. At that point, I had also decided that I would treat myself with a cigar. So I walked through the tailgates and down to the neighborhood tobacconist, Royal Pipes and Tobacco, and picked out an Arturo Fuente Opus X. It had a nice draw and overall was pretty good for a 10$(US) cigar.

View Larger Map
So back at the tailgate, I’m nearly finished with my cigar and have had two beers. Then it hit me. I became very dizzy and started sweating profusely. I had the overwhelming desire to lay down except for the fact that if you lay down in public, on campus, surrounded by beer drinking revelers, you are going to get arrested. I also had an overwhelming desire not to be manhandled by the friend police officers of the OUPD. Discipline is the key to life. And today I’m glad I had the discipline to ride it out.

As you can well imagine, I didn’t want my day to end that way. So I sat down in the shade and waited it out. Allen “The Cable Guy” came back to the tailgate and told me, “I didn’t look so good”. I told him the story and we both thought if I ate something I would be good to go. They had just started serving and with a plate full of food and a couple of bottles of water I was in fact, good to go.

We continued to enjoy the company of the tailgate and finally headed into the game. OU prevailed in grand fashion and it was back to the tailgate. I had one more beer and then it was back to home.

Overall it was a good day. I would have liked to finished the short list of Saturday’s tasks but I had a good time and the break from the Restoration Part Duex was well deserved. As you may well imagine, I spent most of Sunday in bed. It wasn’t from the 3 beers I drank either. I started feeling human late Sunday evening. Except for some unexplained tiredness, I think I have turned the corner and feel pretty good. I’m hoping I will defeat the sinus infection this week and get back on the project come Saturday.

This coming Saturday I am going to drain the transmission fluid and replace it with some fresh stuff.
I am going to bleed the brakes and sort out any remaining issues with that system.
I am going to put the carpet and interior parts back inside the rear of the Rover.
And lastly I am going to drive the Range Rover for the first time since late August.

Hopefully it will be a satisfying jaunt and will be a welcome reward for so much time spent working on her.
And if it is not…at least the Marine Corps Ball is that night and I can toss a few back to forget about it.

As always, thanks for reading and Happy Rovering.

Bushings More Important Than You Know (Post #214) 10/27/2010

Driving my Range Rover Classic LWB is an adventure. 
And I don’t mean an off-road adventure. Driving her on pavement is exciting, and that is perhaps an understatement. Exciting like you really don’t know where she will go at any given bump in the road.

This all began shortly after I got her. My carpool buddy had a funny quip after watching me navigate an on-ramp near the capitol one day. As I accelerated and decelerated, the Classic was bobbing and weaving in the lane. He said, “I wish you’d decide which curb you are going to hit.”

As you have probably surmised, the bushings were very worn. When I would accelerate, the Rover would pull to the left, as you let up on the accelerator, it would dive to the right. When I was in the habit of driving her every day, you learned how to handle that. Combine that with bald tires, worn shocks, old springs, its easy to see that the last few drives to JagGuy’s shop on Saturdays was beginning to be pretty exciting.

Bushings
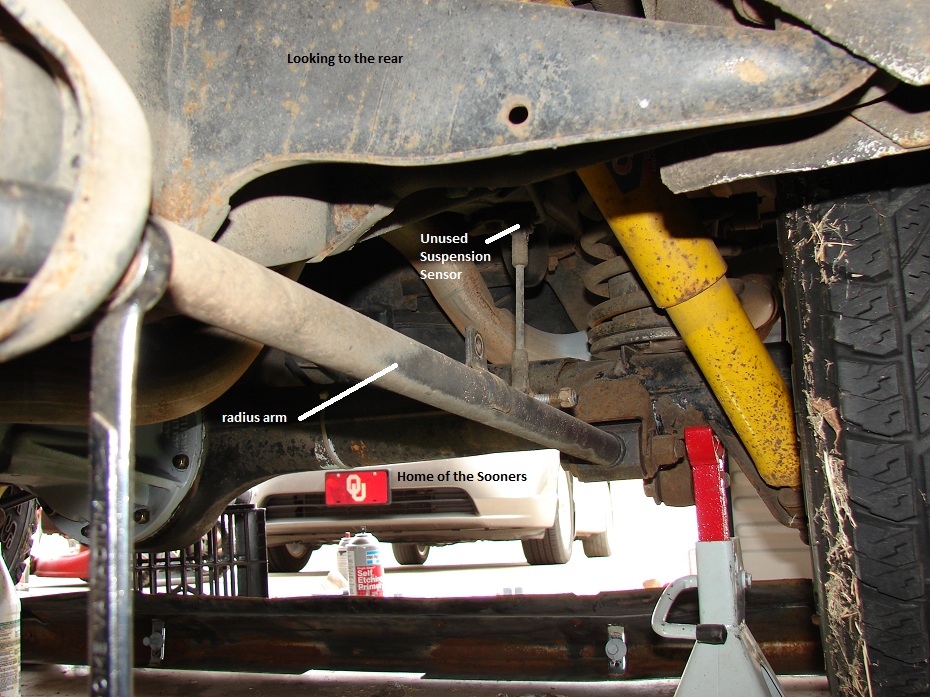
I changed the front radius arm bushings first, actually several months ago. This week I finished the rest of the standard bushing kit.

I purchased the poly bush kit over a year ago, thinking I would have time to do the entire job in one day. That was really unrealistic. Even with JagGuy’s great shop and tools I could only get the front radius arms done in one 6 hour session.

So with the Classic sitting in my garage I endeavored to change the rest out. The bushing kit replacement has only a few simple concepts.

  • Difficult to remove bolts and nuts.
  • Finding replacement hardened nyloc nuts.
  • Difficult to remove bad bushings.
  • Patience.

The good news is the instructions that come with the kit were pretty good. The only problem with them is the fact I was working on a Range Rover and the instructions were for a Defender. Almost the same. Almost.

First I started on the rear radius arms. And the first side demonstrated the corrosive nature of the parts that live underneath your Rover. To remove the first nut I had to use penetrating fluid, which was funny because it is a nyloc nut. Basically I don’t think any fluid got to the corroded bits.

At one point I had both feet braced and a twelve inch wrench with a rag to lessen the pain of metal on my hand. With all that I couldn’t get it to budge. I soaked it again and went to the other side and did it while I hoped the penetrating fluid did its magic. I also lined up my hoss of a neighbor, Kramer. He’s a big weightlifting tattooed biker guy. I asked if I was unable to get it broke loose if he could lend a hand. He agreed.

I returned and thought, “Ungh, fire. Fire good!” Why didn’t I think of that sooner? Hell I’m a closet pyromaniac. Fire should have been one of my first thoughts! So I got out the torch and heated the nut…a lot. The penetrating fluid boiled off, the nylon locking part boiled out as I continued to apply the heat.

I gave her a few minutes more of heat and then I went back to the wrench. I pulled hard and finally with a satisfying moan the nut turned. I reset the wrench and pulled again and another nice groan of metal on metal. A few more turns and it was off.

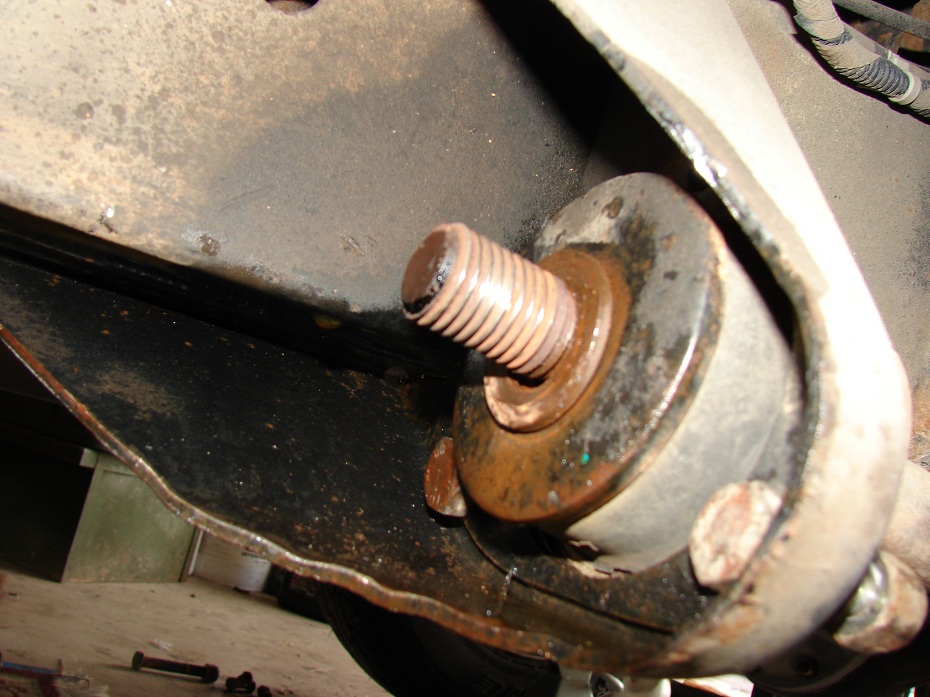
You can see the rust. This was bad. But what I found after that was worse. The end of the shaft had been machined wrong. There was a missing thread and the threading that was there was just slightly off. As if they didn’t place the unit in the machining lathe correctly. You can see that in this picture. The clean and shiny one on the left is from the passenger side. The rusted one is the driver’s side and the poorly machined one.

You can see how the threading just unceremoniously ends. Poorly done. This is a good example of the rust that had to be removed as well. it was bad.

You then remove the rest of the bolts to get the radius arm off the Rover.

After you have the front bolts off, you can start on the back. A few turns of the wrench and off comes the radius arm.

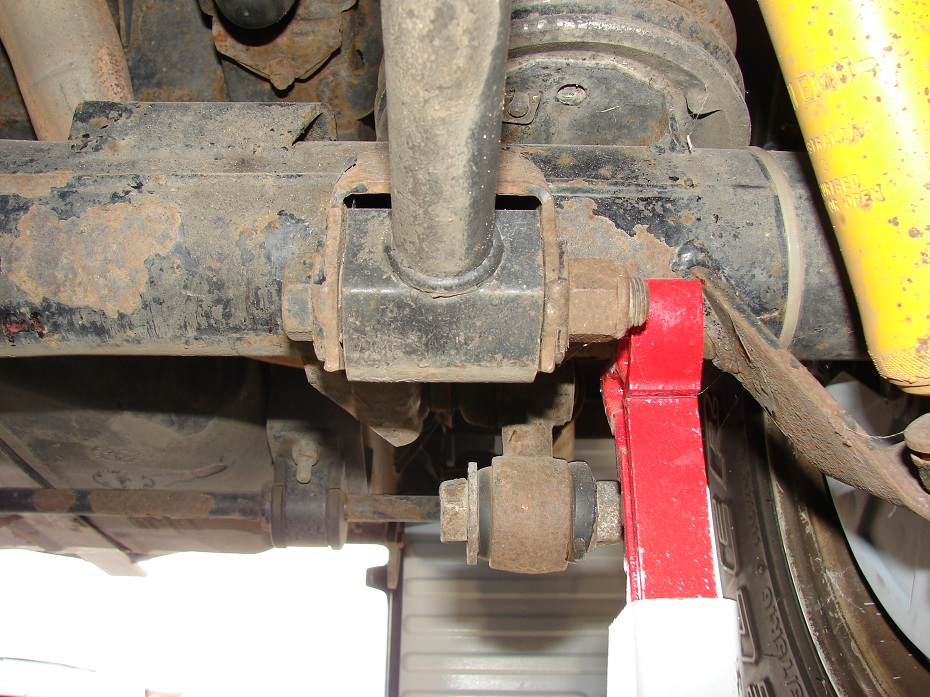
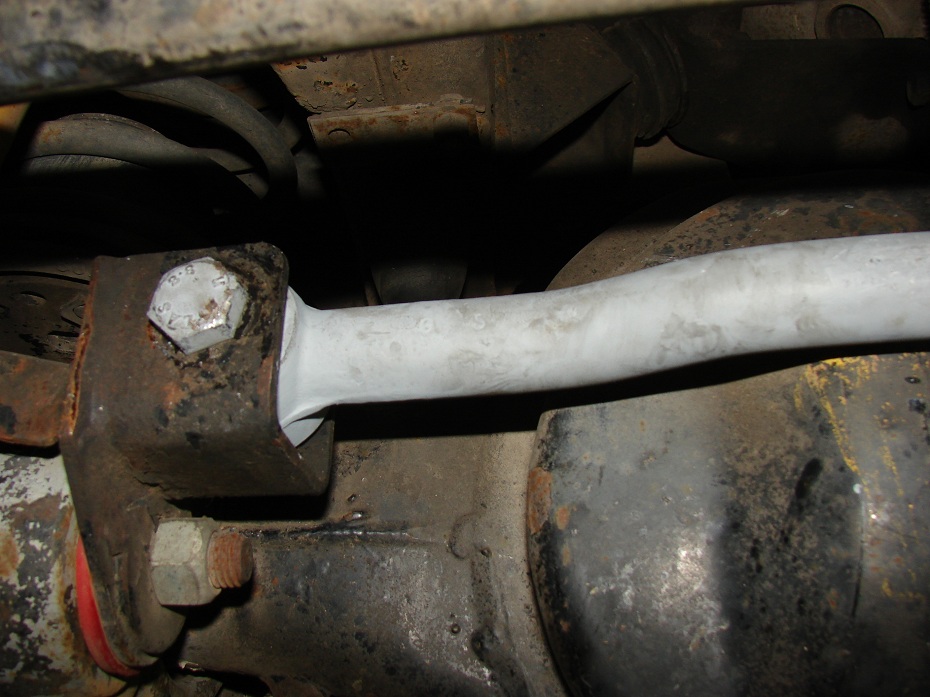
I then went to the front end of the Rover and removed the panhard rod. This was a bit more trouble as this is where the instructions failed to mention the driver’s side bolt will not come out with out removing the bracket.

Blocked bolt.

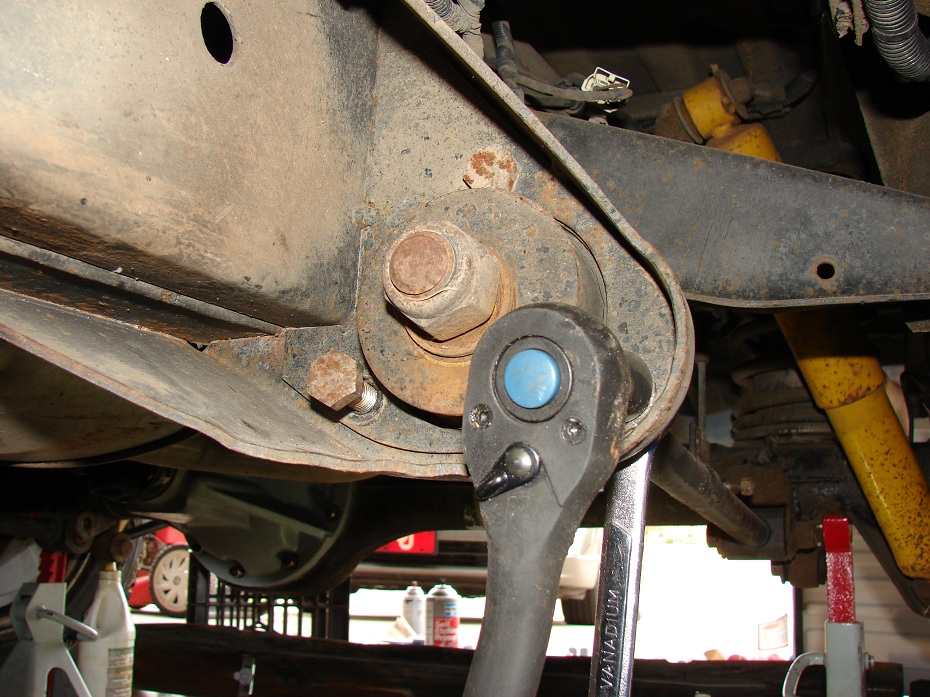
You can see the abuse the front radius arms have had in just a few months. I have the wrench on the backside nut in this picture.

I now had all the parts off. The task of cleaning off the rust. I gave the bench grinder a good work out.

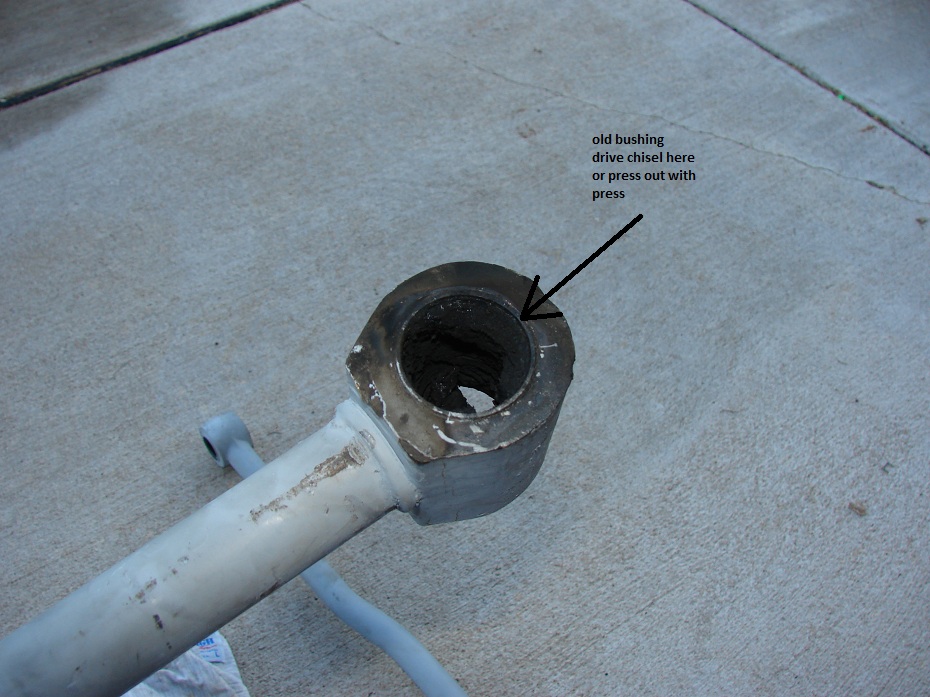
The old bushings need to be removed. You can use an industrial press with the right size of jigs and press the bushings out. I didn’t have the right size of jigs. You can also burn out the rubber bits. And considering I am a Marine and an amateur pyromaniac I chose the fire method. It is not glamorous and its pretty messy but it works in a pinch.

After you get the middle rubber part out you need to get the metal ring out. This is better removed if you have the jig and the press. Without the jig you are relegated to using a chisel or two to bend and cut the bushing wall out. I’ve done this two ways. I have used a big vise to hold the part while I banged on the old bushing with a hammer and chisel. I have also placed the arm on an old brake disc on the driveway floor and banged away with a hammer and chisel.

Using sandpaper and my Dremel with a grinding stone I cleaned out the rust and cleaned up the burrs from the chisel whacks. Poly bushes do not do well when they get cut and nicked and the instructions made it clear this step was very important.

 I then painted everything with it’s first coat of primer. I was determined that I would limit as much as I could, the inevitable rust.

With a second coat of primer and Rust-oleum I put the new poly bushings in and reinstalled. To correct for the bad shaft on the driver’s side I added an additional washer. This was to back the nut up the shaft so all the threads were on good threads. Probably not necessary but I wanted to make sure.

It is important to know that replacement nyloc hardened metric nuts did not come with my kit. So I should mention how hard nyloc hardened metric nuts are to find. Lowe’s didn’t have them. Ace Hardware didn’t have them. So with a phone call to my buddy JagGuy I was turned on to the location for the Mecca of fasteners. The things he remembers is truly amazing. Everyone should have a JagGuy to call. He said J&E Fasteners on SE 59th in OKC was the bomb dot com. And as always HE WAS RIGHT.

I showed up with my bolts and one of the rear radius arms and Dana matched them up with Grade 10.9 nyloc hardened metric nuts. I bought a few extras for my trail kit. I highly recommend J&E Fasteners.
One of the fellows behind the counter said, “the website was a work in progress”.
I replied, “Aren’t they all?”
You can order from there and they will ship. If you visit their OKC location don’t mind the strip clubs across the street. This is Valley Brook and their only claim to fame are the strip clubs and their jack-booted police department. I’ve never experienced a run-in with their police department, that is just their reputation. Two miles an hour over the speed limit…yeah, you’re getting a ticket.

With the bushings installed and the items painted, all that was left was to reinstalled the bits. I had to use the floor jack to position the rear radius arms and to get them pressed into place. I recommend taking a rubber mallet with you when you go under your Rover to gently align the bolt holes.

The panhard rod was not difficult to install. The instructions recommend a lever to help align the holes. I used my large standard screw driver.

Do the left side of the panhard rod first. Slip the bolt through the bracket and then place the bracket into the holes and wrench it all down.

The Wrap-up
This job on the whole is pretty easy. I would however give it a solid 3 on the OkieRover Difficulty Scale. Having a lift would make this job easier. Having a press with the proper jigs would make this job easier.

After doing this job I now know why people just buy kits and upgrade these parts. The fiddling and cleaning and prep is very time consuming for parts that are known to fail in extreme off-road conditions.

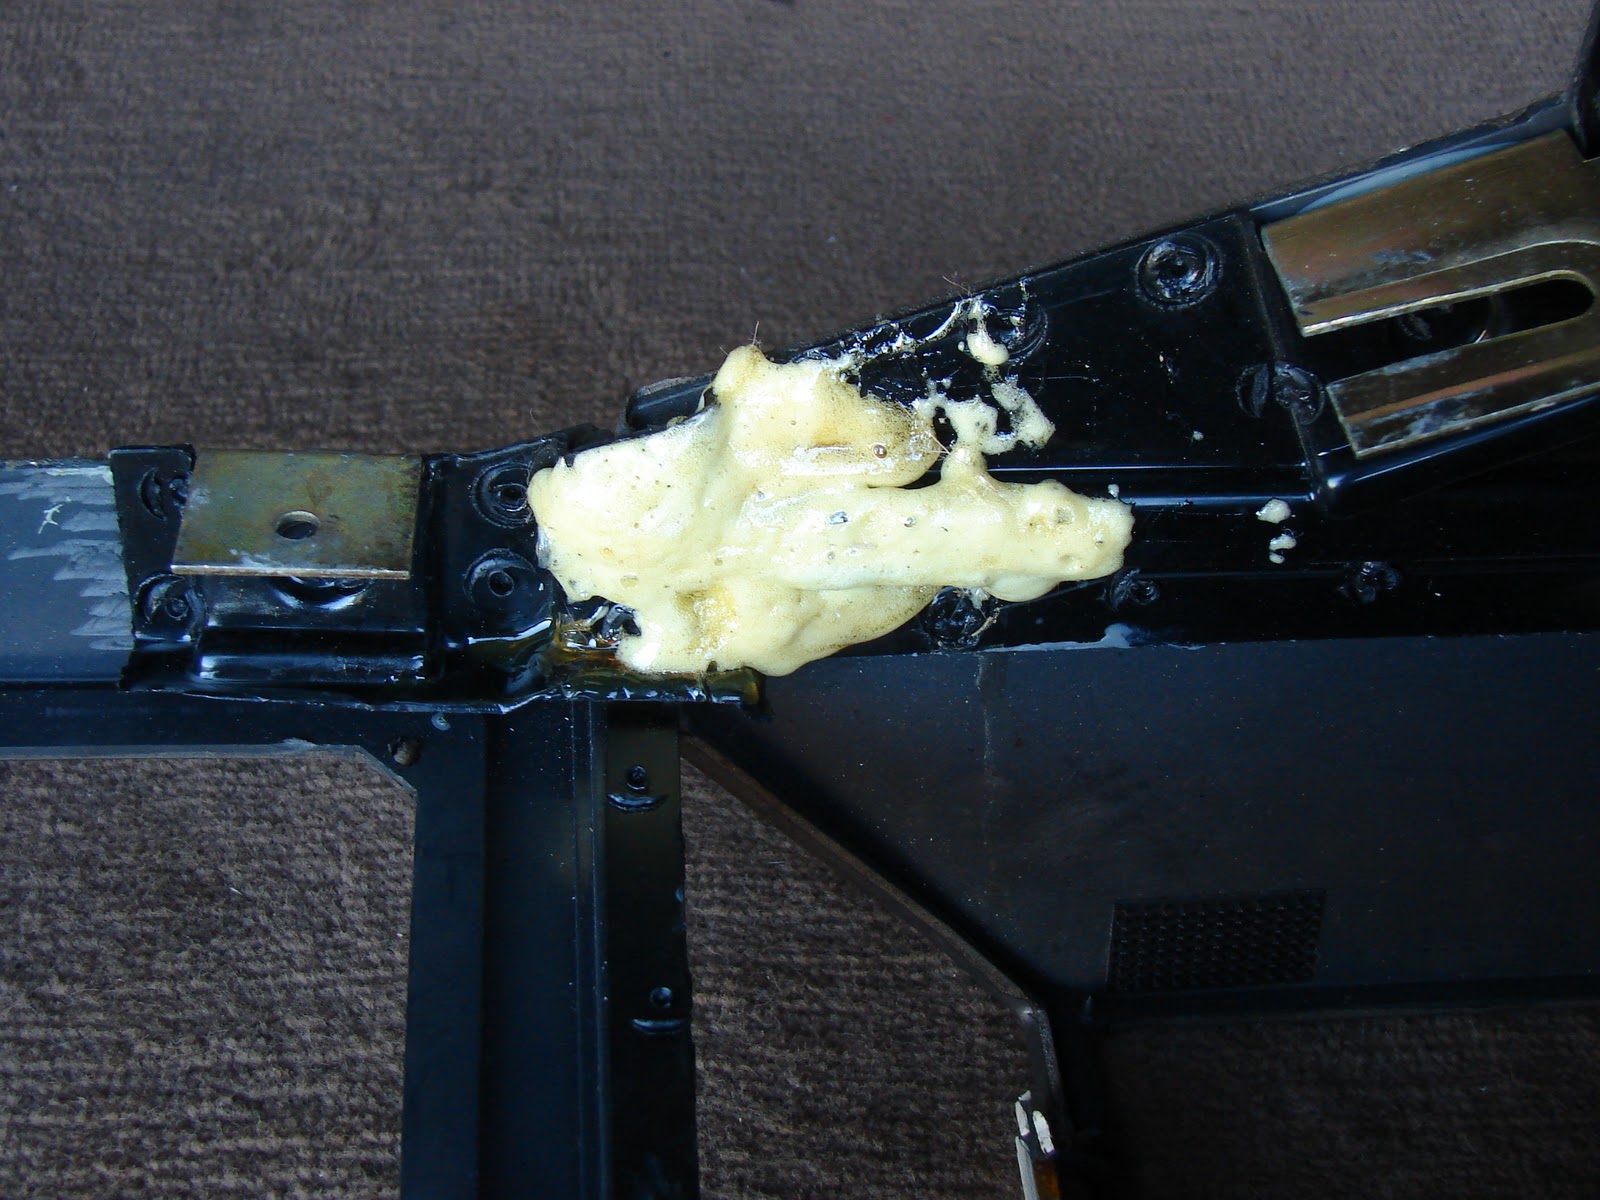
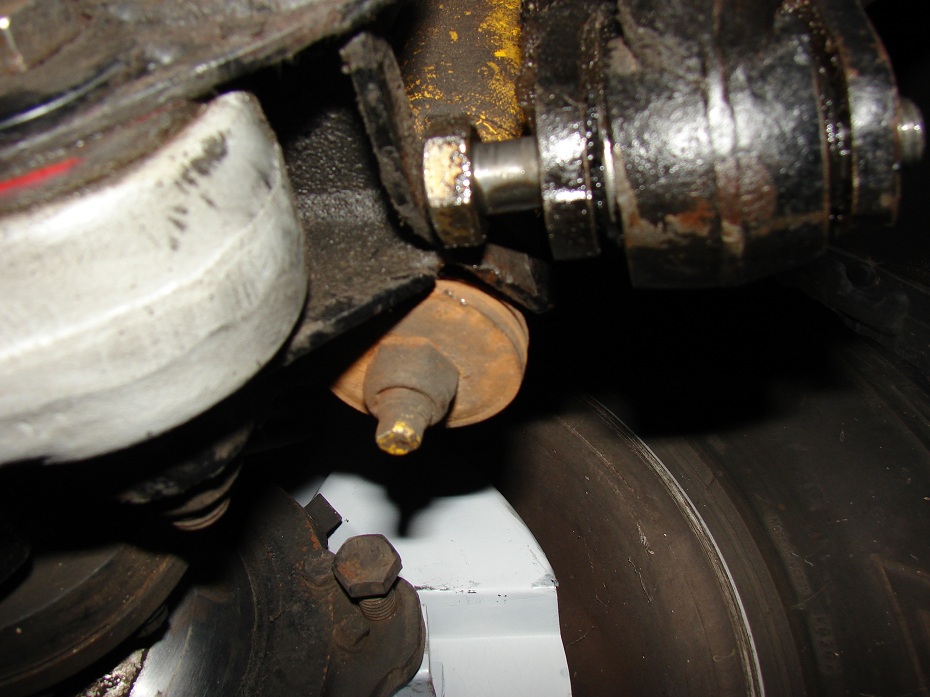
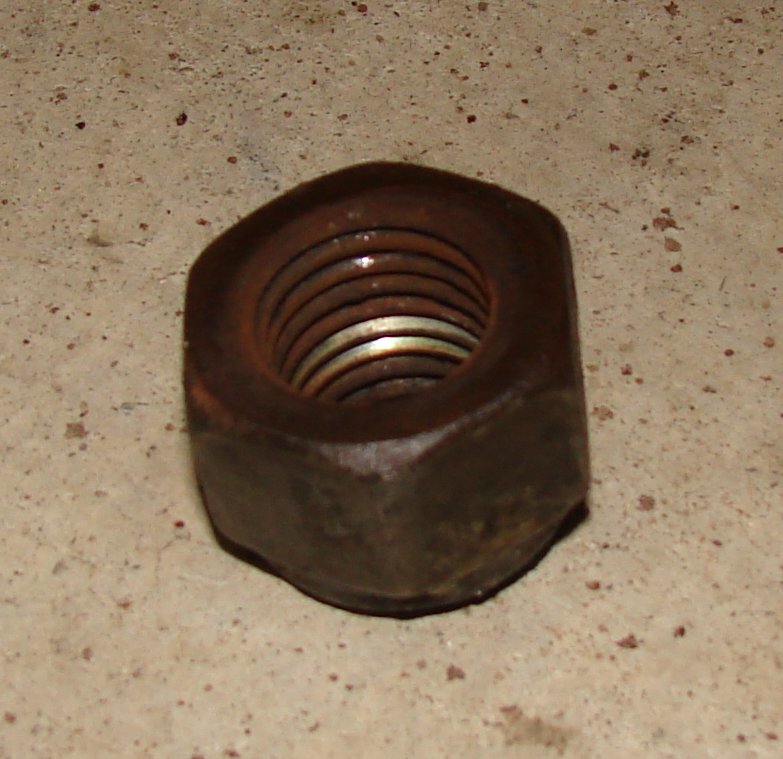
This picture of the nut from the left side rear radius arm should tell you everything you need to know about the corrosion you will encounter on this job.

You can see two clean threads inside the nut. The rest of the threads are rusted and nasty. This makes me wish I had a nice impact wrench, and a bigger air compressor, and a vehicle lift, and a nice set of 1/2 inch sockets in twelve point and six point, and a gallon of penetrating fluid, and a portable sand blasting kit, and a case of acid etching primer, and…

Thanks for reading and Happy Rovering.

High/Low Range Solenoid Problem (Post #213) 10/26/2010

A common failure on the Range Rover Classic is the high/low range shift solenoid. This system often fails and leaves your Range Rover stuck in high range.

My Classic has had it’s lever stuck this way for 5 years. And in those five years, I’ve needed low range at least once each year since it happened. The reasons are all the same, keeping myself from getting stuck. When I got stuck behind my new house in 2005, I’d like to believe if I had low range then I would not have gotten stuck. Last year during the Christmas Eve Snowpocalypse I needed the low range to help extract the my oldests kid’s Ford Explorer 4×4, some dumb kids dressed in shorts, hoodies, and flip flops (seriously) that got stuck in a snow drift at the entrance to our neighborhood, and when my friend used the LWB to pull his Jeep out of a snow drift a few days later after he got stuck trying to pull a car out.

In every example except the first, low range was not needed. I wonder if it would have mattered anyway. The Range Rover was able to pull everyone out with only the front axle, due to the failed drive shaft and busted viscous coupling. Imagine how capable the Classic would have been with both axles working correctly!

So with that a common fix is to remove the solenoid and to remove the pin that holds the lever stuck in high. I know I could have investigated all the parts that caused it to fail. But I didn’t want to spend the time to find the gremlin. It is easy enough to just disable the SAFETY DEVICE.

You must know at this point you are removing the device that prevents you from ACCIDENTALLY putting your transfer case into low range if you are exceeding any of the conditions that are installed to prevent that from happening. This shouldn’t be a problem. I know you have to basically be sitting still, in neutral before you can move the lever to low.

I lined up my tools to remove the solenoid and investigate how to disable it. I got my socket set out and a hex head bit to remove the two bolts holding the solenoid to the shifting lever.

Once again these were difficult to get broke free. The years of water and corrosion have basically welded the bolts in place. After they broke free I pulled the solenoid out and had a look at it.

That’s the pin that prevents a lever located on the bottom of the shift lever from moving “forward” to the low range. To get to the mechanism you have to remove the silicone bathroom caulk…wait what? Yeah, bathroom caulk, They filled the back side of the solenoid frame with caulk.

You can see in the picture with some of the caulk removed that the unit is not exactly water tight. I wonder how many of these failed before the factory started sealing them with bathroom caulk? I wonder which engineer got a bonus for his simple solution to this problem?

Head Engineer: “These solenoids are failing at an alarming rate from water ingression.”
Lesser Engineer: “I have an idea. Last night I was working in the loo and I was sealing the toilet at the base with caulking. How about we just fill the backside with silicone bathroom caulk. That should buy us at least three years. At that point the warranty will be void.”
Head Engineer: “Genius! Let’s head down to the pub to celebrate!”
Lesser Engineer: “But sir, it’s only 9:03 am.”
Head Engineer: “What’s your point?”

I think you get MY point. So you get the C clip pliers out and with the help of a small screw driver you remove the clip and remove the electrical bits from the casing.

All that’s left is cutting the pin off. No biggy. With the pin cut off it’s time to get it all reassembled and to have a couple of rum and cokes and a nice Arturo Fuente cigar while you wait for the bathroom caulk to set up.

Actually I did mine, got drunk and went to bed.

So why did you re-caulk it if you just destroyed it’s ability to do its job? Well I’m not exactly sure how to answer that. It seemed like the thing to do at the time. Hell, using bathroom caulk on a brand new 50,000$(US) Range Rover with Mediterranean Poplar wood accents is just redneck enough to make it into the Redneck Repair Hall of Fame.

Thanks for reading and Happy Rovering.

Painting is harder than it looks (Post #213) 10/25/2010

Before my raging sinus infection took hold of me on Saturday, I decided to paint the tailgate. I woke up to a rainy day and temperatures in the 50s. I know humidity has a huge effect on painting but I could not wait. I’d been held up too many times on this project to blow an entire day once again.

On Thursday I went by my local auto paint supply store, B&H Supply. The good folks there were very patient with me when I had stopped by a month ago to get the “low down” on painting. After describing the project and what I wanted to accomplish, they suggested using a one step process to paint the tailgate. They suggested using Preval system to paint the tailgate. It is simple and easy and has pretty good results considering the situation.

I found the Land Rover paint codes from a website by Stephen Hull (updated link, July 2013). He has a great site that had a helpful chart of codes for all Land Rovers. I found my paint code in the “non metallic” page. I printed the page and took it with me to the paint store. Bud (a truly great Okie name) was a lot of help and was able to find the code listed in his computer. He went to the back and got the paint mixed. He said I’d only need a pint.

He brought out the paint, hardener, reducer. With a measured mixing container he marked the ratios for me and told me I’d have about half my paint left over when I poured the first mix. That wasn’t quite right. I mentioned that when he marked it but he was insistent. As it turned out it was exactly twice too much. Live and learn.

Bud had suggested that I should at least sand the surface with at least 500 grit sandpaper. I’m pretty sure I didn’t give enough attention to the sanding that I could have. I sanded off most of the edges.

I got everything set up and mixed the paint. I went back to the Range Rover and made sure I had everything taped off. In hind sight I should have lit that side of the garage up as well. I set up in my wife’s third of the garage. I got my bright halogen lamps and set them up. I got the paint materials out and tried to imagine how it would all go. I decided to paint the tailgate flat on the work table.

That would turn out to be a mistake. I should have had it propped up from the beginning. I was able to correct that later.

I mixed the paint and filled the paint jar. I used the short spray, short stroke method I’ve seen Edd China do a hundred times. Basically you spray and move, spray and move. If you do it the same way as Edd does you never have the paint coming out more than a couple of seconds before you release. After a couple of passes you have the area coated but not so much paint on it that it will cause a drop or a wave.

Now I say that and it seems my technique could use some more work. I did have runs and I did have one wave. The paint coats well and I think the problems I had were from the humidity. If I had a booth I think the results would have been better.

I painted both sides of the tailgate and both of the spots on the fenders. I sprayed the tailgate hitch, I sprayed stuff I didn’t think I even needed to spray. I had a lot of paint still mixed. I almost painted the floor board on the driver’s side but it was really dirty and would have taken me an hour to get clean enough to paint, so I passed.

Once I was done I used some of the reducer to clean up the parts. I let it dry all the rest of Saturday. I went in and watched football and tried to beat back the sinus attack with orange juice and Respa ™.

On Sunday I assembled everything. I had left the spots where the bolts went through the tailgate unpainted. Turned out I didn’t need to do that after all. The hinges were so loose that I had to align them from scratch. That was easy. I put the tailgate on and tightened it down. Open and closed the gate a few times and called it good. I tightened the bolts and began to work on the upper tail gate. It was a lot harder to get aligned.

I had to adjust the catches to get them to function correctly. This takes a vise-grip and a 7mm wrench to tighten the keeper nut. I got the latches working well, lubed them and put the pieces back on the gate.

I then began to put the badging back on the tail gate. I purchased some double sided tape for emblems from O’Reily’s. I cut it and got all the emblems reattached.

You may notice my EXTRA addition of the Oklahoma Edition badge. I have a friend that works for a dealership and I asked him to get me one when I saw them on a Ford Truck commercial. I put one on my 2003 Discovery and no one ever mentioned it. So when that truck was on the way to the scrap heap I took the badge off. I have a spare but was unable to find it.

I bought the RANGE ROVER and the COUNTY LWB badges quite a while ago and quite frankly was surprised I found them in that mess I call a garage. I put them on and the original dealer badge which was Andrew’s out of Nashville. That dealer is now called Land Rover Nashville. I also mounted the original green oval as well after I cleaned it up and re-glued it all back together.

The purchase of stainless steel screws came in handy when reassembling the tail lights. I was a few short so I just cleaned up the old rusty ones and gave them a coat of paint. I put the lamp assemblies back in their places and with a couple of new bulbs they were ready to go.

And if you go back to the first picture you can see the end result. I am happy with it. It is after all a work truck. It is not a beauty queen. God only knows how many scratches this paint job will have in the future. That is if the floor boards don’t rust out from under my feet before I can get those well earned scratches on her.

Thanks for reading and Happy Rovering.