Busted Differential (Post #555) 3/7/2016

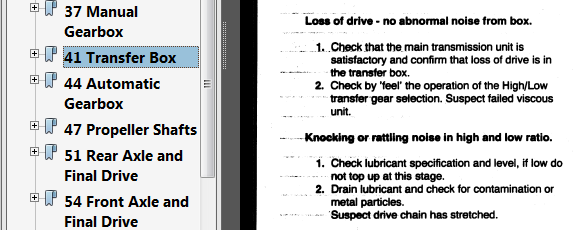
I headed to work this morning as I always do. About two miles from the house I heard the “sound” again. This is the binding sound I’ve heard twice before. I thought for sure it was a CV joint going out.

The two times before I was able to make a three point turn and the sound went away. In my mind this seemed logical as if a CV was binding up it would be fully articulated across the axis and perhaps unbound.

Today, the sound did not go away after the three point turn. It also did not respond to a figure-eight turn in a large parking lot near Mickey’s Garage. As my friend JagGuy says, “if it explodes it’ll be easier to find the issue.” Determined to drive it until something catastrophic happened I turned out onto Flood avenue. About a mile later I got a very satisfying crunch sound.

“I guess its broken now,” I thought to myself.

I have a new CV on the shelf so I wasn’t worried about getting a part. My elbow has just now begun to recover from the severe tennis elbow I’ve been battling for 3 months. And wet weather was coming in today. So with those thoughts I dropped the Big White Bus off at Mickey’s Garage.

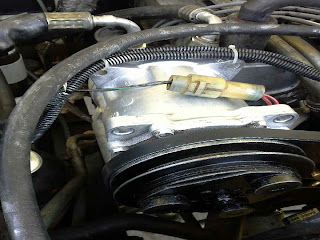
I went home to file my taxes, do laundry, and blog. He called me in the afternoon and sent me a picture. I was on the way home from physical therapy and stopped by.

I told Mickey I was 72% sure it was a CV but I was 28% sure it might be a differential. It was a differential.

Bolt Chunk and Washer
differential
Bad Differential

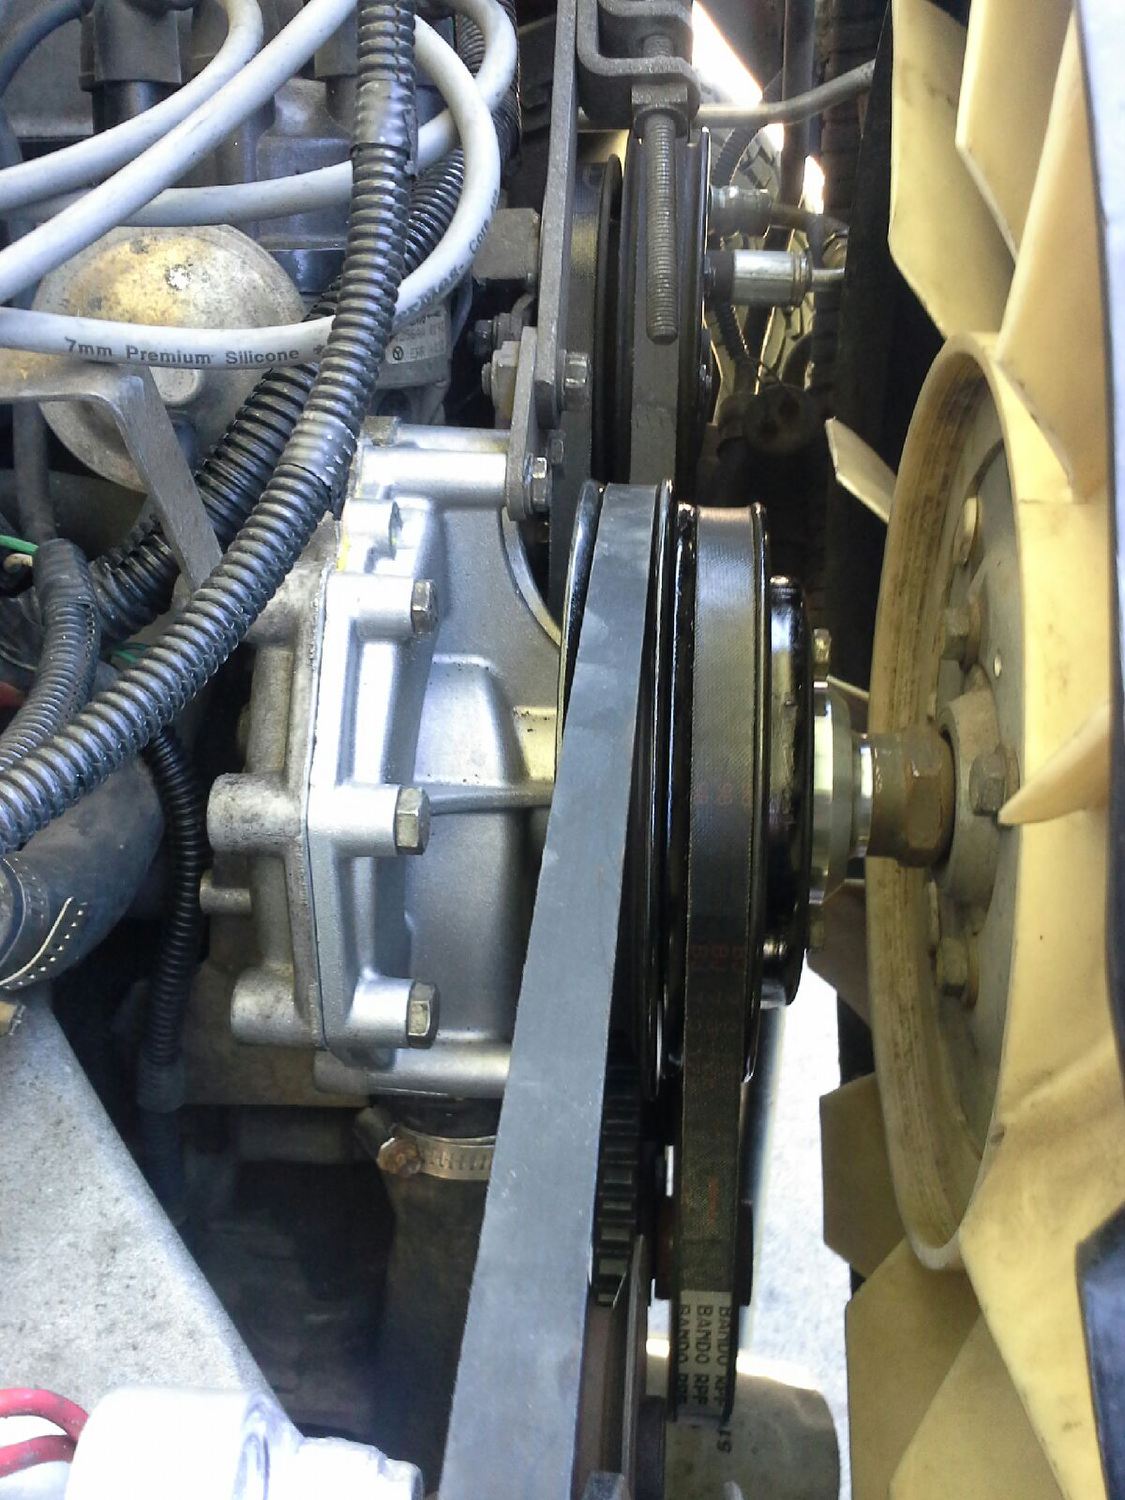
You can see the bolt that is not seated. The top is shaved off. The missing bolt is the one that broke off. Several of the others were FINGER TIGHT, yes, finger tight. The oil in the diff and CV housing was a lovely shiny metallic mess. That metal was most likely in the bearings in the differential making it a total loss. We could have bolted her back up but it would have failed eventually.

Mickey said the bolts required proper torquing and setup with the pinion, etc, etc,… I’m taking his word for it that it would be an ordeal to put right. I can get another used differential for 150$(US) from Rover Cannibal.

We could speculate for days about why it failed like it did. Suffice to say there is a lot of “slop” built into the axles of a Range Rover Classic. This is good and bad. Bad because it causes things like this to happen. Who knows, perhaps someone in this Rover’s past rebuilt it and did it WRONG.

In any event, I’m driving my son-in-law’s Audi tomorrow and will be back behind the wheel on Wednesday. Considering the Saturday afternoon I spent with Mr. Fisher and with JagGuy on the phone trying to find my problem in the ignition that was keeping the engine from starting, I’m getting a little frustrated. I know its a rolling restoration, but damn it, I need reliability. You can laugh at that if you like, but the Big White Bus has been pretty good to me for all of 188,000 miles I’ve put on her. Land Rover and reliable? Say what you like, but they make a purpose built vehicle.

Funny thing, Ehimare, a young man from Brooklyn NY that drives a 1993 RRC and occasionally calls me for help, had his break a half shaft this week too. He’s looking for a differential as well due to his shop’s inability to get the chunk of shaft removed. Must have been a rough week for 1993 RRC drive trains.

Thanks for reading and Happy Rovering.

Transmission Rebuild In Progress (Post #529) 3/11/2015

image

King Transmission called today and they will be getting started building my transmission. I’m very excited that I will have a fully functional transmission.

The Plan
The plan has been to minimize my vehicle downtime. So I went to Rover Cannibal and picked up a core. I took it to King Transmission on Classen in Norman.

They come highly recommended. Mickey of Mickey’s Garage, Ryan from Rover Cannibal,  and my friend JagGuy all spoke highly of their work. They build all sorts of transmissions for many applications. Racing, luxury autos,  and the best 4×4’s x far. The last time I was there the was a bloody dragster in one of the bays.

I am hoping for several outcomes with this new transmission.
One, better gas mileage. I know the tranny is slipping and not functioning optimally.
Two, I can now haul a trailer effectively. Even the slightest bit of tow weight and the Range Rover acts like a ninety-seven year old man pulling an apple cart uphill.

I’ll post again when I get close to having the transmission installed.

Thanks for reading and Happy Rovering.

Not the Water Pump (Post #474) 3/26/2014

If you read “Sometimes Things Don’t Go Your Way” you saw that I thought I had a failing water pump. The “new” water pump was only a few months old so it was quite out of the ordinary for it to be failing. I took the Range Rover to Mickey’s Garage on Monday to have it looked at. It turned out it was not the water pump.

So the sound I heard was definitely a failing bearing. It turned out to be the belt tensioner pulley’s bearing. The pulley is attached to the water pump by a bracket that mounts directly to the water pump. So any noise from the pulley would be transmitted up to the water pump housing. That’s where I put the screw driver “stethoscope” to confirm it was the water pump and not the NEW power steering pump I just installed.

I have a video of the sound. You can hear it as I rev the motor. It’s the prrrrrr sound as the engine winds down.

Mickey’s wise words, “I would not drive that to S.C.A.R.R. without replacing it.” had me stopping at Rover Cannibal on the way home Tuesday. I went in and talked to Ryan. I told him what I needed and he said what I already new, “Those are getting hard to find.” Indeed this is the case. He called “KC” over and together we went up stairs to the bin. KC’s knowledge of where everything is located in that warehouse is impressive. I explained to him that there were two types of pulleys used on the Range Rovers. Once we got to the bin I showed him how they were mirror images of the other. I found a good one and was ready to get out. Once again Ryan and Rover Cannibal had what I needed.

I determined to place the pulley in my spares box for the trip. The growl has been going on for a while and I was not in the mood to swap another part last night. I called Mr. Fisher over to help but at the last-minute decided that if it did fail all I would lose is the belt and I have a spare in the spares box.

I knocked the grease and surface browning off with my wire wheel. I painted it up and have it ready to pack.

S.C.A.R.R. is this weekend and I have only one other task to complete. I must do an oil change this weekend. I hit 206,000 miles and that 6 is divisible by three so 3 thousand miles have passed. Time to put in some more Castrol 20w50 and a new Wix oil filter.

I’m working on a way to service these pulleys. The bearings are behind a cover in the center of the pulley. If this housing can be removed and replaced, or reinstalled, it would allow for repacking the bearings with grease. More investigation is warranted. Thankfully I have a damaged one I can practice on.

Thanks for reading and Happy Rovering.

Helpful Tips for My Helpful Tips (Post #404) 10/21/2013

Ken Arciga of Los Angeles, California, sent me an email recently. He wanted to thank me for the site and to share some comments back with me on things he’d learned and tried when working on some of the same projects for his 1995 Range Rover Classic expedition project vehicle.

He has many of the same issues I have with the fuel economy and is yet another “old Rover” guy looking to swap in a diesel. He uses his Rangie in typical fashion to drop off the kids but at 4$(US) a gallon its expensive.

I must say, excellent color choice 😉

Before we get to the email, my first observation, Ken has the cleanest engine bay I’ve seen in a LONG time. Ken, you’ll have to tell us the secret to that in another email. His email after the jump…

Hi Eric,

Pleasure to meet you, thanks for putting up your site and sharing. Wanted to share notes on a couple of things I just went through:

1. STEERING SHAFT – Looking at your picture, my steering shaft was also put in the same way your old one was, is the part with the rubber band (crash/break away joint?) was on the steering pump side. So that is the same direction I put in my new one. However I had my truck in for alignment and the independent dealer noted my steering shaft was installed backwards!
Sure enough I looked in the manual and it is backwards – that rubber band part is supposed to be on the steering wheel side. I bet it was probably put in either way as these manuals aren’t always accurate.

2. 2ND BATTERY – I kind of did what you did with my P/S pump reservoir and bracket, however for the air box I just drilled a couple of holes to move it over and was able to get the 2nd battery to fit – with the HORN OFF.

3. CC VACUUM PUMP – I ended up not wanting to go through the work to relocate my cruise control vacuum pump unit (my cruise control isn’t working either) but the battery was pressing up against it which I didn’t want – so I ended up taking a little metal off the radiator bracket so the battery could be positioned over enough to give the CC Vacuum enough room.

Anyway thanks for your info, reading up on some of your stuff that I still need to tackle!
-Ken

Steering shaft. My Range Rover was a front end wreck before I got it. When it was put back together there is a good chance this was put in backwards. With that in mind, there’s probably a very good reason one way is preferred than the other. Knowing my OCD will not let that stand, I’ll probably switch mine to match the manual. Great find.

Bracket. Nicely done. I think the bracket I used was from a Discovery I. I read that online quite a while ago. So I just went down to Rover Cannibal and picked one up. I like Ken’s bracket, simple and functional.

After getting such high praise and being a generally curious guy (and seeking permission to publish him) I followed up with another email. He sent the above picture of his excellent Range Rover and the following description of things he has already dealt with. He wants to take his Range Rover to Peru someday and has thoughts of a shake-down expedition a little closer to home in Baja California.

Here is what it looks like so far – I started with suspension (OME 2″ springs, nitrocharger shocks), front radius arms and adj. pan hard to get steering back, wheels, tires, P/S pump (PAIN in the butt, Cardone rebuild didn’t work), gearbox (Meridien – LOOOOOOOSE but I tightened up) and shaft, got the 2nd battery in but saving up for the kit to wire it, oil pan gasket and probably doing the head gasket next (leaking of course : )

Just finishing up the fluids – have the trans pan kit and fluids, transfer case to do, just got my LR grease for the swivel housings. A ton more plans.

I don’t know how to weld but contemplating learning so I can build my own bumpers and skid plates – really a big part of this is to fix stuff and to learn on a vehicle I’ve always wanted since I was a teenager.

Rack, lights….this list goes on!

Anyway thanks again for sharing your stuff, only people that dig into the nuts and bolts I think can really appreciate the details!

Ain’t that the truth?!?
Like myself, I imagine he has expedition dreams on a domestic beer budget. While I am worried about breaking down in my own STATE! he is contemplating a long trip to another continent. Excellent.

Thanks for contributing Ken. These are great tips and I felt they had to be shared. Thanks for letting me put them up for every one.

Thanks for reading, and Happy Rovering.

Water Pump Replaced, AC Compressor Swapped (Post #386) 8/31/2013


Back in the saddle again. I picked up the Big White Bus from Mickey’s Garage this past Friday. Mickey send me these pictures telling me the BWB was ready for pick up. As you’ve read in previous posts, the AC compressor they installed originally had a leaking seal. True to his word he replaced it. As you can see, its now putting out 45 F degree air. The volume of air needs to be investigated. It’s probably the air box. We had a chat about the design and what might need to be done to make it better.

That’s cold air.

Mickey put a coat of paint on the compressor to pretty it up for my blog. I like that. I’m hoping its good to go. If we have trouble with it, he said he’d take car of it for 6 months. That’s not bad for a replacement used part.

Looks good in silver.

The water pump is new. The old one was a questionable part now that the pulley broke. After it was off, it seems to be okay. I’m going to put it on the shelf for a spare. The new pulley’s from Rover Cannibal are now in place with new belts.

New water pump.

I talked to Mickey about the horse power the large fan robs from the engine. I talked to him about putting electric fans on. My research showed that a fan shroud from a late 1990s model Ford Crown Victoria would match up nicely. I’ll start looking for one as soon as the weather cools off a bit. I need to get my measurements and start hitting the breaker’s yards.

The expense of having someone else work on the Range Rover will need to be recovered over the winter. With school, getting the tornado shelter installed, visits to the doctor, and work, I had to trade money for time. Which according to my good friend Paul is a good trade.

Now I’ve got a new water pump, belts, and AC compressor. Three more failure points removed making the Rover even more reliable as a daily driver. No one said keeping a 20 year old Land Rover on the road as a daily driver was going to be cheap or easy. So far the costs are still cheaper than a car payment and insurance for another car. If you consider a payment for a new-ish Land Rover…I’m WAY AHEAD!

Thanks for reading and Happy Rovering.