Looks like I’ve got some rough running again. This time I suspect it is the plug wires and plugs. I have also replaced the distributor cap and rotor. In doing so I managed to unintentionally disassembled the distributor due to a sticky rotor. There are some very scary pictures coming for that repair. Look for the post this weekend.
I managed to get it back together after a few tries. She started up and I thought I had the Big White Bus running again but that was not true. She came home today on the flatbed of shame…sorry no picture…and I’ve begun to diagnose the issues.
I hope you enjoy the video.
A shout out to Ringer for his offer to rescue me in his Jeep Wrangler with extra doors, and to John Joyce who saw me on the side of the road and pulled over and offered a ride.
In all my 50+ plus years of living in Oklahoma I have never been to the top of Mount Scott. So this past weekend, I took off to see it. Mount Scott is located in the Wichita Mountain Wildlife Refuge near Lawton, Oklahoma. It rises to 2,464 feet above sea level and towers over the surrounding area. There is a three-mile long road that takes you to the top.
I discuss panhard rod bushing failure and deathwobble.
I demonstrate how knackered my panhard rod bushings were.
Removing the failed bushing requires you to use a “punch”, I used a socket which is slightly small in diameter than the bushing, to press the failed bushing out. It is similar to the process of pressing them in except when you press in new ones you used a socket that is larger in diameter than the bushing.
I demonstrate how to press in new bushings. Find the beveled side of the panhard rod and the bushings will go in easier than the side that is not beveled. I used a vise to get the bushing started. This helps with getting the bushing “square” in the hole before you apply the press to the bushing.
Getting the tool lined up correctly is 90% of the battle.
Victory is mine. The bushing is pressed in. You do this for both sides.
I had trouble with the width of the bushing sleeve and it require a bit of grinding to get it mounted. I used a bench mounted grinder. Just take off a little of the material and try to fit. If you need more, grind off a little more then refit. I went to the bench grinder four times to get both sides right before mounting with the bolts.
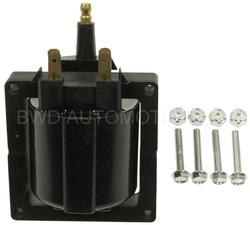
If you’ve been following along with my plan to eliminate my Lucas ignition system you know we’ve had some struggles. Remember the goal, to replace the expensive and moderately reliable Lucas parts with easy to source, available in nearly any auto parts store, inexpensive (sometimes with a lifetime warranty) ignition parts.
No one wants to pay 200$(US)+ for an ignition module that takes 5 days to arrive from one of the coasts or 100$(US)+ for an ignition coil when you damn well know that a similar coil and ignition module for a 1977 Chevy Nova costs 75$(US) and both have a lifetime warranty. Before I owned this Land Rover I had never experienced an ignition module or coil failure….NEVER, on a dozen cars across the entire spectrum of vehicles I have driven.
Our current issue, while we have managed to source an ignition module for 25$(US) and a coil for just under 50$(US) the ignition modules are failing at a rate a great deal worse than the Lucas setup. Think, every 2 weeks I’m replacing an ignition module. I carry TWO spares just in case.
This is in all actuality worse than the Lucas setup. A great deal of science has gone into the conditioning of the voltage and current going into the module and coil. A lot of thought by people a great deal smarter than me has gone into figuring out what is causing the failure of the GM modules we are using to replace Lucas. We’ve come down to this, we need a coil that has higher resistance than the coil we originally sourced. So to that end we now have an ignition module AND coil from a 1977 Chevy Nova with the L6 engine. Matter of fact this is the coil used on 965 different models of cars look at the list here. There’s even 32 models of Jeep on that list! Even with all the models using this coil, this is not a coil commonly stocked at your neighborhood O’Reilly’s. That is a bit disappointing but it is to be expected. The ignition module which is the more common of failure points, is a very common GM part and available in most auto parts stores.
So if you are trying to do the same to your beloved Land Rover.
I’ll be installing these this weekend and will keep you apprised of any additional failures and what we are doing to eliminate them. During a fit of frustration recently I purchased a new Lucas ignition module and official coil and I am prepared to put them back in and scrub this experiment. I was able to find them on Amazon.com below the cost of some Land Rover parts sites you have seen online and with my Prime membership they came to the house in TWO DAYS! That will work. It won’t work if I’m stuck in the middle of the Comanche National Grasslands 30 miles or more from the nearest parts store, so I guess I’ll be carrying a spare from here on out, perhaps even two spares.
I’m hoping to have a reliable rig for an Oklahoma Overland Group run to the western part of the state at the end of this month. If you think you’d like to go check out the Oklahoma Overland Group on the Facebook.
We woke in Picture Canyon. Erik and his team planned to return to Oklahoma City. We made a big breakfast cooking everything we hadn’t eaten so far on the trip. By the time we finished cooking eating and packing up Mr. Fisher and I had to change our plans too.
The trek up Black Mesa and back takes at least 5 hours. We had 7 hours of driving to get home. We had an hour and a half to get to the trail-head. The math put us in Norman around 11 PM or even later. That wasn’t really an option as I had to go back to work on Tuesday. So we skipped Black Mesa. I’ve been to the Black Mesa area three times and I haven’t made the hike yet. My next trip to the region Black Mesa will be my primary goal. I’m doing that first.
We headed to Campo, Colorado to get some fuel. We found a garage there with a mechanic, that’s something to put in the memory bank just in case. We fueled up and struck up a conversation with a local gentleman who heard we were overlanding and gave us a great suggestion for a route home. We headed south out of Campo looking for Road C. We headed east and soon found ourselves out on the wide open grassland.
Along the way we found a historical marker and stopped to check it out. Turned out it was a short cut for the Santa Fe Trail.
“Santa Fe Trail Marker with Stone Posts”
37°01’05.7″N 102°27’42.3″W
37.018258, -102.461744
The historical marker.
Faded badly.
Sun bleached.
Neglected.
A map.
The markers were for the Aubry Cutoff. From the sign, it was a way from the Mountain Route to the Cimarron Route on the Santa Fe Trail.
The sign was well weathered and really hard to read so I translated it for you.
“Francois Xaver Aubry was born December 3, 1824 near Quebec. In 1843 at 18, he left his home and moved to St. Louis, Missouri where he began working as a clerk for a French Canadian merchant company.”
“In 1846 lured by the talk of trade making money and adventure on the Santa Fe Trail, he gave up his job as a clerk and became a full-time trader. By 1850, Aubry had traveled multiple routes with the goal of finding the shortest sand-free path that provided adequate water and wood. In 1851 he found it establishing what became known as the Aubry Cutoff.”
“From 1846 to 1854 Aubry was among the business most influential merchants on the Santa Fe Trail. His caravans were usually large and his speed and reliability in getting goods to the right market ahead of others was legendary. The average length of Aubry’s trips was 37 days while other merchants would take up to 90 days to deliver their goods to Santa Fe.”
“Along with this mercantile reputation he developed a talent for individual travel. Aubry’s 730 mile trip on horseback from Santa Fe to Independence Missouri in the **** days…”
The rest of the sign is indistinguishable.
On top of a small hill near the trail.
Looking north.
Looking south.
Me near standing at the trail marker.
Another trail marker.
The grassland was amazing. I’ve never been so far away from everything. It is a truly wide open place.
A panoramic view.Such a great road.
There were other markers laying out the Santa Fe Trail.
We crossed in to Oklahoma.
Mr. Fisher stands in Colorado and Oklahoma at the same time.
We decided to head to the Washita Battlefield National Historic Site. I’ve never been but have wanted to go several times. The shortcut through Texas was really terrible. We battled the 18-wheelers hauling pre-hamburgers and pre-steaks at mach 2 on the roads throughout the panhandle of Texas. I’m pretty sure most of them should be arrested and thrown into jail for the speed they were traveling and the absolute utter disregard for other drivers. Seriously we were nearly rammed by two 18-wheelers going well over 80 mph. There’s no way they could have stopped if something happened.
We stopped in one these cattle towns and made some sandwiches and ate lunch. Every town had a silo like this one.
Cow town with a silo.
The Washita Battlefield National Historic Site is a real nice museum and was free! We stopped and watched an informative video about the event. We looked at the artifacts and read some of the interesting perspectives of the times. There would be a recollection of a white person and a recollection of a native person showing the two sides of the same event. Very informative.
A very nice museum.
Battle description.
Another monument.
Trailhead marker.
Respecting the dead.
We then went down the road to the actual site. The river has moved since the original event but with a little imagination you can put yourself there that fateful winter day.
We took the two lane highways home. I can tell you as we came back into civilization I actually longed for the wide open spaces of the plains. The rest of the trip was uneventful and we managed to get home without dying.
Two hundred fifty thousand miles. You can drive to the moon (238,000 miles), drive around the moon’s equator (6,786 miles) and have plenty of miles left to find a good parking spot with 250,000 miles.
That’s probably no big deal today when you are thinking about cars. I know several Japanese based autos that have clipped that. JagGuy got 340,000 miles on his Isuzu Trooper and has 300,000 on his Mercedes 300CD’s clock. Like I said no big deal for some manufacturers. But for a British made auto from the middle 1990’s that’s a big deal.
How do you get to 250,000 miles? The answer is lots of maintenance. You’ve seen the “tick sheets” for Land Rover maintenance. Most people don’t take their car to the dealership for maintenance after the warranty runs out. You are already paying 400-600$(US) a month to buy the Land Rover why would you pay 2000$(US) for a “service call”?
So after time goes by and those things get neglected suddenly you have a hose pop that should have been replaced 25000 miles ago and that can lead to even more trouble. Or how about a sensor that stops working optimally and starts to damage other stuff? Eventually you have to replace components when they fail.
Major components start to fail and cost quite a bit to repair. How about 2000$(US) for a transmission, or 1200$(US) for a transfer case. Air conditioning components don’t last forever either and are pretty expensive to get repaired.
I have long ago made my “last payment” on my car loan. As I tell my wife when I have to pay for a repair, “it’s cheaper than a car payment.” Indeed even in terrible years when I have replaced a transmission, averaged over 12 months its cheaper than a car payment on a new car.
So I will continue to drive my Range Rover until I can no longer find parts or some moron crashes into me and she is truly beyond repair. I’ll then find another and drive it until I can no longer find parts.