The plan this weekend was to do some welding. Unfortunately the welding supply store was closed. So I was unable to source the shielding gas I needed. That…was frustrating. I instead knocked out a project my wife has asked for “she claims” for 18 months. I’ll admit it was a while…but maybe only a year. In any event, the pantry portion of the former laundry room now has fancy shelves.
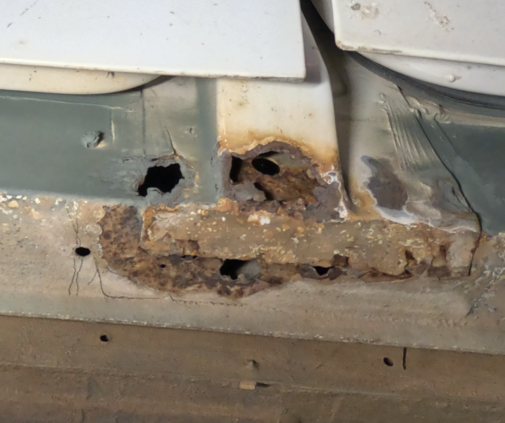
So today I did some more investigating of the rust, primarily on the A and B pillars at the sill. The B pillar is mostly rusted out. It is as bad as it looks and I’ll need to source the ready made B pillar lower portion. I’ve seen them online…but don’t remember if they are available in the US of A. I’ve found at least three businesses in the UK. Part is only about $33.00(US) the shipping to the US is the same amount. More research is needed, or I weld up my own version.
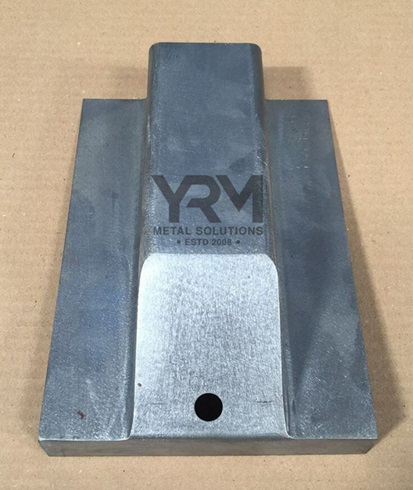
YRM B Pillar for Range Rover Classics and Disco 1
The A pillar has a hole next to it in the sill. I think it would be an easy patch to fix.
So this week I’ll get some more shielding gas and I’ll be ready to do some repairing next weekend.
Once again thanks for stopping by and for watching the videos.
Like and subscribe… Patreon if you like this content and want to help me keep this site up.
In this post I explore the rust under the passenger side fender well. It was my intension to WELD this weekend. Unfortunately I absent-mindedly did not turn off the shielding gas and the tank was empty. Major bummer.
So I took time to get the fender ready. I also cut my patches. I also installed the new gas tank filler hoses and my new gas cap. How exciting! It wasn’t.
I cut the fender rust out of the part where the body mount is. Turned out it was just the outer skin that had rust. I cleaned up the rusty metal underneath and will paint it with the magic rust-encapsulating-paint before I weld the patch for the fender back in place. Why Land Rover didn’t bother to try and keep rust out of there is still a mystery to me. It’s like they WANT their vehicles to rust out. What kind of a sales strategy is that?
I’ll need to get more shielding gas this week. However there is really NO RUSH because Christmas is this week and the house will be filled with people and very little in the way of rust repair will get done.
Like and subscribe to this blog and the videos. It really does help and it is much appreciated.
Okierover.com\Patreon
Thanks for reading and Happy Rovering and Merry Christmas from the Okierover family.
If you follow the blog you have seen the rust damage from open cell foam in the upper D Pillar. The foam got wet and over time ate through the pillar and caused a hole that allowed water into the rear. It wasn’t likely a “stream” of water as the pillar had a cover and the foam also blocked the hole.
In any event, it had to be repaired. I went to some effort to research the removal of the rear quarter panel windows. Damaging the seal is a non-starter. Replacement seals cost in the neighborhood of $500.00(US). And there is also a chance of breaking a window.
I had the Evil German Dude over for Thanksgiving and showed him the damage. He was pretty certain that I could weld a patch there WITHOUT removing the seal and window. Using caution and allowing time for the welds to cool, he was sure that the welding would not be a problem.
Trusting he was right, I proceeded to build a patch and weld it in. The patch was pretty easy to make. You’ll need a bench vise or a metal brake to bend the steel. Well…if you have to bend steel for your patch. I got the patch in place, wire wheeled the paint and primer away and started welding.
My first welds didn’t stick. I had to work through that. Some of the issue was a crappy ground point. The other could be paint I hadn’t removed. I finally sorted that out and made the weld around the piece. I will come back with some seam sealer and make sure there are no holes by sealing them with a bead of sealant.
I was a bit surprised at how well this went. I was expecting a much more complicated repair. I’m not in love with the welds. But such is the way you have to weld thin steel. They also are not in sight so they didn’t have to be pretty…and they aren’t pretty.
The temp cooled off this week. It was 40F degrees when I finished up. Funny how two and a half months ago the temp was three times that in the shop. We got a little reprieve on Sunday and it got above 50F degrees.
I’ve been kicking around an idea if the window had broken. Building in wing window storage boxes. I could use them to pass through power to solar panels, shore power, a heating tube for a propane heater, and the most exciting, water for showers and cooking/washing hands and such. I’ve got the bug so I may build a mockup with cardboard to see if it would work the way I’m thinking. It’s maybe a project for another day. You can check out this video which served as a good portion of the inspiration. Dirt Lifestyle has two videos on gullwing windows for his Discovery II. This is the latest [YouTube], and is an improvement of the original, enjoy.
I hope you enjoy the video of my work. Like and subscribe and if you want to help through a recurring contribution, Patreon is helpful way to do that.
I have official started the rust abatement on the passenger side rear wheel well. I’ve looked at it and took the stone chip back and overall, it’s not nearly as bad as the driver’s side.
I think it will not take too much to get this side repaired. Just 8 small spots of rust that will require patches.
I should have done more research. I didn’t account for the fuel filling hoses when I took the fender off. I didn’t need to remove the hoses. The top of the filler was only in place by a rather badly deteriorating rubber gasket. Which, as of this post, I have not found a replacement for. Also in doing this, I’ve decided it would be easier to replace the filler hoses than reinstall. They are 30+ years old and quite hard.
I found one hose on Rover’s North but the second smaller one I did not find. I may just take a sample of each and go down to O’Reilly’s and find the equivalent size hose from the “WALL OF HOSES”. They are usually pretty good about letting me go back there and matching up. If I secure hoses with this method I’ll put the part numbers in this post.
Next up will be cutting and welding the bits. I took the subwoofer out as it was in the way. The speaker inside was perished. I looked on line and found some comparable speakers. They look to be 6.5 inches in diameter and 3.5 inches in depth. I think I can replace it for as low as $90.00(US). I could spend WAY more, but I don’t see the point. I mostly listen to books on tape, books on CD, audiobooks when I drive. When I overland, more often than not, I just listen to the wind and the engine while I’m bopping down the backroads.
Now that I have the Range Rover flopped in the shoppe I can start on the rust abatement. But first, I thought I should get some oil and some other fluids and do some fluid refreshing. That was a great idea if I had done that BEFORE I started the Big White Bus. But the fact I was doing it AFTER I ran the engine, -2 points.
I loaded up one 5 gallon barrel of oil and headed to my favorite O’Reilly’s. When I got out of the truck my folly was apparent. I had successfully done an Exxon Valdez [Wikipedia] imitation. The metal barrel had rusted through the bottom and dropped 5 gallons of used oil all over the back of my F-150 and on to their Prince William Sound parking lot. I ran in and bought two bags of kitty litter/oil soaker stuff and with the help of one of the guys we spread all that all over their parking lot. I haven’t been that embarrassed in a long time.
I finished up the clean up of the back of my F-150 when I got home and started getting the rear passenger wheel off to start the investigation. The video shows I had a mostly optimistic view when I started scraping the rust. In comparison…the passenger side is no where near as bad as the drivers side wheel well. The rear window is another issue entirely but let me attack these one at a time.
I’ve got two holes SO FAR. I still have to get the wire wheel out and take the rubber back to metal where there are brown spots. The worst looking SO FAR is the bottom of the C Pillar is rusted out. The reason for the rust there is the sunroof drain hose exits there and the crappy plastic grommet did not keep water out. And it is entirely likely that there was nothing inside the C Pillar that would pass for paint. So that was an obvious place for rust.
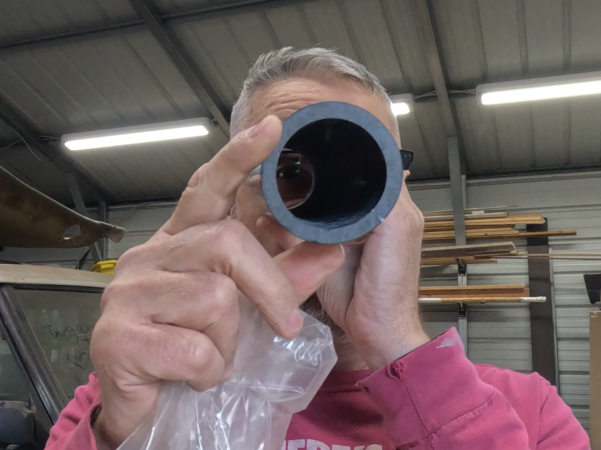
I’m going to replace the sunroof drain tubing and possibly fit a “Hose Barb Thru-Bulk Head Hex Union 90 Degree L Right Angle Elbow Barbed Brass Fitting with Flat Washer Gasket Water/Fuel/Air” fitting. Something like this….
I’ll add a rubber washer to assist in keeping the water out. I’ve got to measure the tubing and get the right one ordered. They can be found on Amazon.com. Not sure if they are using ID (inside diameter) or OD (outside diameter) to determine if I get 3/8″ or 1/2″.
This may be complete folly but what the hell right? If it works, I’m a genius. If it doesn’t work, I’m still a genius, just a terribly misguided one. Half of me says extend the drain line to behind the mudflap. It would not be that hard to add a little more distance to the hose and NOT put it back in the same poorly designed place. I mean seriously, lots of water and ice and mud and road salt and roadkill chunks (mostly opossums and armadillos and skunks) and all kinds of crap fly off the tires at extreme tangential velocity [Study.com]. The fact that plastic gromet is even able to not be dislodge is a miracle. So…let’s try to make it better!
The headline came out also so I could get the sunroof drain. It had to come out anyway, because it needed to be replaced…again. This will be the third and final. If this is needed again while I own this rig, it will be painted and forgotten.
More next week. Like and subscribe my Youtube channel. Send me a comment too…I love to converse with you.
In this video I’m wrapping up the quarter panel rust tasks. I got a rattle can of “bed liner” sprayed on. It took the entire can! I will probably apply another application just to be sure.
The fender install went “smoothly” until I realized later that I forgot to plug the light cluster in. So I got to do that job twice. You only get to see the excruciatingly painful initial time. I saw a funny meme. The scene is a spring install with the narrator saying something to the effect that doing a job required on both sides of the vehicle.
First time 2 days and 89 hours.
Second time 29 minutes.
Ain’t that the truth though! So it’s been a hot minute (as my kids say) since I reinstalled a fender. So it went not quite so well the first time. I did cuss some. But that’s the nature of working on cars after all, is it not?
I talk about having to remove the glass on the passenger (starboard) side to complete the welding that needs to be done on the D pillar. I also talk about how outrageously expensive new window seals will be.
I did watch a couple of videos on how to do it. One of them is listed here:
The the hell is “duck water”??
So you can see getting the window AND seal out in one piece is going to save me a LOT of money.
Lastly I tried to start the Big White Bus. After charging the batter over night, she would not start. I got one cough, but otherwise a whole lot of nothing. The relay is working, but I am not hearing the pump run. I’ll need some help with diagnosing spark and electrics at the pump. So I put this off until next weekend when I can either get my buddy Larry over, or press my son into service.
I also tried out a new camera. My son had a GoPro Hero 5 just sitting around so I
confiscated itindefinitely borrowed
asked him if I could use it. Yeah, he’s not likely to get it back. I bought a new SIM for it. The SIM I was using doesn’t work in my Hero 11 and gives me a message about that. The Hero 5 did not give me a similar message so I thought it was good to go. It was not. So you missed out on 5 minutes of riveting footage of me walking back and forth in front of the camera and using a dustbin to sweep up and spraying bedliner. I’m sure it was the difference in this week’s video being a smashing success. Que sera, sera.