In this episode I install some shocks on the old Range Rover Classic. I went for the basic shocks this time. Ordering these from Atlantic British resulted in Boge brand shocks for the front and Girling for the back. The item should have been four from Boge, but I guess they didn’t have the stock and swap the parts for what they did have.
I went about installing them and guess what I found??? RUST. I know, you are shocked, but it’s true. The cups that hold the rubber bushings were very rusty. I cleaned them up the best I could and painted them with Rust Inhibitor paint.
I have no fantasy in my mind that this will stop the rust, but it did FEEL good to try. Also the nuts were VERY corroded and were quite a chore to remove. In order for me to not go through that again, I added some anti-seize goo to the thread parts of the shock. It won’t affect the nuts staying in place because they are nylocs.
The install went about as I expected. I did one front and one back for the video. I’ll do the other half next week and start looking at all the parts that have to come off to replace the bushings.
Thanks for reading, like and subscribe if you watch the attached video, and Happy Rovering.
I am still recovering from my back injury. I am able to unbox my bushings and shocks. Boring I know, but you do what you can when you are not quite 100% (or even 60%). Next video will be an install video for shocks for my Range Rover Classic Overland Rig.
I bought the basic shocks and a set of bushings. The rubber type. No matter what I read about poly bushings, I have experienced them failing. They are good for about 5 years. For half the price you can buy rubber bushing that last twice as long. I fell for the hype one time. Not again. If I could get OEM rubber bushings I would install them every time over poly.
The shocks I ordered were also the basic shocks. I could have popped for another set of Terrafirmas or Old Man Emu but I am on a budget. The Big White Bus had Old Man Emus on it when I first swapped the shocks. At that time I put Terrafirma on her. They served me well and I have no complaints.
So this time I went budget and if I notice them failing in the future and my need for better shocks comes up again, I’ll investigate a “name brand”. Girling is a recognized provider for British autos and motorcycles. I make a joke in the video about “girly” shocks, I’m sure these will be fine for the type of driving I do. The front set is Boge which is a German brand. I’ve never heard of them. I’m sure they will be fine too.
The next step will be removing all the suspension parts that are going to get new bushings and taking them up to my friend’s shop to press the old out and the new in. How exciting! I wonder if Mike will quote another “Love Buffet” song for us? Love Buffet’s lead singer passed away in 2024.
Thanks for reading, like and subscribe, and Happy Rovering.
In this post I explore the rust under the passenger side fender well. It was my intension to WELD this weekend. Unfortunately I absent-mindedly did not turn off the shielding gas and the tank was empty. Major bummer.
So I took time to get the fender ready. I also cut my patches. I also installed the new gas tank filler hoses and my new gas cap. How exciting! It wasn’t.
I cut the fender rust out of the part where the body mount is. Turned out it was just the outer skin that had rust. I cleaned up the rusty metal underneath and will paint it with the magic rust-encapsulating-paint before I weld the patch for the fender back in place. Why Land Rover didn’t bother to try and keep rust out of there is still a mystery to me. It’s like they WANT their vehicles to rust out. What kind of a sales strategy is that?
I’ll need to get more shielding gas this week. However there is really NO RUSH because Christmas is this week and the house will be filled with people and very little in the way of rust repair will get done.
Like and subscribe to this blog and the videos. It really does help and it is much appreciated.
Okierover.com\Patreon
Thanks for reading and Happy Rovering and Merry Christmas from the Okierover family.
In this short video I take care of the surface rust I found under the passenger side fender. There were some unpainted surfaces notably under the rubber washers at the top of the quarter panel. There were also some pin hole spots of rust.
They look like dirty spots until you put the wire wheel on them. Is that primer? this stuff Land Rover used under the panel just flaked off in spots. In the video there is a segment that has some leopard spots…that’s where the paint just came off.
The two rust spots in the arch will be ground down again. I don’t think I need to fix them, just stop the rust. The holes are on the outside of the vehicle so water getting in won’t be from these two spots.
I wire wheel all the rust I could see. Then I washed the panel with acetone. This was to remove any lingering dust, dirt, oil, whatever.
I then coated the panel with primer in a green color I really like. I could see myself driving a vehicle painted like that. I’ll watch the weather and give it all a second coat when it warms up a bit. The temp in the shoppe was 54F when I started the work and 52F when I started painting. That’s just barely above the paint range listed on the side of the can.
A big shout out to my fans in Norway. 31 views from that country on 12/12! Tusen takk!
If you are enjoying the content, like and subscribe. Okierover Patreon.
In my previous post I talked about the fuel pump and it’s lack of suckage of fuel to make the Big White Bus go down the road. Or more importantly in the short term, get out of the shoppe so I can proceed with the rust repairs.
I ordered the fuel pump from Atlantic British. As I’ve said earlier. If you order from them the part will not officially ship until the day after the first business day in which they receive the order. So if you order on Saturday, they will see the order on Monday, and it will be picked up on Tuesday. Then it will be in transit. For us here in the central southern plains that means a minimum of 6 days to arrive. I think I got this one in 7 days. I’ve come to accept this as the way it’s gonna be. Since the Range Rover is not my daily driver this does not upset me anymore. It just takes extra planning when you need something.
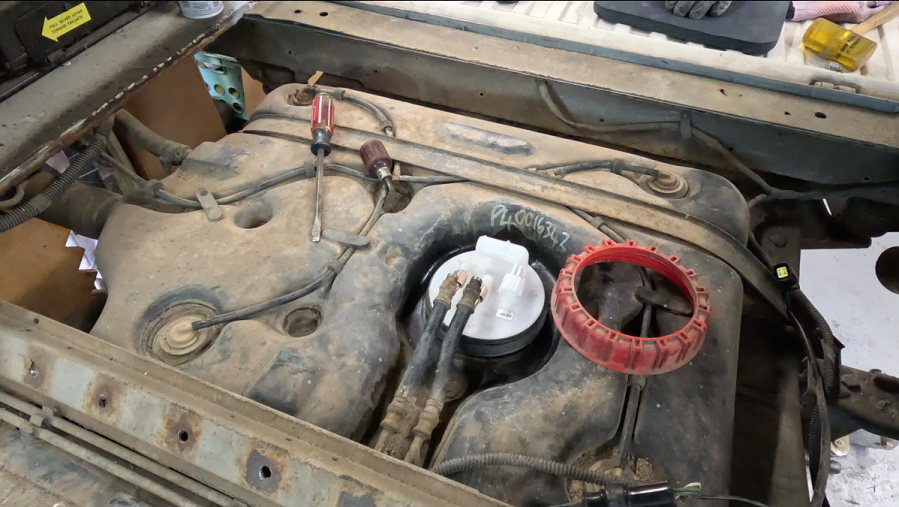
Removing the derelict pump is pretty easy. Turn the ring first. This may take some tapping with a screwdriver and a hammer. Take it easy and take your time. Don’t damage the ring.
The second step if it wasn’t your first step is take the fuel lines off. You will need a pair of 15mm wrenches. Once the lines are out of the way you can rock the fuel pump back and forth while pulling up. It will eventually come up.
The “bowl” will have fuel in it commiserate with how full the tank is with petrol. Pour this out while the fuel pump is still over the tank opening. Be prepared to clean up some petrol if it spills.
Reassembly is a reverse of the process. The most difficult of the tasks is getting the rings of the seal past the tank opening. You can gently coax it past the lip with a flathead screwdriver and steady pressure pushing down on the pump.
Is there a way to use a lubricant…maybe, I didn’t research that. I’ve never used lube for the install, so its not necessary for success.
Take it easy with the float and its electronic bits. Don’t bang it around.
That’s about it for the swap. I need to test the pump and get the the BWB running again. I’ll give it some test cranks to get fuel back up to the fuel rail then reinstall the plugs and fire her up. If I’ve sorted everything we should have a running Range Rover.
Thanks for ready and Happy Rovering.
Like and subscribe if you want to stay current on my video posts.
Contribute to my Patreon account if you are also inclined.
I have fired it up once since I parked it in my newly constructed shoppe 5 years ago. I guess I should have expected there would be “issues”. But I wasn’t expecting the issue to be this one.
Mr. Fisher came over and we diagnosed the issue. We started with checking the power at the pump. As you may be aware, when you turn the key over it powers the pump briefly. So if you just “turn on the key” and go back there to check the voltage you won’t find any. That’s why it takes either some seriously creative use of a volt meter or you get one of the bestest friends to come over and turn the key for you. We had voltage all the way through the wiring harness.
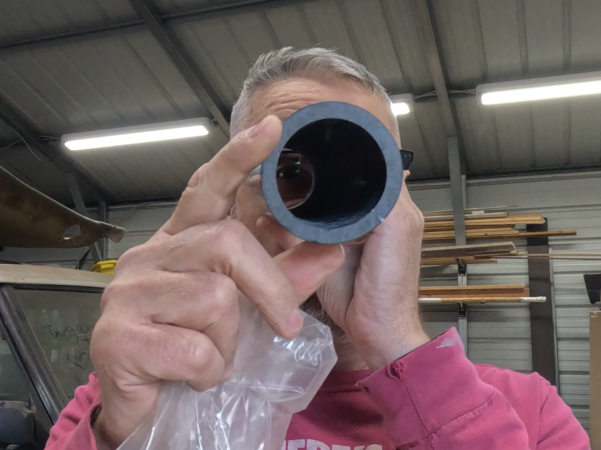
We then confirmed we have spark from the ignition system. I pulled the number 1 plug and with a screwdriver I grounded it and watched for spark. You can buy a fancy spark tester, matter of fact I think I own one. I have no idea where it is though. Spark confirmed.
So we have two of the three things (Meatloaf would say that “ain’t bad”) to make the vehicle run. Air and Spark. Now why aren’t we getting fuel.
I pulled the gas line off at the regulator on the back side top of the engine and had Mr. Fisher crank the ignition. We should have had gas squirting out if it worked. It did not. This fit with me NOT hearing the pump run when the ignition was turned over.
The only thing left was to pull the fuel pump and do a visual inspection. What I found was not expected. I said, “Wow.” a lot in the video. There were several parts that were obviously degrading due to being submerged in petrol for so long. There was visible rust on the steel parts as well. Generally the pump was in a terrible state. I was not aware that petrol would do that to those parts. The only gas I ever put in my Classic is 100% real gas, unless I am in Texas where they only sell ethanol (at least the last time I was buying gas there). You would expect ethanol to eventually separate and turn to water. You can read all about that on the Road Guardians website.
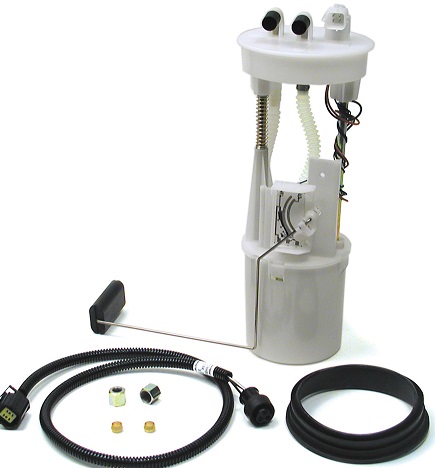
I will be replacing the fuel pump and have ordered the part from Atlantic British. I found some that were cheaper on Amazon. But my skepticism and need to have it delivered before next October weighed heavily on my decision where to purchase. The pictures all looked like the pumps were manufactured in the same place. Same white plastic. Same blue plugs.
PRC9409K
If you look on Amazon you’ll see the pumps look like the same ones. If I had unlimited funds or sponsorship, I’d buy one from everyone and do a side-by-side comparison.
All this “BUY IT NEW” has me thinking about what this would cost if we just fixed the pump. All you need to do is replace the pump in the collector can (that bottom part). I’ll do a post about that in the coming weeks.
So…do I drain the tank too? If the gasoline HAS turned to varnish I should probably put some treatment in there. I’m thinking I’m gonna add a silly amount of STP Fuel Injector cleaner in that tank. I can say, WHEN I get it running It will run for quite a while before I shut her down. I want to give the truck plenty of time to dislodge any crap in the fuel lines. I’m also guessing I’ll need to swap the fuel filter too.
If its not one thing, its another. It really, never ends.
Mr. Fisher also brought over his Viair Compressor. We spent some time looking at it and checking out all its features.