Broken Bits (Post #431) 1/6/2014

During my recent repairs of radiator cooling fans and power steering hoses I came across a couple of broken bits. While discussing the electric cooling fan project with the Evil German Dude we noticed the belt that drives the air conditioning compressor was very loose. So while I was under the bonnet for the hoses I thought I’d just sort that out. I didn’t have the replacement hose and it was New Year’s Day so there was no way to get the hose.

I got the pulley in place and began tightening the bolt on the belt tensioner. It never got tight. At some point I decided something was not right at all. At first I figured the bolt was stripped. That has been my experience in the past so my brain naturally went to that first.

I removed the bolt and the bracket and found…
it was broken. Wow. That is disappointing. As you can see in the picture above there are two of these on a Range Rover Classic 1987-1994. The 1995 model has a spring driven unit. This spring driven unit is common to most “modern” cars. This friction method is serious old school. I didn’t say better, I said old school.

I knew finding this part was going to be a nightmare. I immediately called Paul Grant. He is a master of parts and he told me he thought he had one in inventory. I ordered it. It should be sitting in my mail box when I get home today. According to Paul, these are threaded on opposite sides so the one that works for the AC belt will not work for the water pump belt. I’m guessing this is going to added to the list of parts I pull from Range Rovers I find in the breaker’s yards. If you are looking for parts I highly recommend Paul. Stop by his eBay Store and buy something.

The second wasn’t really visible until I had the belts out of the way. Some how the Oil Pressure Switch lost its spade connector. I had noticed a couple of wires loose but was unsure where they went. The spade end doesn’t look like any thing I’ve ever seen before.

The oil pressure switch is found on the side of the engine right where the oil filter is screwed on. I know I’ve changed my oil at least once recently and I should have noticed this but didn’t.

I did find an interesting thing when researching parts sites. Rover’s North lists this part with a really great diagram of it’s identification and location. It also lists for 54.95$(US). However on the Atlantic British site it lists for 7.95$(US). On the Rovers North site similar ones for Discovery II’s also list for 8.95$(US).

I find that a helluva difference in price. I’m almost afraid to ask why. I think I’ll order the 7.95$(US) one from Atlantic British. I’m running out of funds for this round of repairs and I still need to purchase some oxygen sensors.

In my quest for improving the gas mileage by swapping to electric fans I will need to only change one variable at a time. There are potentially four things I believe I can do to improve gas mileage:

  • Remove roof rack (this one is obvious)
  • Replace oxygen sensors (when they begin to fail you will notice fuel use go up)
  • Replace my mechanical fan to electric fans (increased torque and horsepower)
  • Reinstall the air dam (another obvious one)

For the sake of the scientific process I think I’ll change only one variable at a time. I can run a couple of tanks of fuel and get a few MPG readings. I’ll report them all back as soon as I get the data.

Thanks for reading,
You are driving a brick what do you expect your gas mileage to be?
and Happy Rovering.

Brake Caliper Failure (Post #364) 7/2/2013

I’m pretty sure that should be dry.

Look what I found. No, not the rust on the splash guard, I expected to see that. The left front brake caliper is leaking. I’ve been hearing a pop on that side ever since I replaced the left rear brake caliper. I was just about ready to send the old gal to the shop for some fresh springs and air conditioning and then this.

I rebuilt all the calipers about three years ago, or was it four? I had trouble with the right rear staying together so I replaced that caliper with a “professionally” restored unit. I’m pretty happy with having 197,000 miles and one rebuild before a replacement for this part.

This may explain the ABS problem I’ve been having of late. When the brake is depressed (pushed down, not emotionally upset) it is hard (as expected) and is stopping but as the brake continues to be pressed it the braking really picks up and decreases the speed very quickly. That tells me something is not quite right time for a replacement.
More after the jump….

Upside down, stamped on the front axle.

When ordering a brake caliper you will need to know your axle number. My 1993 Range Rover LWB is axle number 57L03581A. This will tell the parts man which caliper to send you. The differences are also noted by the type of bolt used to mount the caliper to the axle. Either a 7/16th bolt or a 12mm 12 point head. I’m sure if you pull yours off and inspect the bolts you’ll know which one to order.

I’m looking all over the internet for the part. Rovers North has a unit for 149$(US). Atlantic British has one listed for 199$(US). I’m hoping for a price match. There are some other units available under a hundred dollars. One was “out of stock” and the others did not give me any confidence in who I was ordering from. These are brakes (read that as mostly important) so I’ll stick with companies I’m familiar with.

My grand kids came over while I was researching parts. While their dad and mom ran errands and I was awaiting a response on a price match request from Atlantic British we ate Jell-O and made funny faces. You might say I was encouraging them.

At this point I’m wondering when the caliper will arrive, what with the Independence Day holiday being mid-week. I’m too cheap to have it over-nighted. And when I’ve asked for “priority shipping” it always seems to arrive on the day it would have if I just order the “whenever you get around to it” shipping. If it arrived on Friday I could work on it that day. Saturday is out, Sunday would work but I’m not sure it will arrive by then. So I’m looking at a weekday evening.

Phone rings….
Bully for me, it looks like Atlantic British is going to price match for me. So I got that ordered and I’ll be ready to swap it when it finally arrives. I always enjoy talking to Eric at Atlantic British. After we briefly kibitz and share a joke about my new credit card number and being on a budget, he says it will be here Monday or Tuesday. Indeed the Independence Day holiday has things mucked up a bit.
Thanks Eric (and AB) for the price match.

I told Mrs. OkieRover that I thought I was getting close with the repairs. I’m guessing that was probably in vain. The circumnavigation of Oklahoma is still in the works, with every repair I grow more confident. The Big White Bus is a twenty year old British automobile and I’ll probably have something to work on every week until the rust wins the battle.

Thanks for reading and Happy Rovering.

Code 17, Not As Cool As It Sounds (Post #334) 4/30/2013

This has been an interesting 24 hours. So this weekend JagGuy was showing off a throttle position sensor he bought cheap. It was an omen of things to come.

On the way into work today I had an engine stumble at highway speed. Thirty seconds later another. And a minute later…it was very disappointing. My first guess was not the throttle position sensor. I had suspected I was having alternator issues.

I got to work and thought nothing more about it until lunch. I came out, started her up and the Check Engine Light came on. “Good,” I thought. “At least now I know it was something with a label on it.” I got to my favorite Monday lunch spot, VZDs (VZDs.com). I went around to the passenger side and looked at the Code Reader. 17.

I went in and ordered the meatloaf. Its made with ground buffalo. So delicious. I looked the code up on my Samsung 3 smart phone and confirmed what I had guessed. That is the throttle position sensor code. I finished lunch by checking for a replacement part.

Atlantic British has a replacement for 449.95$(US). That is roughly 1/5th of the value of my Land Rover in it’s current state. I can’t do that. I sourced one from eBay for 80$(US) used. I will continue to do this and pull parts from the breaker’s yard as long as I can.

I had an errand to return some fencing bits to Lowe’s that we didn’t use to fix my former neighbor’s fence. I drove home with lots of stumbling along the way. I thought it was the TPS so I swapped it with a spare from my supply. I got about 2 miles from the house and the Big White Bus coughed and shut down. I coasted to a side street.

Just before she shut down, the tachometer stopped working. That is a tell-tale sign the alternator is dead. So to review:

  • I thought I was having alternator issues two weeks ago.
  • The alternator light occasionally glows when I have the lights on.
  • The tachometer stopped working.

I called JagGuy to confirm the theory, he concurred with my hypothesis. My awesome neighbor Larry was the first to answer his phone when I called and after delivering a pizza to his wife, he came and gave me a jump. The charge was just enough to get me to the Walgreen’s across the street from O’Reilly’s Auto Parts. The plan was to have them check the output on the alternator and the condition of the battery.

Instead they had to charge the battery just to test it. I grabbed some dinner and waited. Jacob said it was done and tested good. I grabbed some nitrile gloves and the oil change stuff for our Honda CR-V.

I installed the battery and it was enough charge to get me back to Casa de OkieRover. It occurred to me that I had a spare OEM alternator on the shelf. That last trip to the breaker’s yard has turned out to be very fruitful. I installed it and it worked as expected. No troubles.

I bought the dead alternator from NAPA Auto Parts in 2005. That one failed in 2008 and under warranty I replaced it. Turns out it is time for a third. I see on the invoice that I paid 335$(US) for it with a lifetime warranty. If I replaced it today:
Atlantic British charges 359.95$(US) for their rebuilt 100 amp alternator.
NAPA is offering one from 213.00 to 279.00$(US).

So that’s the good news in all this. I have a spare alternator and I can get the replacement part as early as tomorrow because their website said they were in the warehouse and its FREE…AGAIN.

I should have the original receipt laminated. That thing is really paying off. JagGuy suggested I keep the OEM in the Range Rover until it dies. I probably will.

I have a TPS coming in for 80$(US) off eBay. I think that’s a fair cop. Beats 450$(US) all day.
I will have a spare alternator on the shelf by the end of the week.

I still need to figure out what broke on the sunroof.
I still need oxygen sensors. I will probably buy those the first week of June.
I still need a sound system. JagGuy said he would help with that. I have fond memories of his radio in the red van.
I still need air conditioning. Mrs. OkieRover will not tour with me in the Big White Bus without it.
I still need the springs installed. I am going to pay Mickey’s Garage (Google+) to do that for me along with the air conditioning.

So you can see this looks like the summer of electrical gremlins. This is the first thing that comes to mind when gremlins raise their ugly heads.

Diabolical sabotage!

Thanks for reading, and Happy Rovering.


Rust and the Art of Welding (Post #332) 4/22/2013

Do you know what this part is?

Nope, it’s an upper shock mount on a Range Rover Classic. Wait, what? You guessed that right? Bully for you. This weekend I climbed under the Range Rover to swap out the old and tired Old Man Emu shocks I bought in 2001. Before it was over, I had ordered two of these.

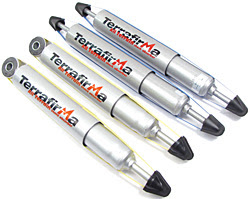
I sourced a set of Terrafirma shocks from Atlantic British and they had been languishing in their boxes on my garage floor. It was time to replace them.

The front shocks on went without a hitch. However the rear shocks were quite the ordeal to remove. It required me using the electric impact wrench. (Brilliant tool, by the way. If  you don’t have one, get one.) The rust was terrible. I have pictures to share in another post.

The nuts were welded to the shafts with corrosion and after hitting them with the impact wrench they just spun on the shafts. I had always wondered why people buy shock mounts, they are made out of metal right? How pictures have you seen or witnessed in person a person breaking a shock mount on the trail? I used to think these things were from hard use. Apparently they are from “use”. The part is shipped from the factory unpainted and you know what that means. RUST.

This means that after just a few years the rust has begun and the structural integrity of that part is being compromised. After climbing around under the Range Rover this weekend I was really surprised at how much rust was forming on the parts I had painted with Marhyde Self-Etching Primer just a summer ago.

If I had the budget and time I would probably pull the major bits and have them all powder-coated. But that is not really practical nor affordable. If I were doing a FULL RESTORE it would be. But I’m not, so I’ll just chase the rust around, part by part.

Speaking of rust, I noticed the brake calipers on the rear are really nasty. I replaced the right rear brake caliper a year or two ago when I noticed my second caliper rebuild failed. Frustrated I sourced new brake calipers. I did not paint them at the time thinking if I needed to return them under warranty they would not take them back. That left them with what ever they were coated with to rust. Turns out they were coated with Pre-Rust ™. Yes, I just trademarked that product. I will show a picture of the right side rear caliper in a future post.

After pulling the wheel to remove the shock, it turns out, I will need to replace the left side brake caliper as well. It does not seem to be contacting the brake disc. I may or may not have mentioned already that I have a pop when I apply the brakes and I would bet 100$(US) that this caliper is sticking and the culprit.

So what started as a Difficulty Scale 1 shock replacement, is going to be four jobs:

  • Replace Upper Shock Mounts
  • Rust Abatement on Right Rear Brake Caliper
  • Rust Abatement on Left Rear Brake Caliper
  • Replace Left Rear Brake Caliper

I think I will pull the right rear caliper and take it to JagGuy’s shop this coming weekend and sand blast the rust off. Then everything will get two coats of primer and get slapped back on. I wonder if anyone makes a “portable sand blaster”? I’m guessing Google is going to get work out on that search string later today.

I missed SCARR this weekend (http://scarr.texasrovers.org/) I really wanted to go but the time was not available. And as it turned out, my Range Rover wasn’t ready either.

Happy Earth Day. I hope it was awesome for you. In honor, I cut down a tree Sunday which was encroaching on my swimming pool. Up with people! (there will be no singing).
Smoke’m if you’ve got’em.

Thanks for reading, and Happy Rovering.

Fuel Pump Replacement (Post #326) 4/5/2013

196,000 miles out of one fuel pump. That’s pretty good. But as you have read in previous posts it was time for a new pump. Let’s first sort out the process for testing the fuel pump.
Checking for fuel at the fuel rail was first. I disconnected the fuel line from the fuel rail.
Remove the hose clamp. Place a rag, preferably a large one like a t-shirt under it. You are checking for fuel coming out. WARNING. When you turn the key to the on position it activates the fuel pump. The fuel pump will run for a short burst to pressurize the rail. It will then shut off. A lot of fuel will come out when you turn on the key. It may even shoot out on to the engine. DO NOT DO THIS WITH A HOT ENGINE.
When I disconnected mine, no fuel came out. So that told me the pump did not run. So I climbed in the back and disassembled the back to get to the fuel pump access panel. Some time in the late 1990 models they started manufacturing an access panel to repair the frequently failing pumps.
I wanted to first check to make sure I didn’t have a blown fuse. I couldn’t remember which fuse was the one for the pump. So I pulled all of these and checked for a blown one. I also reseated the fuel pump relay (silver one) located between the green and brown items. All the fuses were good. On to the pump.
Remove the carpet and the dogs from the rear of the vehicle and access the panel.

I don’t know why they think it is okay to get in the back of the Range Rover.
Luna and Paisley
Remove the six screws. Move them to a safe place. Remember you are about to open the fuel tank. If you have something that might fall in the tank…it will fall in the tank. Secure all loose items NOW.
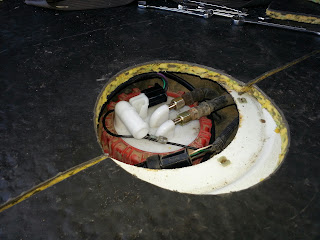
After you are open you are dealing with two fuel lines, a ground wire, and the power connector.
There is also a fair amount of dirt under there. I used a shop vac to get as much as I could to eliminate debris from getting in the tank. Vacuum before you start to remove any bits. Vacuum again after you have knock the wrenches against stuff.
Pull the connector and set your volt-ohm meter to volts. Have someone turn on the ignition. You will see a voltage spike for a few seconds. Remember the pump only runs for a few seconds. I checked across all the combinations of wires. I had power to the plug so….it had to be the pump.
Disconnect the fuel lines and the ground wire.
You are going to use a mallet (I used a rubber one) to hit a large flat-head screwdriver to turn the ring. They make a special tool for this…I didn’t buy it. Take your time and lightly tap this ring until it spins enough times to remove it.
The next series of pictures is me pulling the pump from the tank. 

Holding the fuel supply lines out of the way.

Remember the fuel level indicator is connected to the float. So as you are pulling it out you will angle the pump to slide it out. The lower part of the pump is a sump that keeps fuel around the base of the pump. This way the vehicle is not starved for fuel when the tank is low and you turn a corner and slosh the fuel to one side.

So as you are pulling the pump assembly out. Let the fuel run out of the pump. This will prevent fuel being spilled in the cab.

Fuel draining out.

I inverted the pump and drained more fuel out. You can see the official Land Rover Tool Kit in this picture. I needed to use it due to having an insufficient collection of tools in my tool bag. I remedied this by purchasing a socket set for the on-board tool bag.

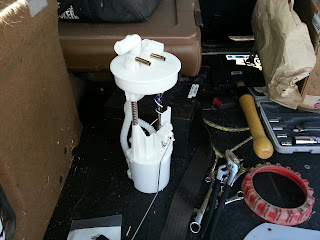
Once I was back in my garage I took the old pump apart. Look at the debris attached to the filter. NASTY!

Look at the debris in the bottom of the “starvation tank”. 

While I was sourcing a new part I just placed the access panel over the hole and replaced the carpet.

I ordered a new pump from Atlantic British and paid the up charge for it to be delivered in 3 days. 300$ for the kit. I originally intended to repair the old one. I talked myself out of that due to my schedule this week. Two assignments, a test, and the weather (four inches of rain in four days, thank you God.) made this an easy decision. I will rebuild the old pump with a replacement pump. I expect it will cost less than a hundred dollars to replace the pump portion.

With the new pump in hand, I went about installing it.

I placed the rubber seal in the tank and then fitted the pump through the seal. It was a tight fit. You then screw down with the red securing ring. Use the screwdriver and rubber mallet. Take it easy and take your time. No need to use the mallet like Thor uses Mjölnir (Wikipedia).
Connect the power connector pig tail thing they send in the kit. Reconnect the fuel lines. 
With the access panel still open, I started her up. I watched for fuel leaks. NONE. So I buttoned everything back up.
I drove the Range Rover over to Braum’s in Tri-City to have ice cream with my grand kids (and my daughter and son-in-law). I had a single dip of chocolate chip on a sugar cone. Yummo.
The Range Rover ran great. I noticed the fuel gauge had me at a quarter of a tank. With a new pump and new indicator I thought it prudent to fill the tank and make sure the gauge was working correctly. It was all good and showed a full tank.
I pulled over in the parking lot of the Chickasaw Nation Training facility. This is the old T.G.&Y. building. I really loved that job. I called JagGuy and chatted about lots of stuff and he looked up replacement pumps will we gabbed. I’m lucky to have him, both as an automotive resource and friend.
As I was chatting I saw the state bird of Oklahoma, a Scissor-tailed flycatcher fly by. Spring has officially come to Oklahoma.
On the Difficulty Scale I’d rate this a 2. It is not difficult, just a tad fiddly.
Thank you to Justin and Lecia for letting me maroon the Range Rover in their driveway. Thank you to Lecia for helping me check for electrical continuity by turning the key while I was in the back.
I am heading to Fort Washita for the annual rendezvous this weekend. Get out and support your local historical society this spring.
Thanks for reading and Happy Rovering.

Terrafirma Springs and Shocks (Post #314) 1/17/2013

Last week I ordered a set of Terrafirma shocks and springs for the Range Rover Classic from Atlantic British. They should be arriving any day now. The springs and shocks on her now are a bit tired.

I currently have a set of Old Man Emu shocks that I bought the same month I bought my Classic. That was June 2000. I figure they are probably ready for replacement. While working with the front shock in my recent attempt to repair the left front shock mount it seemed to perform as expected. I’m not a suspension expert but I figure 120,000 miles on a single set of shocks is a bit much. For the record, I did not have a single complaint with the Old Man Emu shocks.

The springs in my Range Rover were put in to replace a failing air ride system. I’ve always felt they were a bit tired and the install was always a concern too. I have it on good authority that it was done “as standard”. But with out retention rings I always thought something was going to go horribly wrong. Luckily it never did. So next week baring winter snow storms I’ll have new springs to install.

I’ll need to source a spring compressor but I think I can rent one from my local O’Reily’s Auto Parts store. That is if JagGuy doesn’t already have one.

I think the silver color will go nicely with all the gray bits I’ve painted over the last couple of years, don’t you?

 Thanks for reading and Happy Rovering.