Panel rust and rust in the cargo area (Post #189) 7/20/2010

Welcome back dear readers. Multiple post in one week? What is wrong with me?
As promised in yesterday’s post I said I’d come back with the pictures and descriptions of the rust in the rear of the Range Rover. So here it is.

I have always seen the rust bubbling up on the rear of the Range Rover. I vowed I’d get to it eventually. Eventually is here. If you see rust in one place, its a good idea to look for it in other places. That couldn’t be more true on a Range Rover Classic.

A note here about quality. I find it entirely unacceptable to produce an automobile that is as capable of off-road adventure like this…

…and then to fail to use materials that protect it from the elements. The rubber pads and bits and pieces that cause water to be trapped against metal and allow rust to take hold is unforgivable. If you intend to use your Land Rover for these kinds of activities, take it apart and coat the entire thing in some sort of water proof bed liner, like Line-X or Rhinoling. You’ll save yourself hours and hours of frustration later.

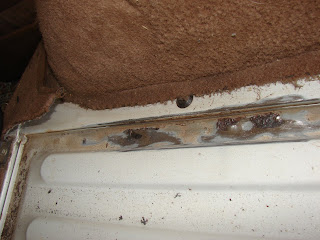
Back to the tailgate rusting. I decided, if there was rust on those parts, what on earth would I find if I pulled the carpets off. Well I’ll tell ya, more rust. Rust on a scale I did not expect to be quite honest. The rear tailgates of the Range Rover are not noted for their water tight seals.

What I found under the carpets disappointed me greatly. The good news is that as I posted yesterday, my best friend JagGuy said, “…that ain’t rust.” His observation was a comparison to the rust he finds on his Jaguars and M35 trucks. Compared to them I was mostly rust free! We know that is not the case.

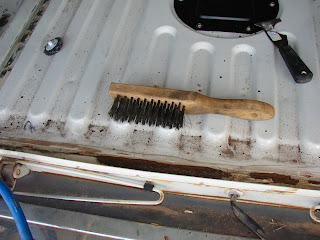
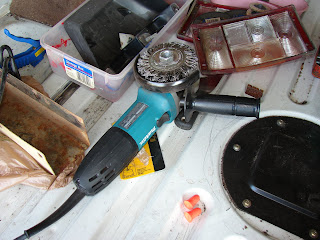
The treatment for rust is to remove it with extreme prejudice by all means in your power. For that I bought an angle grinder and some aggressive wire wheels. On advice of the Evil German Dude I got a Makita from Home Depot. You can see the ear plugs in the lower portion of the picture and wearing more or less protective clothing is a must. As always, wearing goggles is key to not wearing an eye patch pirate style for the rest of your life. Patches used to cover your empty eye socket are albeit very cool and interesting conversation pieces do not help you gauge distance while driving.

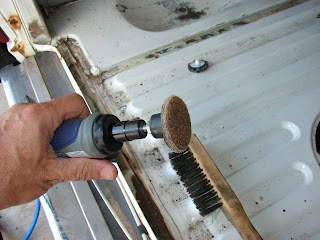
The angle grinder has more than paid for itself in time already. After getting the discs for cutting and the wire wheel, I’m out about 75$(US) for this time saving device. The honest truth about it is, I don’t have the patience to use a wire brush vigorously enough to bare metal.

JagGuy suggested I get a brillo pad like wheel and just use that. I have a new air grinder and attempted to use the brillo pads. They worked pretty good but they were not getting me down to BARE METAL. Besides that I could only use the air tool for about 5 minutes and then I had to wait for my compressor to catch up. My Campbell Hausfeld air compressor is louder than its small size would indicate. When it is running you can’t hear The Clash belting out their motivating sounds. In defense of the other rust removal methods, you can’t hear the music with any of the power tools in operation. My air compressor was hot enough to melt the plastic covers when I retired it at the end of the first day.

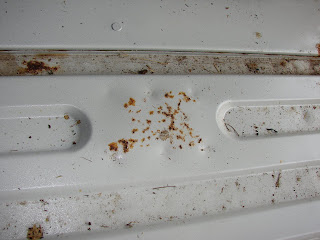
As before there is a pre-picture and a post-picture of each area. Keep in mind I will hit everything one more time with the grinder for good measure before painting with acid etching primer. The flash lights up rust nicely and you can see the parts I missed in some of the pictures.

The question remains, which product to use for the rusted through parts? Waxoyl or copious amounts of Rustoleum? This is where you have to apply serious amounts of patience. The Rustoleum approach is using ridiculous amounts of paint, to the point it drips off the parts and then waiting at least a week for it to dry. Waxoyl is not a product I’ve used before so further research is required.

My plan is to remove as much as possible with tools and use acid etching primer. On those parts I can’t get tools on or paint directly on, are the parts that require the products listed above. There is a healthy amount of “how much of this is seriously necessary?” going on as well. It is a 17 year old Range Rover. As all cars do, it will rust. Eventually you have to get to the “this is silliness” level of labor and move on to “thats good enough”.

So from that you can conclude that I’m probably not going to do this job again. Anything short of me putting my foot on the floor board and it extending through the floor Flintstone’s style I’m most likely not going to be doing this level of project on the beloved Big White Bus. This vehicles function is to haul stuff. Primarily to haul me, to and from historical events and hopefully my family on a couple of camping trips this coming fall or spring. The mechanicals are far more important than the cosmetics. Momma likes her air conditioning if you know what I mean.

After all the primer is applied I have sourced a company in Norman to buy matching the white paint of my model year and they have a clever method of getting it on to the metal. More on that when I get to that stage.

Lets look at some rust!

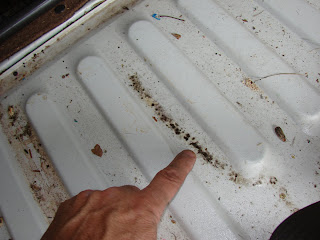
Bed rear from the driver’s side to the passenger side.


I cut back the pitted and rusted metal parts on the gutter portion seen above. I will just paint this and clean up the edges a bit when I’m done. None of this is visible after the carpet is put back in.

Inside the cargo area.


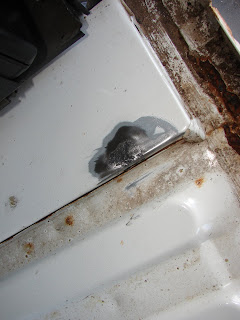
Oxidation from the roof and the outer panels

The oxidation will be taken care of with a buffer and some Meguire’s. I also found some mildew under the rear bench on the bed. This is not surprising from the amount of wet gear we packed in the back during the second consecutive Fourth of July rain out at the Norman Day celebration. I have made it a habit to wipe everything down with paint thinner before continuing. So there will be no organisms living back there when I’m ready to paint.

The next post will get me totally caught up with the pictures and work I have done so far. I will show the work I’ve done on the tailgate, which you are all aware is a famously rusty bit of trouble for Range Rovers Classics. When Edd China was restoring the Range Rover for the Wheeler Dealer show he just replaced the entire tailgate in leiu of wasting the time to get the rust out and off.

You can catch the rest of the episode if you are interested by using the links on the right side of the YouTube page. This is from part 2. He (Mike) sources the tailgate and door from a breakers yard (how quaint) at 7:20 and replaces it in the ninth minute.

Well that gives you a ton of material to look at and roll around until the next post.

Thanks for reading and Happy Rovering.
Special Forces Shovel : Cold Steel Throwing Shovel (Post #184) 7/6/2010

I just found my next addition to the Range Rover Expedition Kit. That is freakin’ sweet. And cheap enough to have three or four on hand.

Amazon has them very cheap.

Thanks to the Art of Manliness for the link.

I just bought one and added the sheath. I’m figuring, it the bloody thing is sharpened enough to do the tricks in the video, you don’t want that bad boy just bouncing around in a tool box or the back of your Rover.

Viscous Coupley Goodness (Post #151) 7/22/2009


I picked up two things today. First was a used viscous coupling from Rob at Rover Cannibal. The second was an air grinding tool from Lowe’s. My Dremel died a few months ago. And I was faced with replacing it for 50 odd bucks or I saw this grinder on clearance for around 16$(US).

I figured I’d use this for the big stuff. I will probably get another Dremel for the small stuff but for now this will work.

The viscous coupling is finally becoming an emergency fix. This weekend couldn’t come soon enough. I can tell the CV joints are getting noisy and I can see the tires getting balder.

Oh, did I forget to mention I’m driving the BWB again? Well I am. My son turned 16 over the past week and we bought him a….Scion xB. He was not going to be a Land Rover kid after all.

Erica’s untimely crash with the Discovery ended that for him. Yeah I know I could have bought him a Land Rover for the same price as the xB. But it wouldn’t get 32 miles per gallon and have only 5700 miles on it.

I love driving the Rangie. I had forgotten what a joy it was to drive. I love being able to see everything around me. It was a treat to drive this morning and I love the comment of my friend Butch from my office, “your back to being a REAL man, with your manly truck.”

That meant a lot.

More next week after I tear the viscous coupling off and charge the AC for some cooler driving.

Happy Rovering

October 14th, 2005 (Post #62)

October 14th, 2005
Charging problems
All of a sudden I have a charging problem. Everything was working fine. I leave my lights on one time at work and drain the battery to zero. So I get it jumped and it manages to get me home and such. So a week later I don’t drive the BWB for an entire weekend. That was nice. Anyway, Monday morning she is dead again. So I jump her and drive her to work. Battery drains over the day and I have to have a jump again.

I get home and have to jump the next morning again. So I take it to the O’Reilly’s they test the battery and the alternator. Thumbs up on the alternator according to the guy holding the tester. So I go in and get another battery, prorated and it costs me $15.05(US). Sweet what a deal.

So a couple of days later it’s dead again. I can’t figure that out. So with a suggestion from EGD I begin pulling fuses while measuring the amps at the battery. That was a tricky deal, because the measurement changes as the devices draw. I’m averaging 1.4 to 1.7 draw. I notice how ever that on a couple of fuses when they are out I’m drawing 4.3 to 5.2. With them out I draw more?

Also depending on how long I kept the leads connected the voltage would eventually drop to .3. I’m guessing that was something to do with the meter. Meters don’t like to be conductive paths and I figure that was a safety feature to protect the meter. That is a guess of course.

Well as I’m testing I notice a very high frequency hum coming from my right. Over near the alternator. So I listen closer and the alternator is humming. That can’t be right I think. Also the 4.3 to 5.2 is on the meter when I hear it. Remove the leads it goes away. Reconnect it is back. Well a few times anyway. I am unable to make the hum start on my own accord. So I am convinced the alternator is toast. All that charging on a dead battery could wear out an old under powered alternator anyway.

Lots of web pages mention the alternator being too wimpy anyway. This is supported by the fact that when you order a rebuilt one, they are 100 amp and not 80 amp like the original.

So I order the alternator from NAPA with a lifetime warranty, five year free towing to a NAPA service center. If the alternator is the reason for the tow a new alternator and the tow are free. What the hell, I say, $290 bucks. Whatever I want the damn thing fixed. The teasing from EGD, Titanium Hitch, and my boss is becoming unbearable.

So I swap the alternator. Two big bolts, remove the air filter assembly, loosen the belt tightener. Swap. Bolt it back up, done. Poof like 30 minutes I’m done. I cleaned off the terminals and the battery cables and even grease them for fun.

I go to start it and nothing. Turns over does not start.

First I’m thinking WTF? Those two things aren’t related, well not much anyway. So I get RovErica to fire her up while I check for spark. No spark.

With a suggestion from JagGuy who informs me I must have busted a wire when I was working near the ignition relocation module. Okay so I go back and every wire I touch breaks. Makes me wonder how it was running in the first place. So I wire it all back up with some difficulty. Not completely understanding where all the wires go makes the logic hard to follow. But wired back up it was. Still nothing.

I give up and my wife says it might be good to look for another Rover. “If this one is going to be down three days a week. You’ll need to get to work.” That was bad. I don’t want another car payment right now. And I’m beginning to doubt why I am obsessed with these Rovers. I printed up the testing procedures and got to Test 2 before I find the problem, dead coil. I give up at 11:15pm, send the emails to work telling them to cancel my appointment and telling them I’m dead in the water.

In the morning I call JagGuy again. He says Eric that doesn’t make any sense if you are wired up and don’t have any voltage at the coil, it’s not the coil. It must be something else. I tell him how frustrated I am and that I’m well over my head at this point. He says casually as he signs off, telling me to call him later and to check your fuses and your connections again.

I have half the wiring harness disassembled and am wondering how all this works. I think okay check the fuses. Why didn’t I check them earlier? Well guess what dead 20 amp ignition fuse. Feeling like a complete horse’s ass I fire her up and everything worked. Fun thing happens while I’m reassembling the wire harness…the NEW alternator makes the hum sound.

What is wrong with me? I’m a smart guy, well sorta. I’m no slouch anyway. Why can’t I understand all the concepts related to ignition systems? It’s rhetorical, so don’t email me on that.

It’s a few day later and all seems well and the alternator is working well. The battery is not discharged. I own a new trickle charger. And I can now get to work.

January 20th, 2004 (Post #40)

January 20th, 2004
CV Joint Again!

This week was a great week. We were on our way to visit the Orchid Society and I was nearing the Northern Transavaal Region in South Africa when the CV joint went bust on me again. It was a terrible bit of bad luck what with the wild animals running about and us with out our normal guide. The funny thing is I wasn’t trapsing around in the Transavaal at all. I was on Porter Street in Norman, Oklahoma. I would expect this thing to fail again if I were on the Transavaal ripping it up with my buds. But I’m just tooling along on paved streets. It seems the frustrations never end. By the time the year is over I’ll have a nearly new 1993 Range Rover sitting in the driveway. This is due to the fact I will have replaced nearly every part
known to fail. Really, nearly everyone. So my New Year’s resolution to, “get out on the trail” imparted to me by Mark will be put off another month as I struggle to pay for this latest repair.

I ordered a repair manual from an Ebay seller last night. It’s on CD. I worry about the legality of it, but in the end it’s cheaper than the printed version at about $100(US) less. I also bought a new Bayco Work light from O’Reilly’s so I should be able to see in my dark garage. Price was $20 plus tax. My good old fashioned “trouble light” as my dad used to call it, eats light bulbs, especially when it is cold outside. It is more “trouble” than “light” most of the time. JagGuy has one and I liked it when I used it at his shop last month.

The CV Joint will arrive Friday and I guess I’ll tear it down Friday night in the garage. I ordered it from Motorcars, LTD. Ken was very pleasant to deal with. I believe the price at $189(US) was the best I could find on the internet. There was one place cheaper but they only sold wholesale
to “Actual Repair Shops”. I didn’t feel like faking my way through that for thirty dollars, it just wasn’t worth the time. Thank you Motorcars for your support of our club and the great prices.