I discuss panhard rod bushing failure and deathwobble.
I demonstrate how knackered my panhard rod bushings were.
Removing the failed bushing requires you to use a “punch”, I used a socket which is slightly small in diameter than the bushing, to press the failed bushing out. It is similar to the process of pressing them in except when you press in new ones you used a socket that is larger in diameter than the bushing.
I demonstrate how to press in new bushings. Find the beveled side of the panhard rod and the bushings will go in easier than the side that is not beveled. I used a vise to get the bushing started. This helps with getting the bushing “square” in the hole before you apply the press to the bushing.
Getting the tool lined up correctly is 90% of the battle.
Victory is mine. The bushing is pressed in. You do this for both sides.
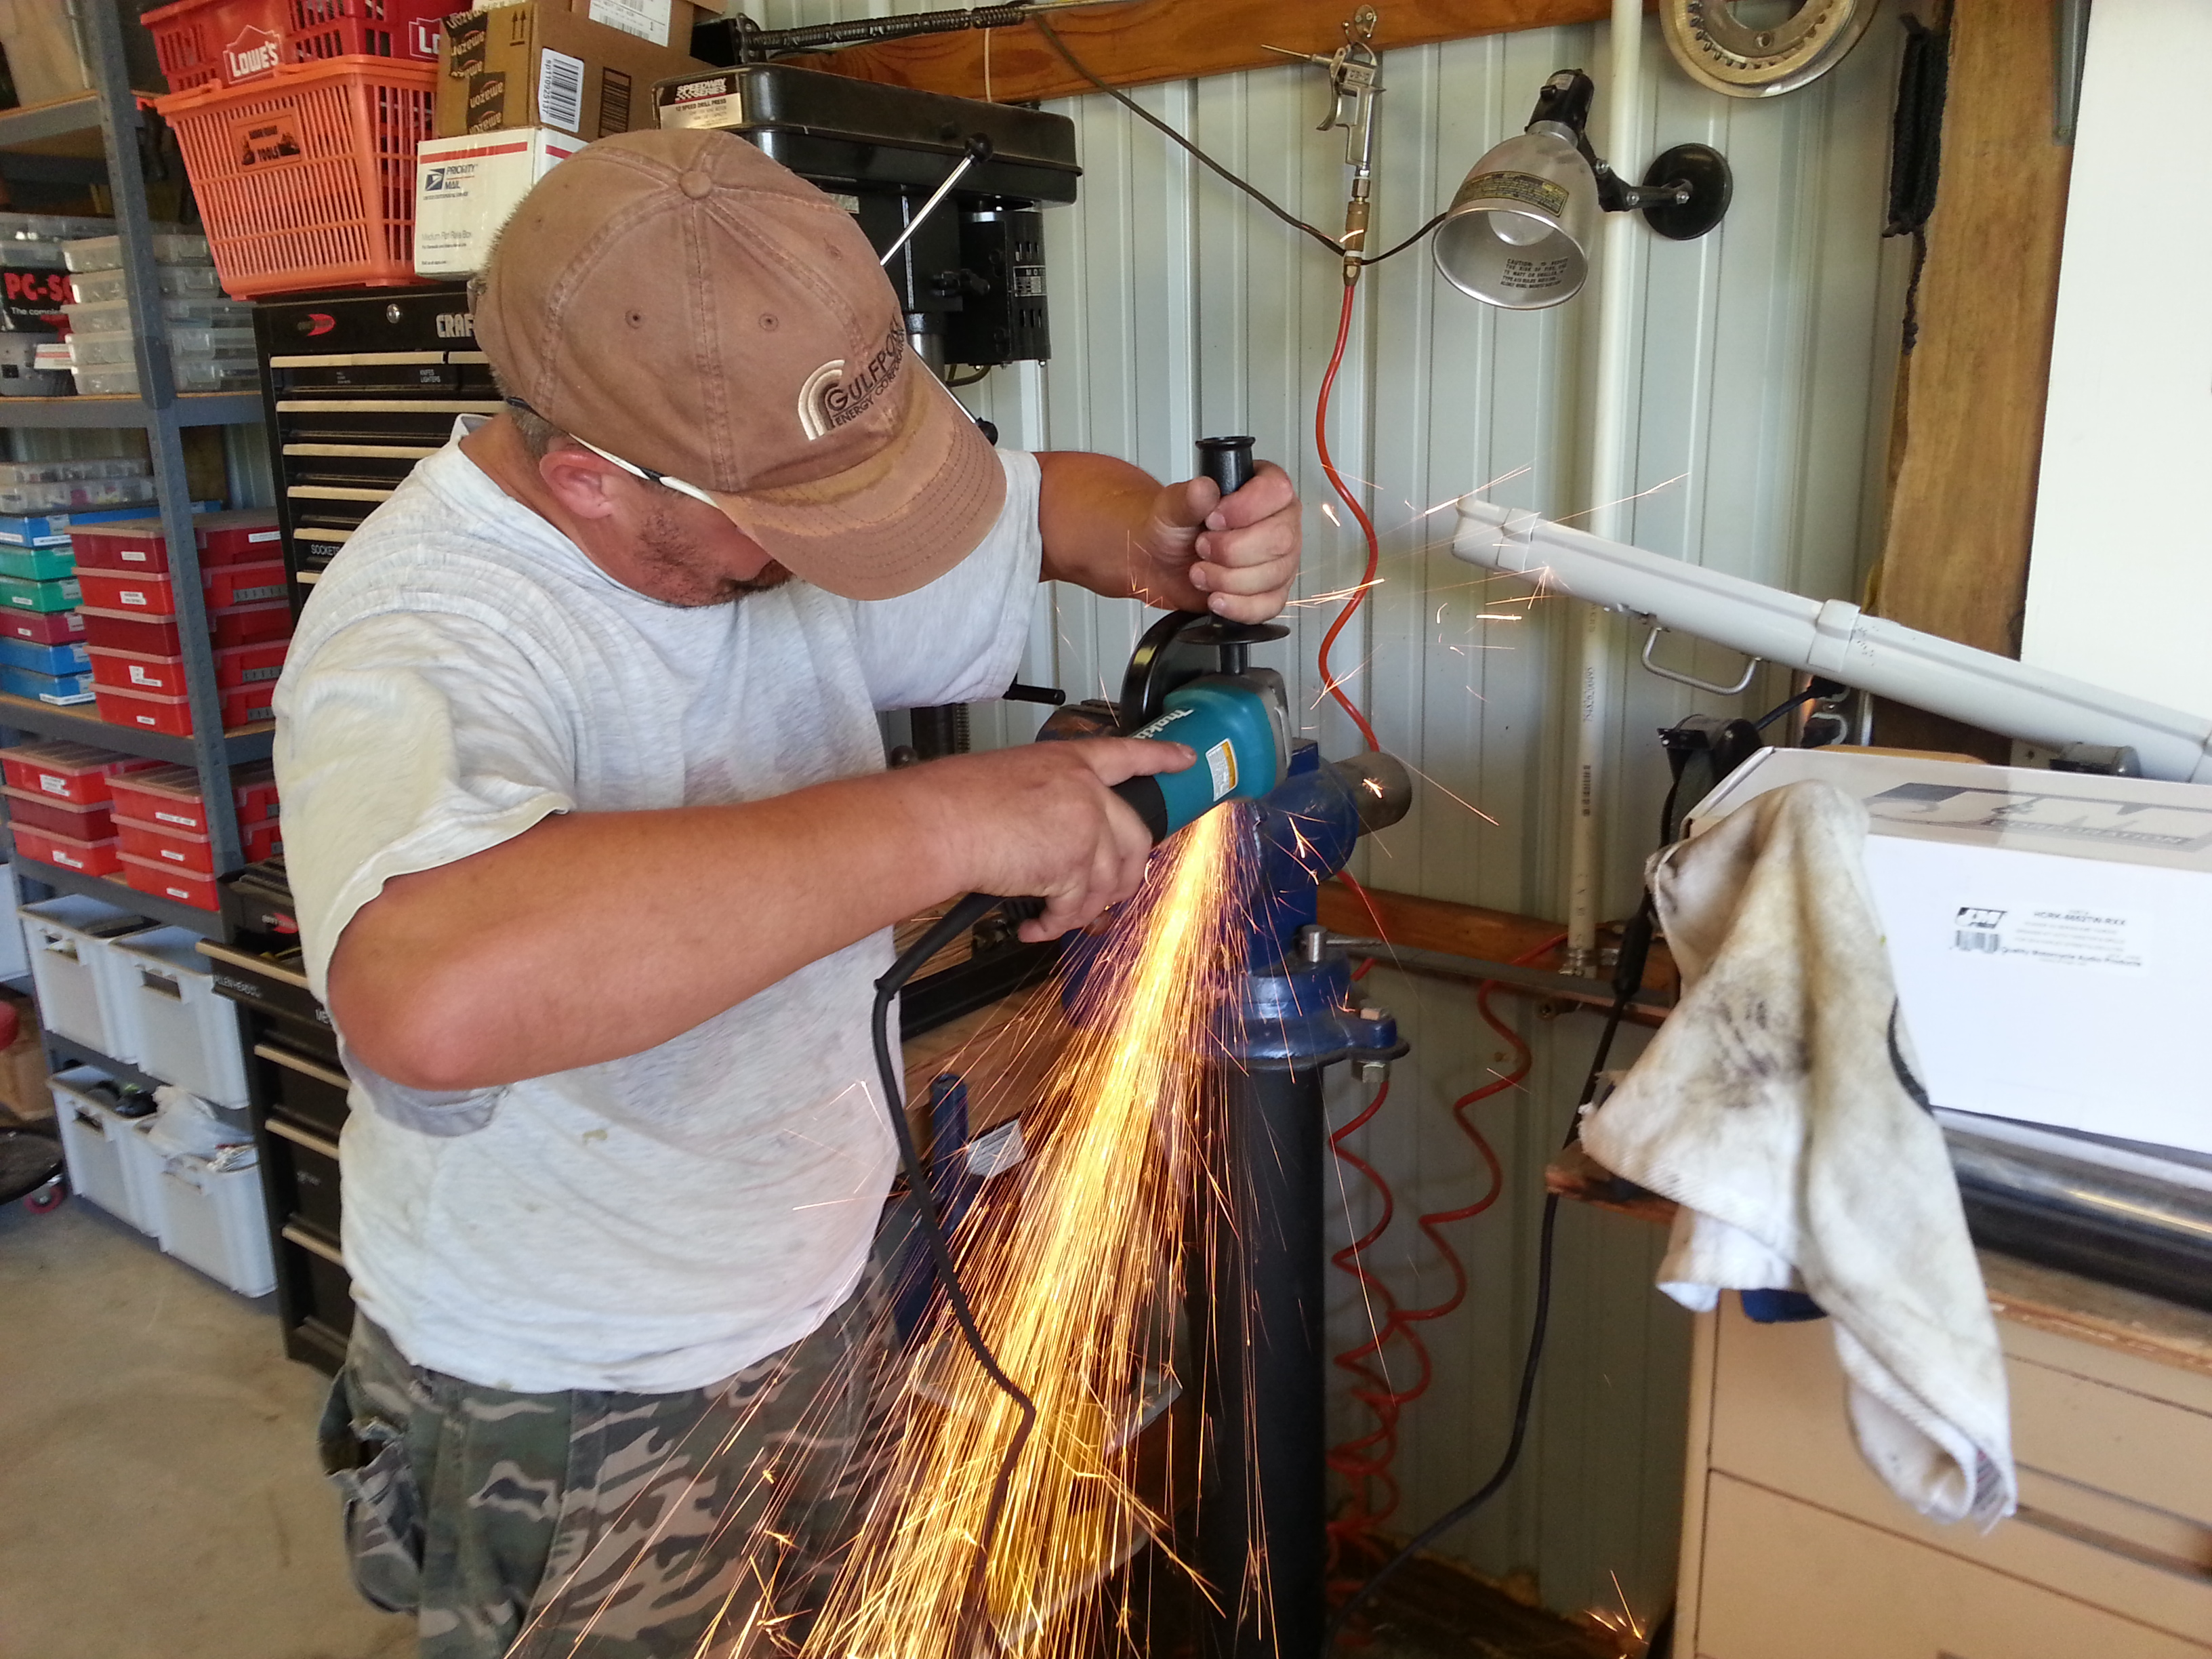
I had trouble with the width of the bushing sleeve and it require a bit of grinding to get it mounted. I used a bench mounted grinder. Just take off a little of the material and try to fit. If you need more, grind off a little more then refit. I went to the bench grinder four times to get both sides right before mounting with the bolts.
If you are a regular reader you will remember some late unpleasantness when a distracted driver smacked into the Big White Bus while she was parked on a city street. I was determined to get the BWB back on the road. After all we already have one car payment and my budget would not allow for a second. Besides that, I love this Range Rover. We have a lot of miles together and I know her inside and out. I didn’t really relish going through learning another automobile.
So the day was set aside for “mechanic-ing”, but before we managed to get started some friends of Rogers showed up with a lovely 1932 Buick. I don’t remember all the specs on this car but it was a Buick and nicely done. The trunk was a dealer option and still had the original leather clad luggage inside. A time capsule to another time.
1932 Buick. You never know what will show up at the shoppe.
To get the fender straightened was the first thing. We got the Range Rover lined up with our pull point. We did not believe the under structure was damaged but we needed to pull the fender out to make sure. JagGuy got the “come along” out and hooked it to a M54 military truck parked in front of the shoppe and on to the bent fender.
Mike gently pulls the fender out.
After the pulling, inspection.
That worked nicely. “The panel “wants” to go back the way it started.” he said admiring the job. So pulling it straight will help with a lot of the work. We did learn the bumper was a loss. I couldn’t see any reason to try and straighten it. I’ll have to get a new bumper. I’ve got my eyes on some aftermarket ones.
We took a break after that and went over to Back Door BBQ. The “Beastwich” sounded appetizing so I indulged. This might have been the best sandwich I’ve ever eaten. No, really. It was amazing.
Beastwich. Something different each day.
Satisfied we decided to attempt to put a coat of paint on the new fender I had salvaged from the Pull-A-Part yard a few weeks back. We got it on to the table and I was instructed to rough it up and wash it down with a solution that removed all the grit and oils. These are basically all the same, sorry I didn’t remember the product name.
A little rust to remove.
Buffing it rough to assist in paint adhesion.
Painting.
After JagGuy applied a layer of paint he wasn’t terribly happy with the results. Knowing we weren’t going to be able to install the same day as paint, he told me he would put another coat on during the week and it would be ready for the next weekend to install.
The results were mixed. I should have probably bought medium drying instead of the fast I wound up buying from English Color and Supply. Good folks there, and they have the expertise and a nice disposition. I didn’t pretend to know what I was doing and asked for help all the way. Highly recommended.
English Color and Supply
So I retrieved the fender and a couple of weeks later I installed it. I had already disassembled the fender on the donor Range Rover so this was old hat to me. There really isn’t anything special about removing the fender. Remember these are built to be worked on.
Remove the lights.
Remove the pozi-drive (The Garage Journal) screws (use a number 1 or 2 Phillips) from the inside.
You will need to remove the plastic box on the seat release. The push button unscrews.
You need to remove the two bolts on the inside of the fender above the tire.
Screw removed.
Five if I remember correctly.
Two bolts underneath.
What she looks like without the fender.
Fender off.
Reattached the lens cover rubber to the fender BEFORE you put the new fender on. You can do it after…its just harder. I ground down the rust spots as well as I could and gave everything with rust a coat of self-etching primer.
I reattached the fender. The rear inside is attached with pop rivets. So you’ll need to put some elbow grease on the fender to get the holes lined up.
Pop rivets
I think there were 4 or 5 needed. That’s it except for putting the light assembly back on. I used the new one I salvaged from the wreck. In the end, it looks great.
It is now the third different painting she has had. I really should get an orbital buffer to her this summer and get the oxidation off and get the panels shining and perhaps closer to the same color.
That’s about it. The removal and reassembly of the fender is a 1(one) on the Okierover Difficulty Scale. The painting however is another thing. If you REALLY, REALLY care about the paint matching and there being a nice coat of paint this might be a 3(three) on the Difficulty Scale. You would need to apply bondo and sand a great deal more than we did. Every minor imperfection on the panel will be magnified by ten once you start to apply paint. I didn’t care all that much about perfection.
With all the rain we had at SCARR 2015 the trails were muddy. But unlike Oklahoma’s red clay this soil took the water very well and drained away. That didn’t mean it came off any easier than Oklahoma red mud, but it was not as nasty when you were driving through it. We had quite a few creek crossings to add to the mud.
Arto and his well equipped Discovery 2.
We started the first day with a lecture from Arto Pullinen. Some of us (read that as NOT Mr. Fisher) learned some new hand signals that trail guides would be using.
This has not been a very fun couple of weeks for Big White Bus. My all time favorite thing on an automobile to work on is the electrical system. /end sarcasm.
I live by five simple rules.
I don’t play with electricity.
I won’t live any place I’m not the tertiary member of the food chain.
I never get less than twelve hours sleep.
I never play cards with guys who have the same first name as a city.
I’ve never gotten involved with a woman with a tattoo of a dagger on her body.*
I’ve talked about JagGuy’s nasty hobby of bobbing deuce and a halfs. The picture is of his personal rig. It is simply awesome. The stance, the color, the massive 5 ply tires, it has “that look”.
While I waited for him to get back from lunch on Saturday I checked out his truck. I drove M54 the 5 ton version of this vehicle when I served in the Marine Corps Reserve. The summer of 1984’s Combined Arms Exercise found us driving the Wisconsin National Guard’s M35’s aka the deuce and a half. So I have a slight fondness for them.
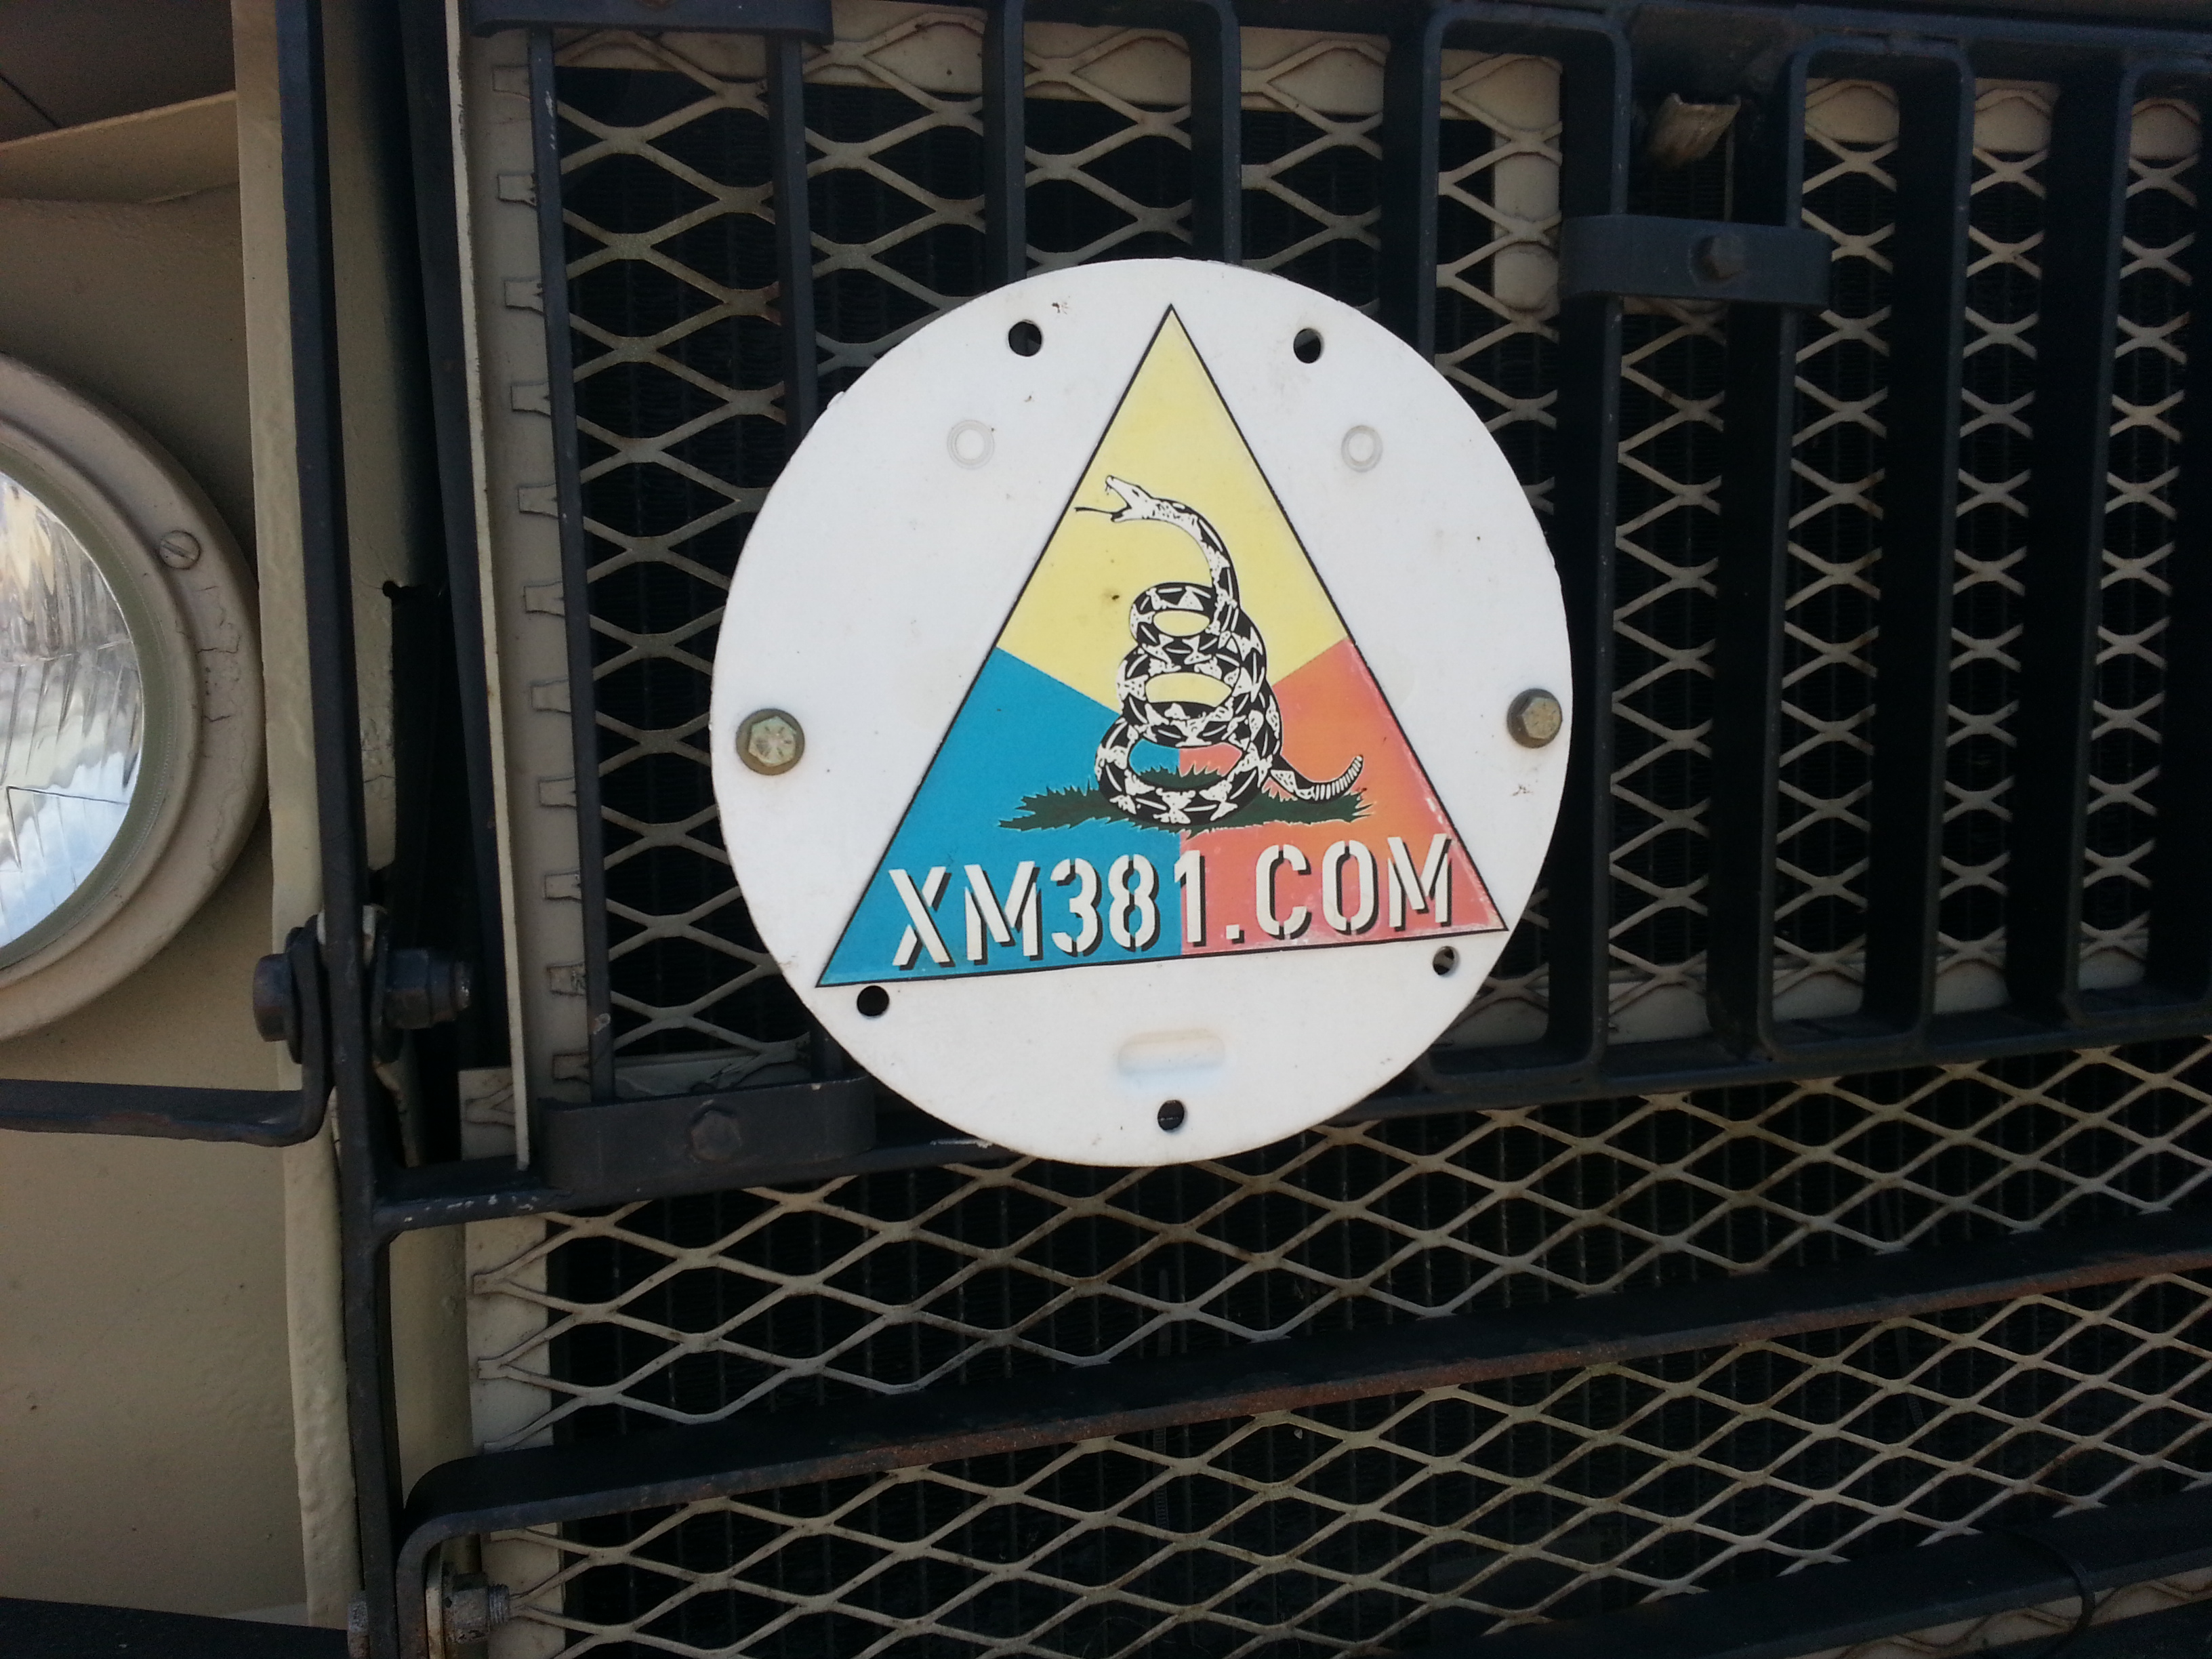
Everyone he builds he puts a different sign on. That’s his website, XM381.com. You can go there and see other examples of the trucks he has built.
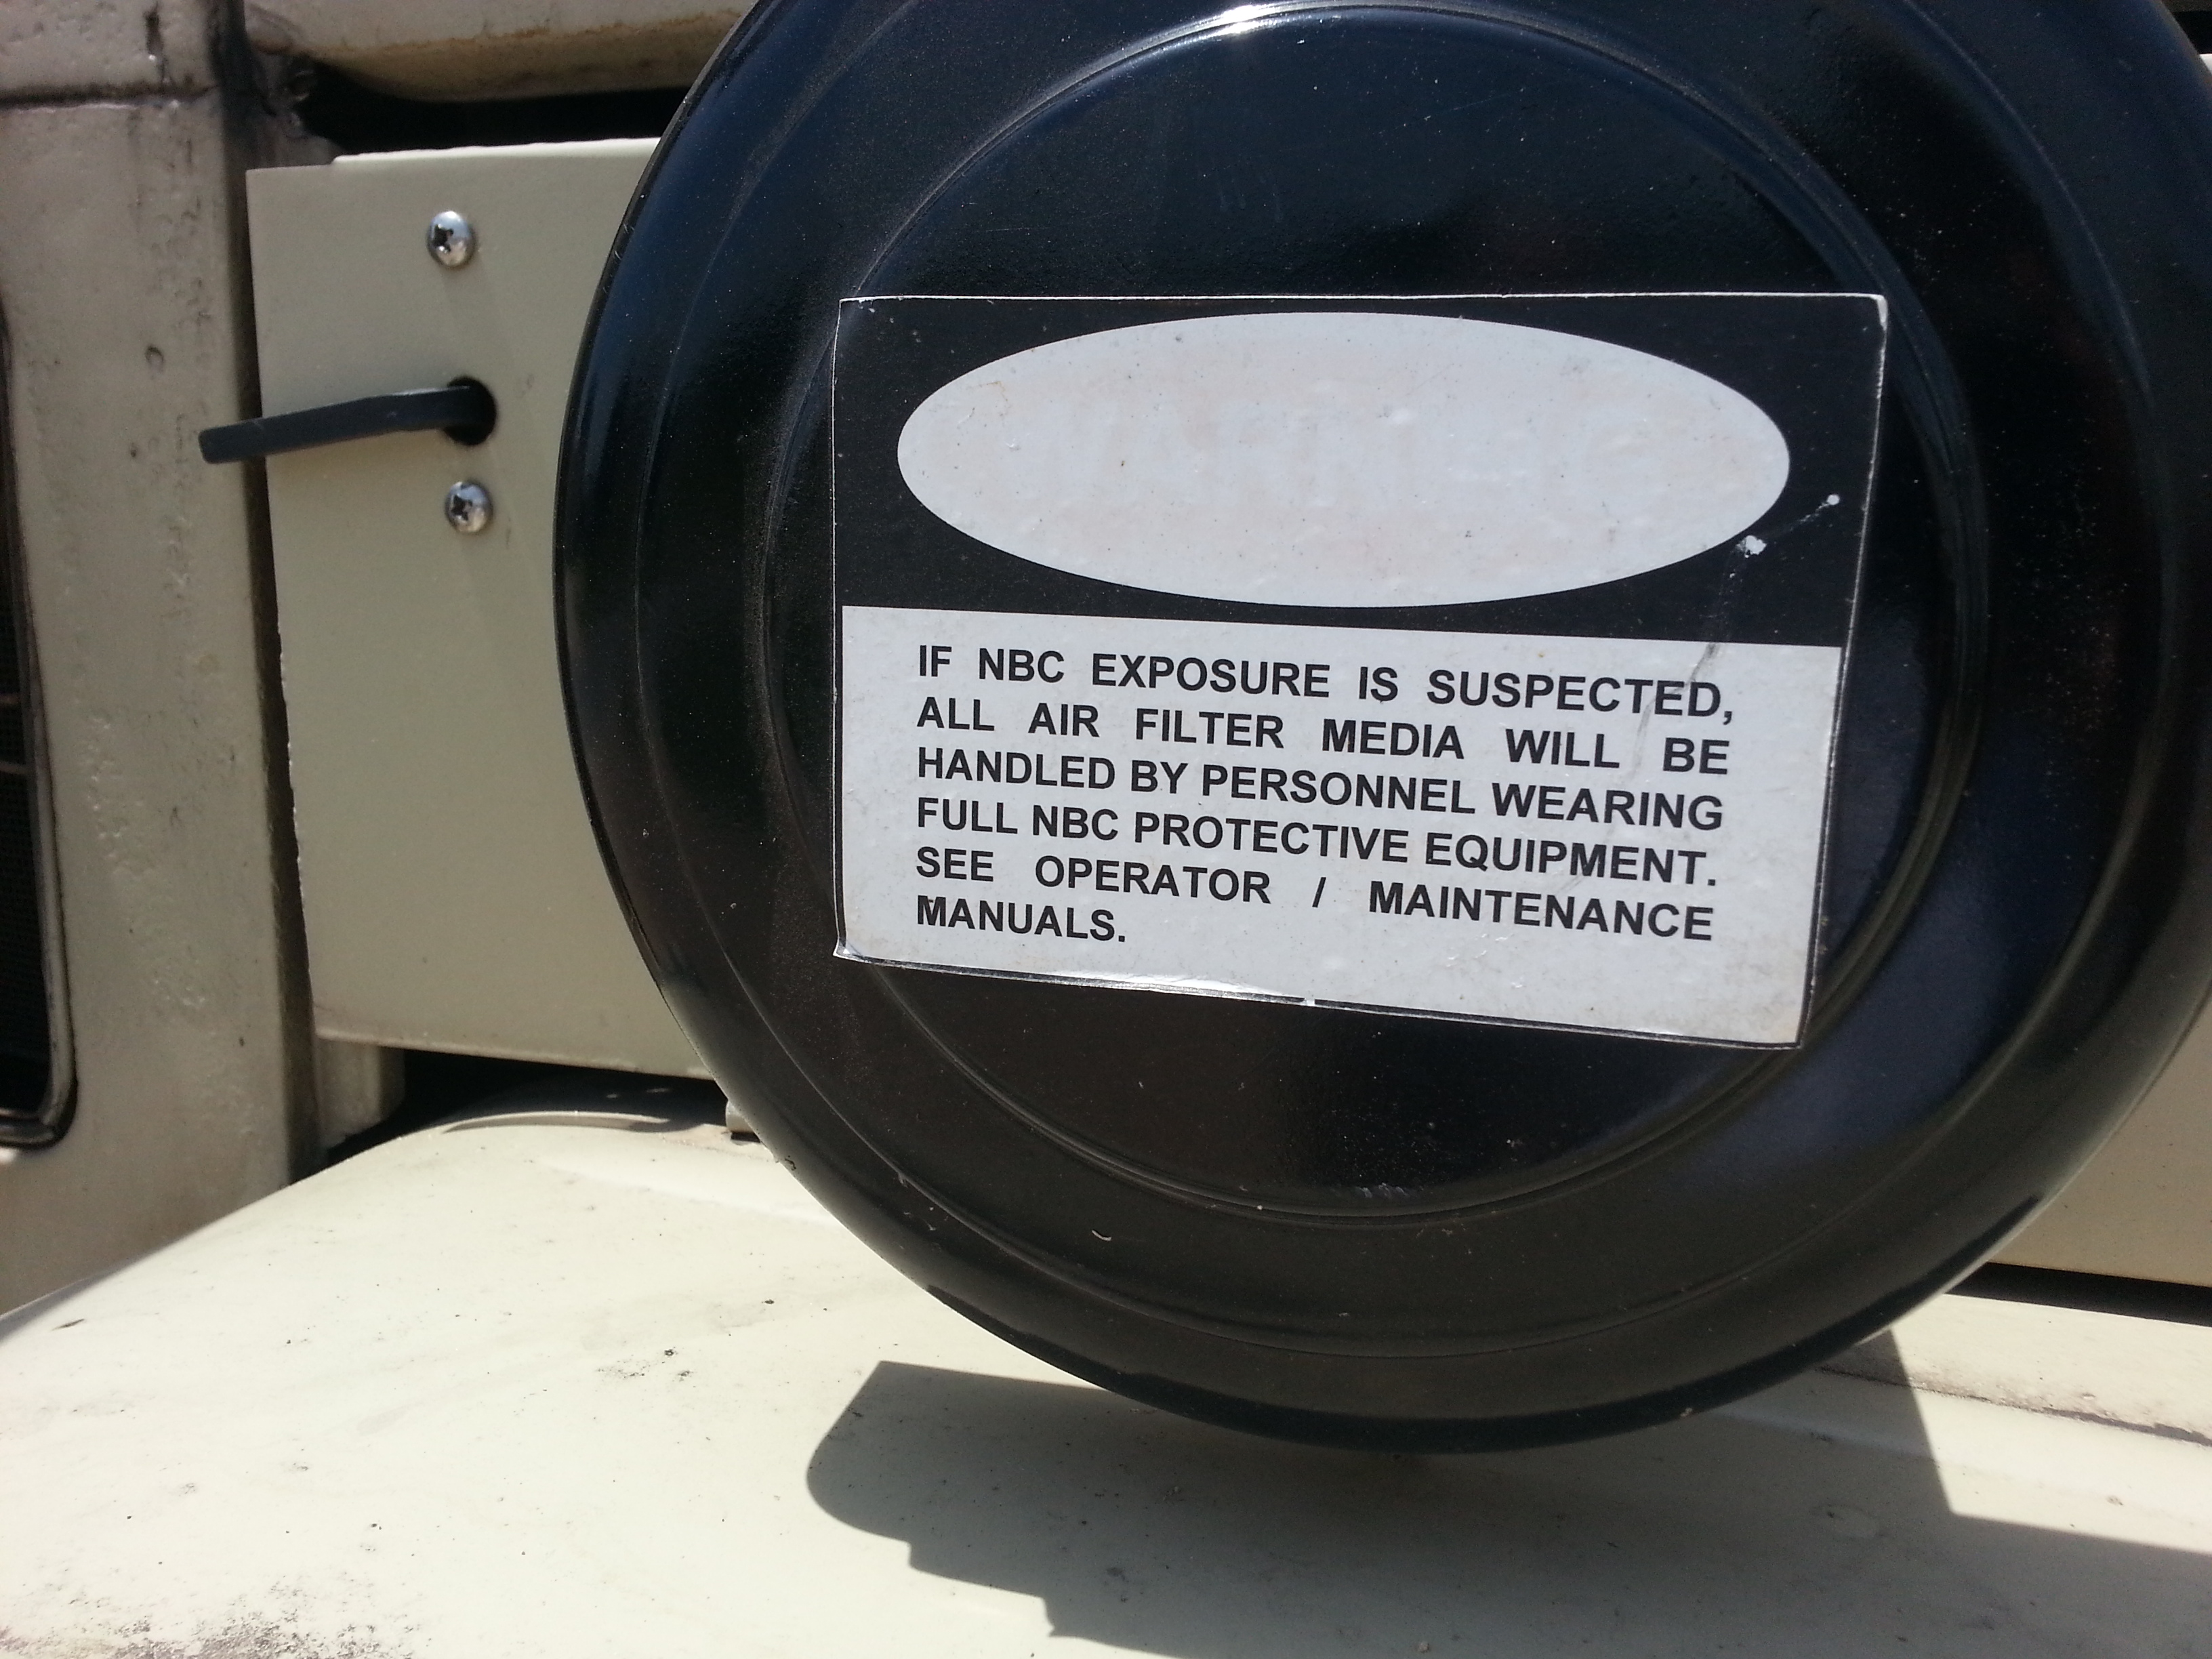
He has sources to vendors where he can get the replacement stickers. Ah….NBC…nuclear, chemical, and biologic warfare. Three of my absolute favorites!
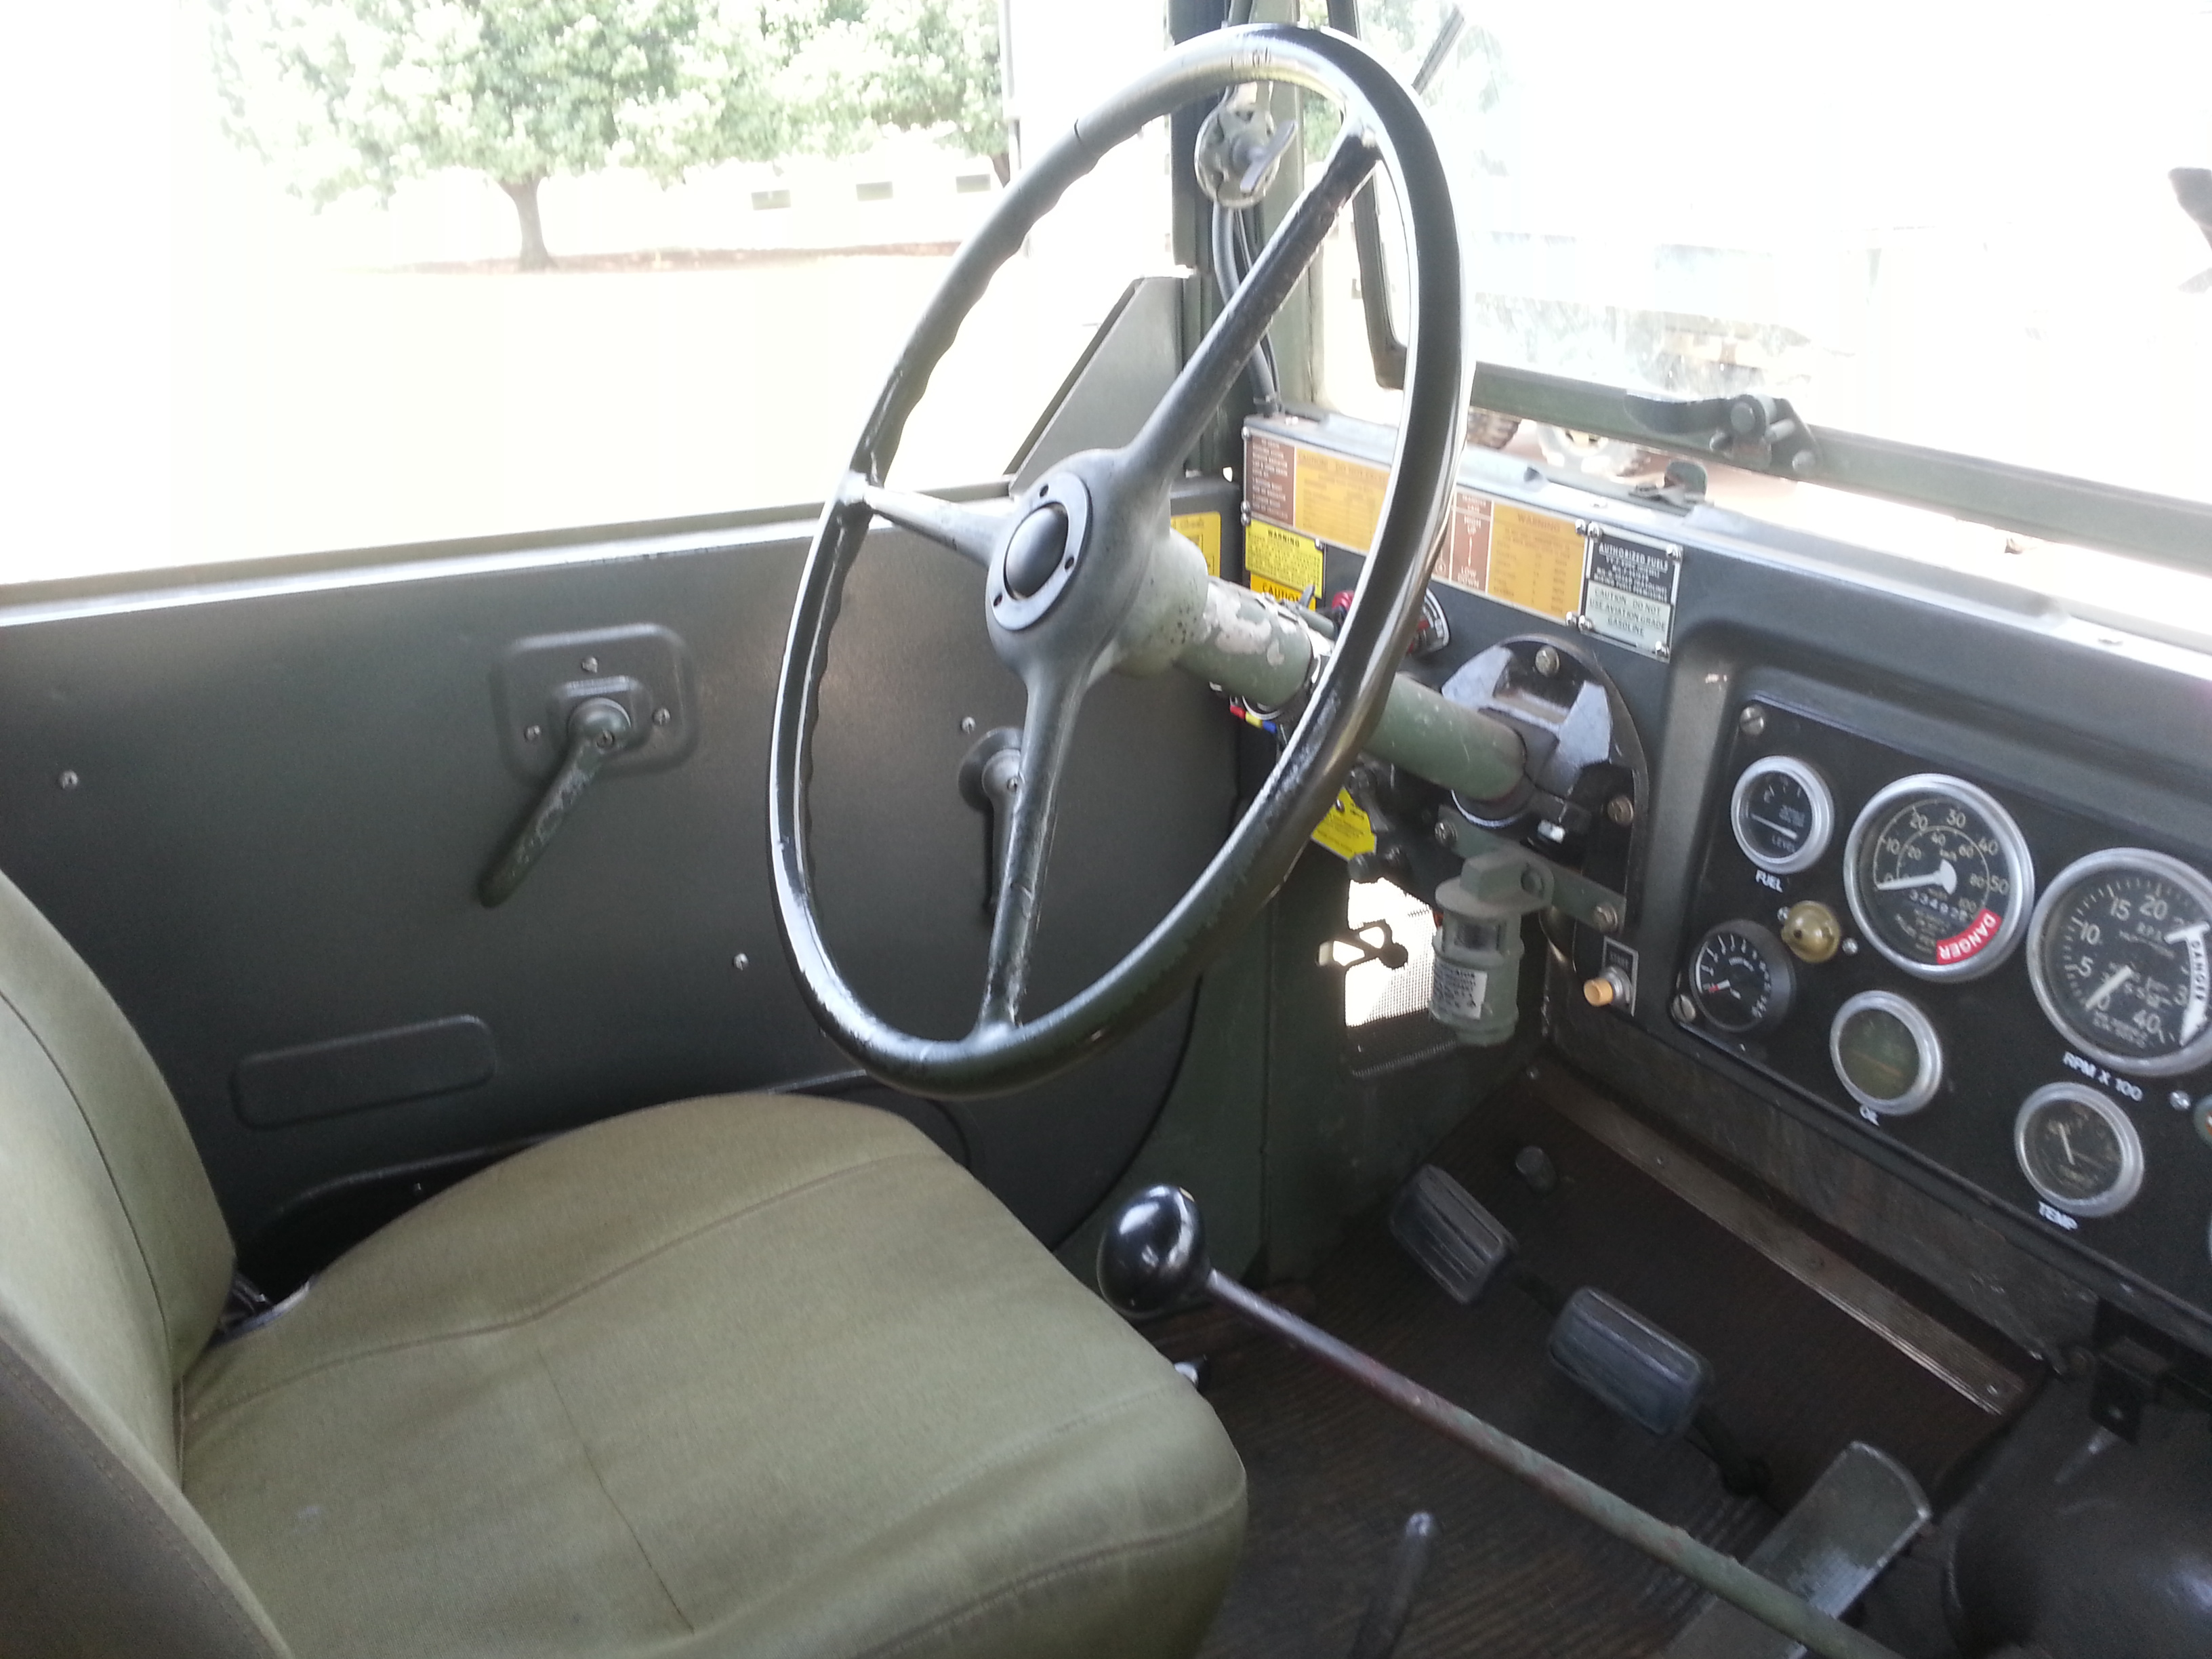
Kaiser Jeep built these trucks.
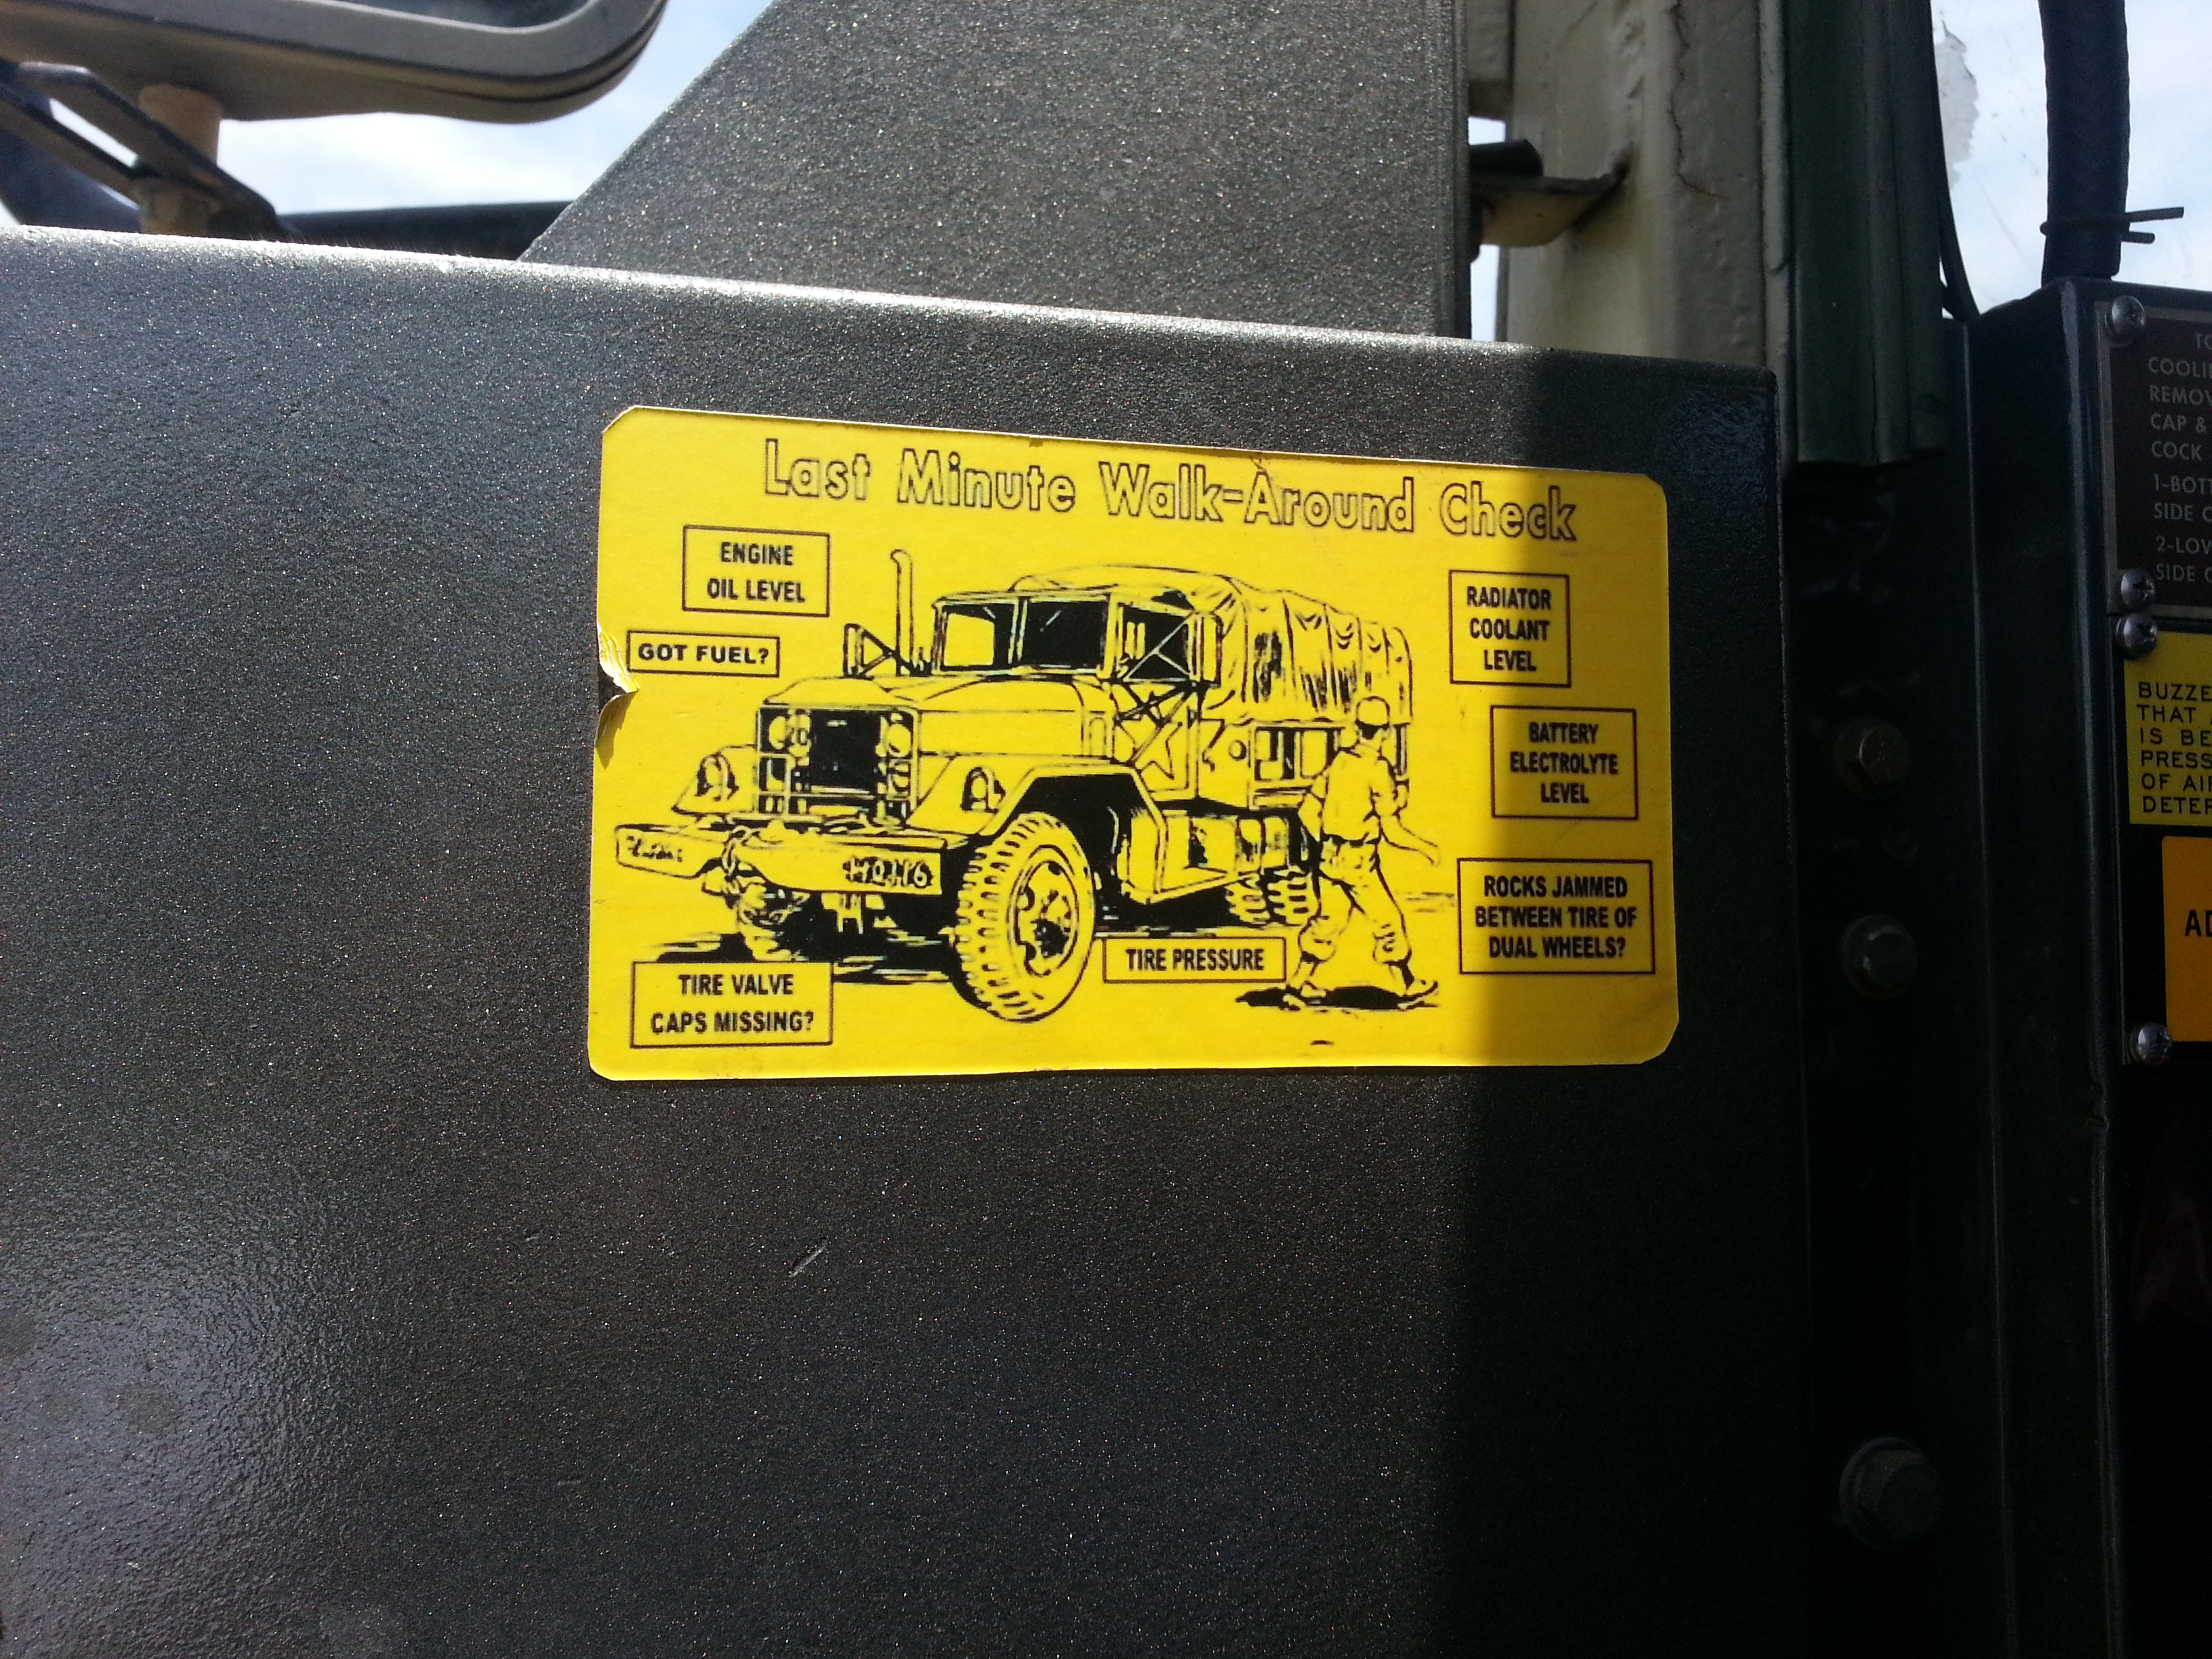
Some views of the cab.
Always a good idea no matter what you are driving.
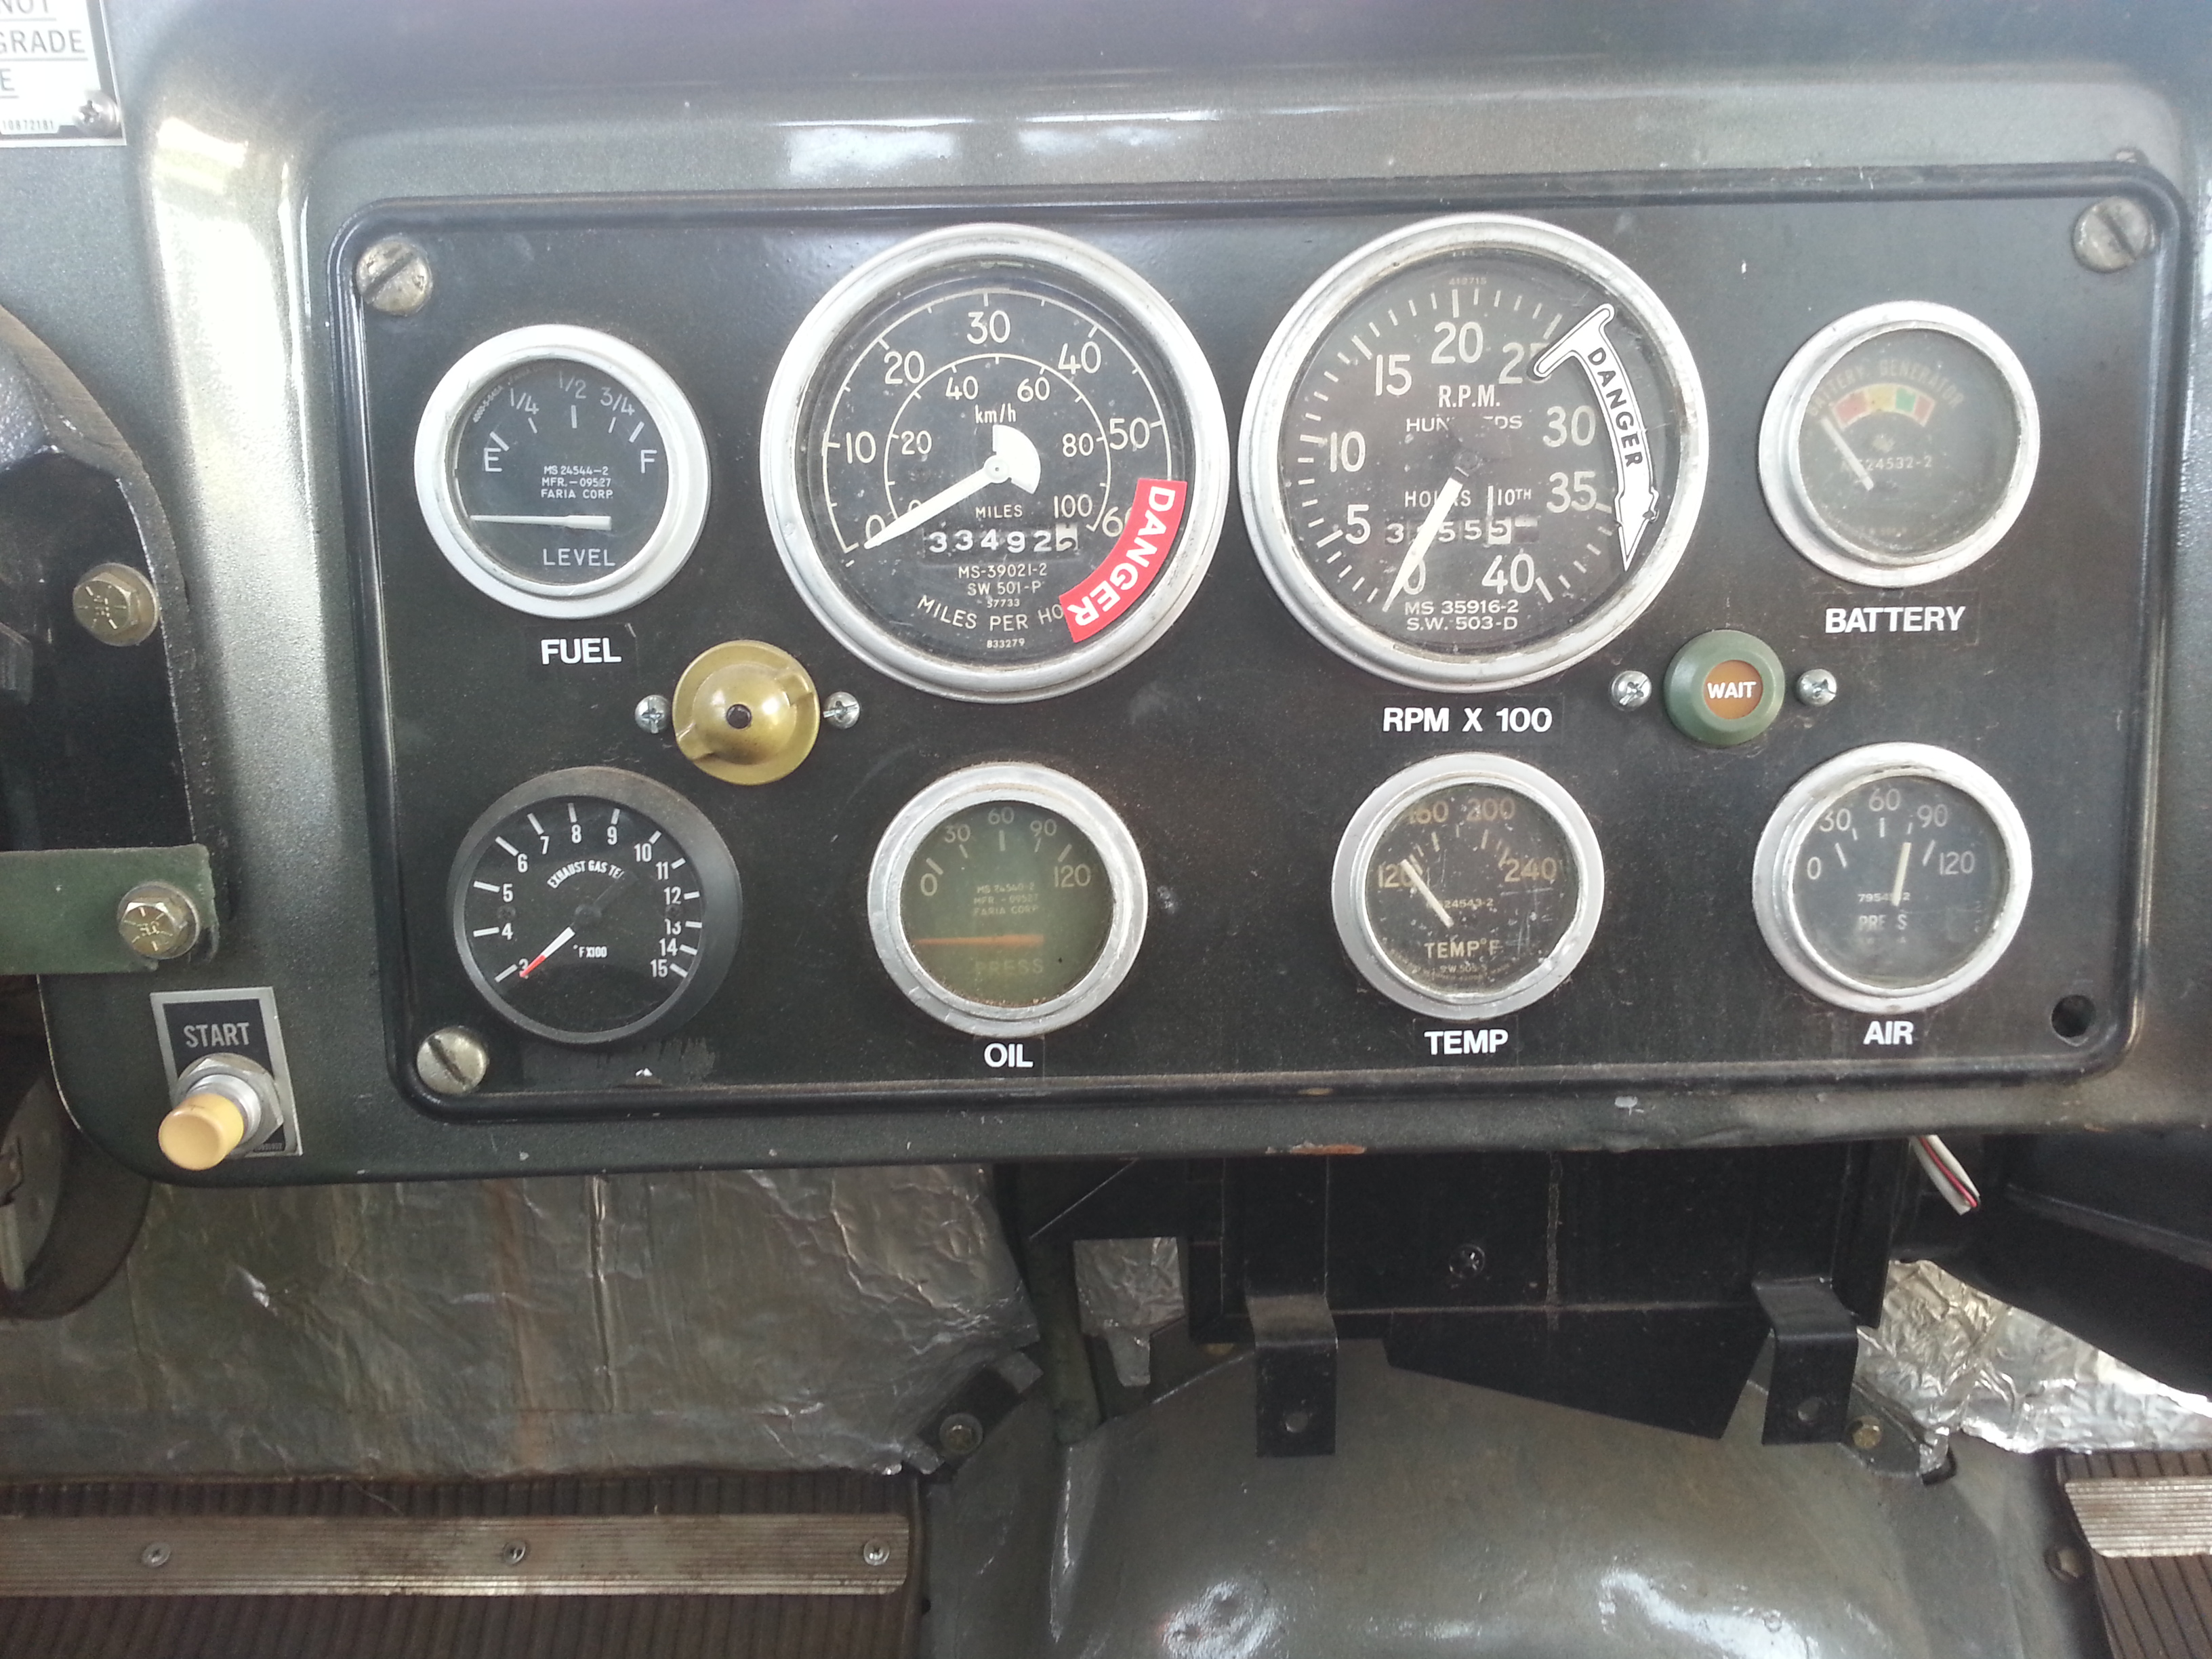
Danger! a slightly modified instrument cluster.
Modified spring seats.
Waterproof radio with waterproof Mil-Spec speakers. That just looks bad ass.
I know you all are thinking how much? I actually have no idea. If you are interested give him an email. In our chat today we got to talking about his camper project. It’s still in the planning phase but I know its going to be awesome too.
It was another hot Saturday in Central Oklahoma. The temperature made it to 102 F in Norman. Even with the temps as nasty as that we don’t stop work because we might get a little sticky and sweaty. We just turned on the fans and opened up the doors.
The Evil German Dude had us all over for some electrical fun. I know you’re thinking, Land Rover…Electric…sweet! Well not this weekend. The modifications were for Magnum Mike and Paparazzi Ford. Both of them had some seriously unimpressive factory wiring.
First was Magnum Mike’s Dodge Magnum. The work was to upgrade the ground. On this model of Magnum the battery is located in the trunk. That’s Mike sitting and sweating in the back of the very impressively modified Magnum. It is a true hot rod. He drove us to lunch one day. I’ve never been so scared and excited since Eric Kammerlocher took me for a spin in his Corvette back in the 1980’s.
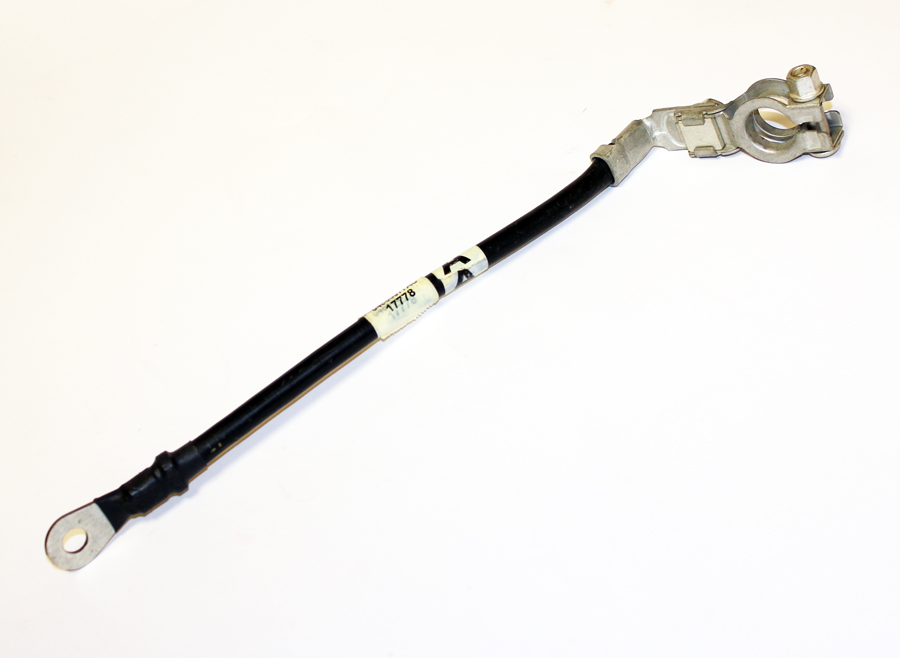
The standard from the factory ground wire was a very small wire maybe 8 AWG. Compared to a normal battery cable the ground is about a fourth of the size it should be. The battery terminals are a simple flat metal. Not nearly the beefy terminals EGD uses normally.
You can see the flat metal and small wire in this image.
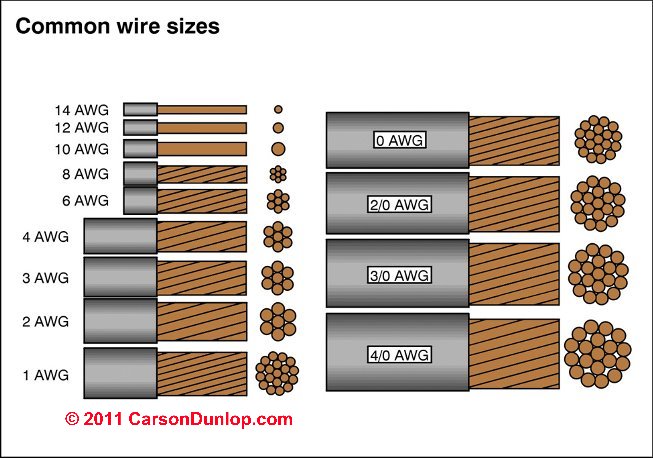
So the plan was to swap out the cables. EGD doesn’t do anything “half-assed”. The new cables were 2/0. Yes…two aught.
This wire chart should give you a great comparison.
We tease EGD but he knows his electrics. He has all the tools and always has the fittings, connectors, and heat shrink wire just about anything. The hydraulic crimping tool is pretty impressive too. So when you hear me talking about upgrading my battery cables you know why I am taking the Range Rover over to the evil lair.
The crimping dies had to be modified. Here EGD makes another minor correction to the tool’s die.
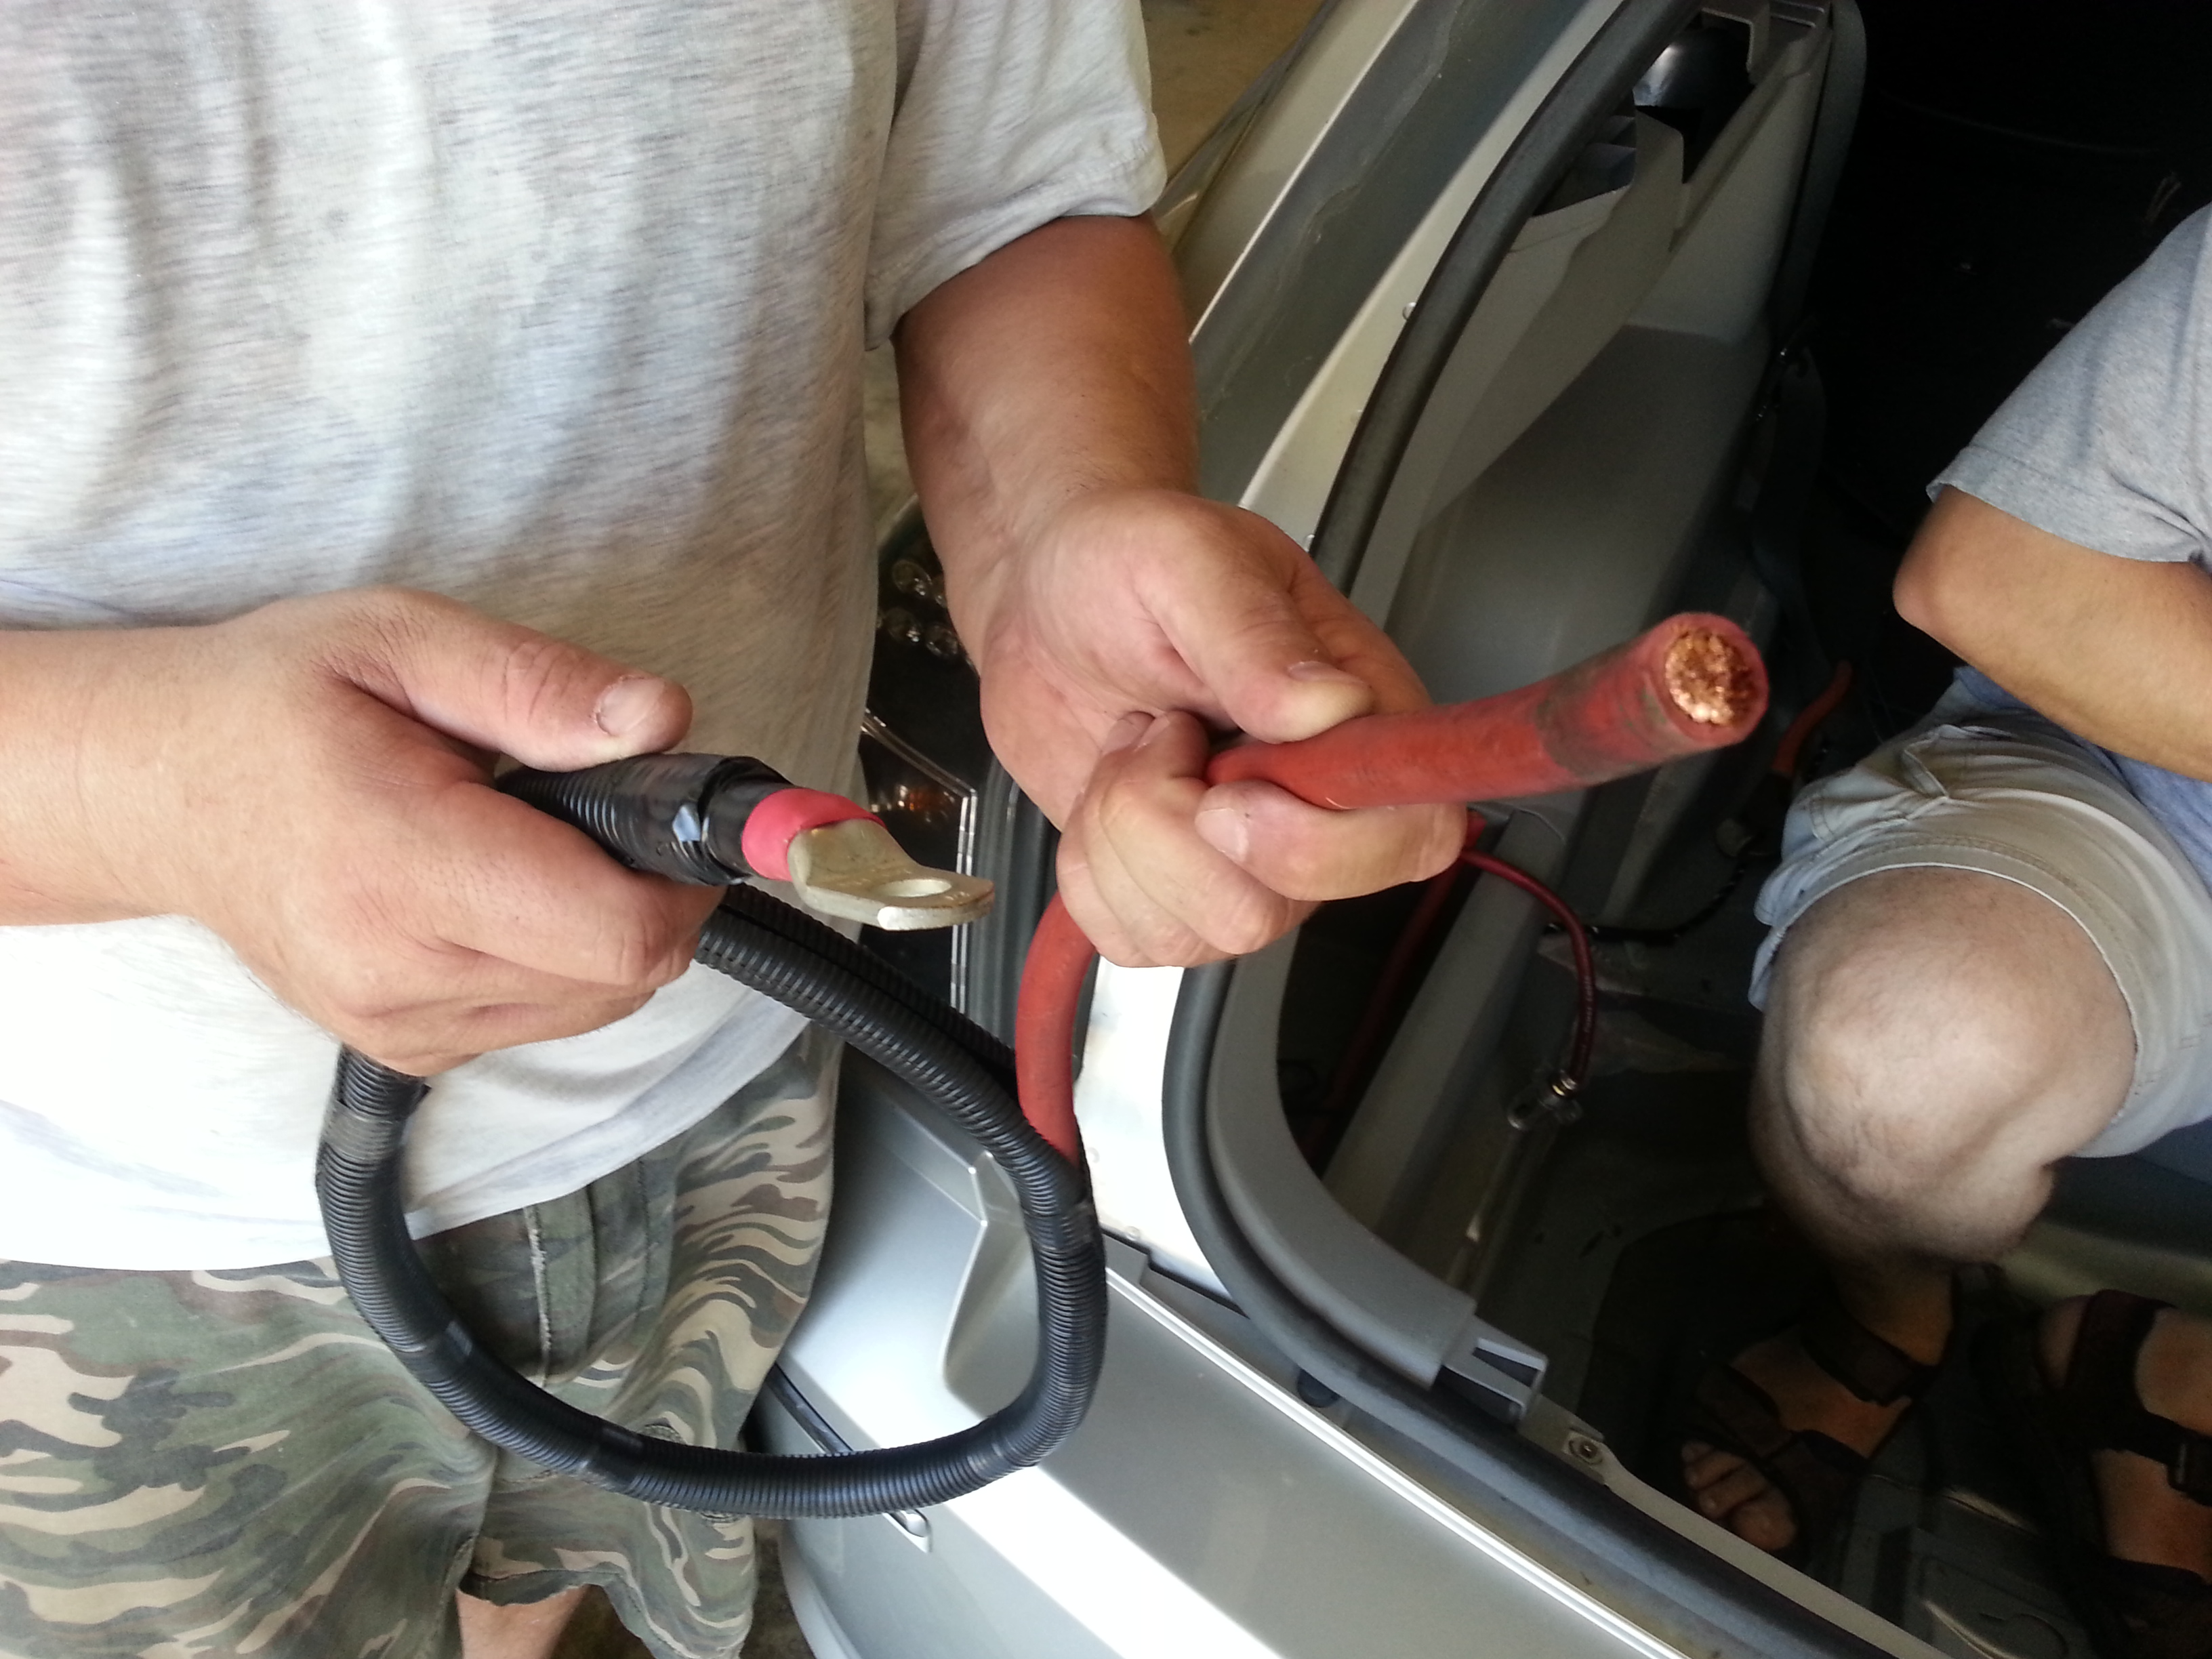
You can see in the next picture that they got the cables in place and the battery strapped back in.
Paparazzi Ford brought his Jeep Commander over with a very persnickety start problem. Basically something was wrong with the battery cables that would disable the vehicle. He would futz with it, the Jeep would start for a few days then quit him again.
He drove to EGD’s evil lair but when his turn came up the truck would not start. He popped the bonnet and I simply twisted the positive battery cable just a bit and the Commander started. Being as Jeep is now owned by Chrysler/Dodge the same type of battery terminals are being used.
Upon further inspection it turned out to be a very corroded connector. Swapping the terminals out had to be done. Here the crimping tool is used to marry the cables to the terminal.
Heat shrink is moved into place.
And here the heat gun heats the shrink wrap.
I couldn’t stay longer. JagGuy promised to take a look at my air conditioning. As you have no doubt read or have seen in my video blog my A/C is out. I’ve been chasing fully functional air conditioning in my Range Rover for years.
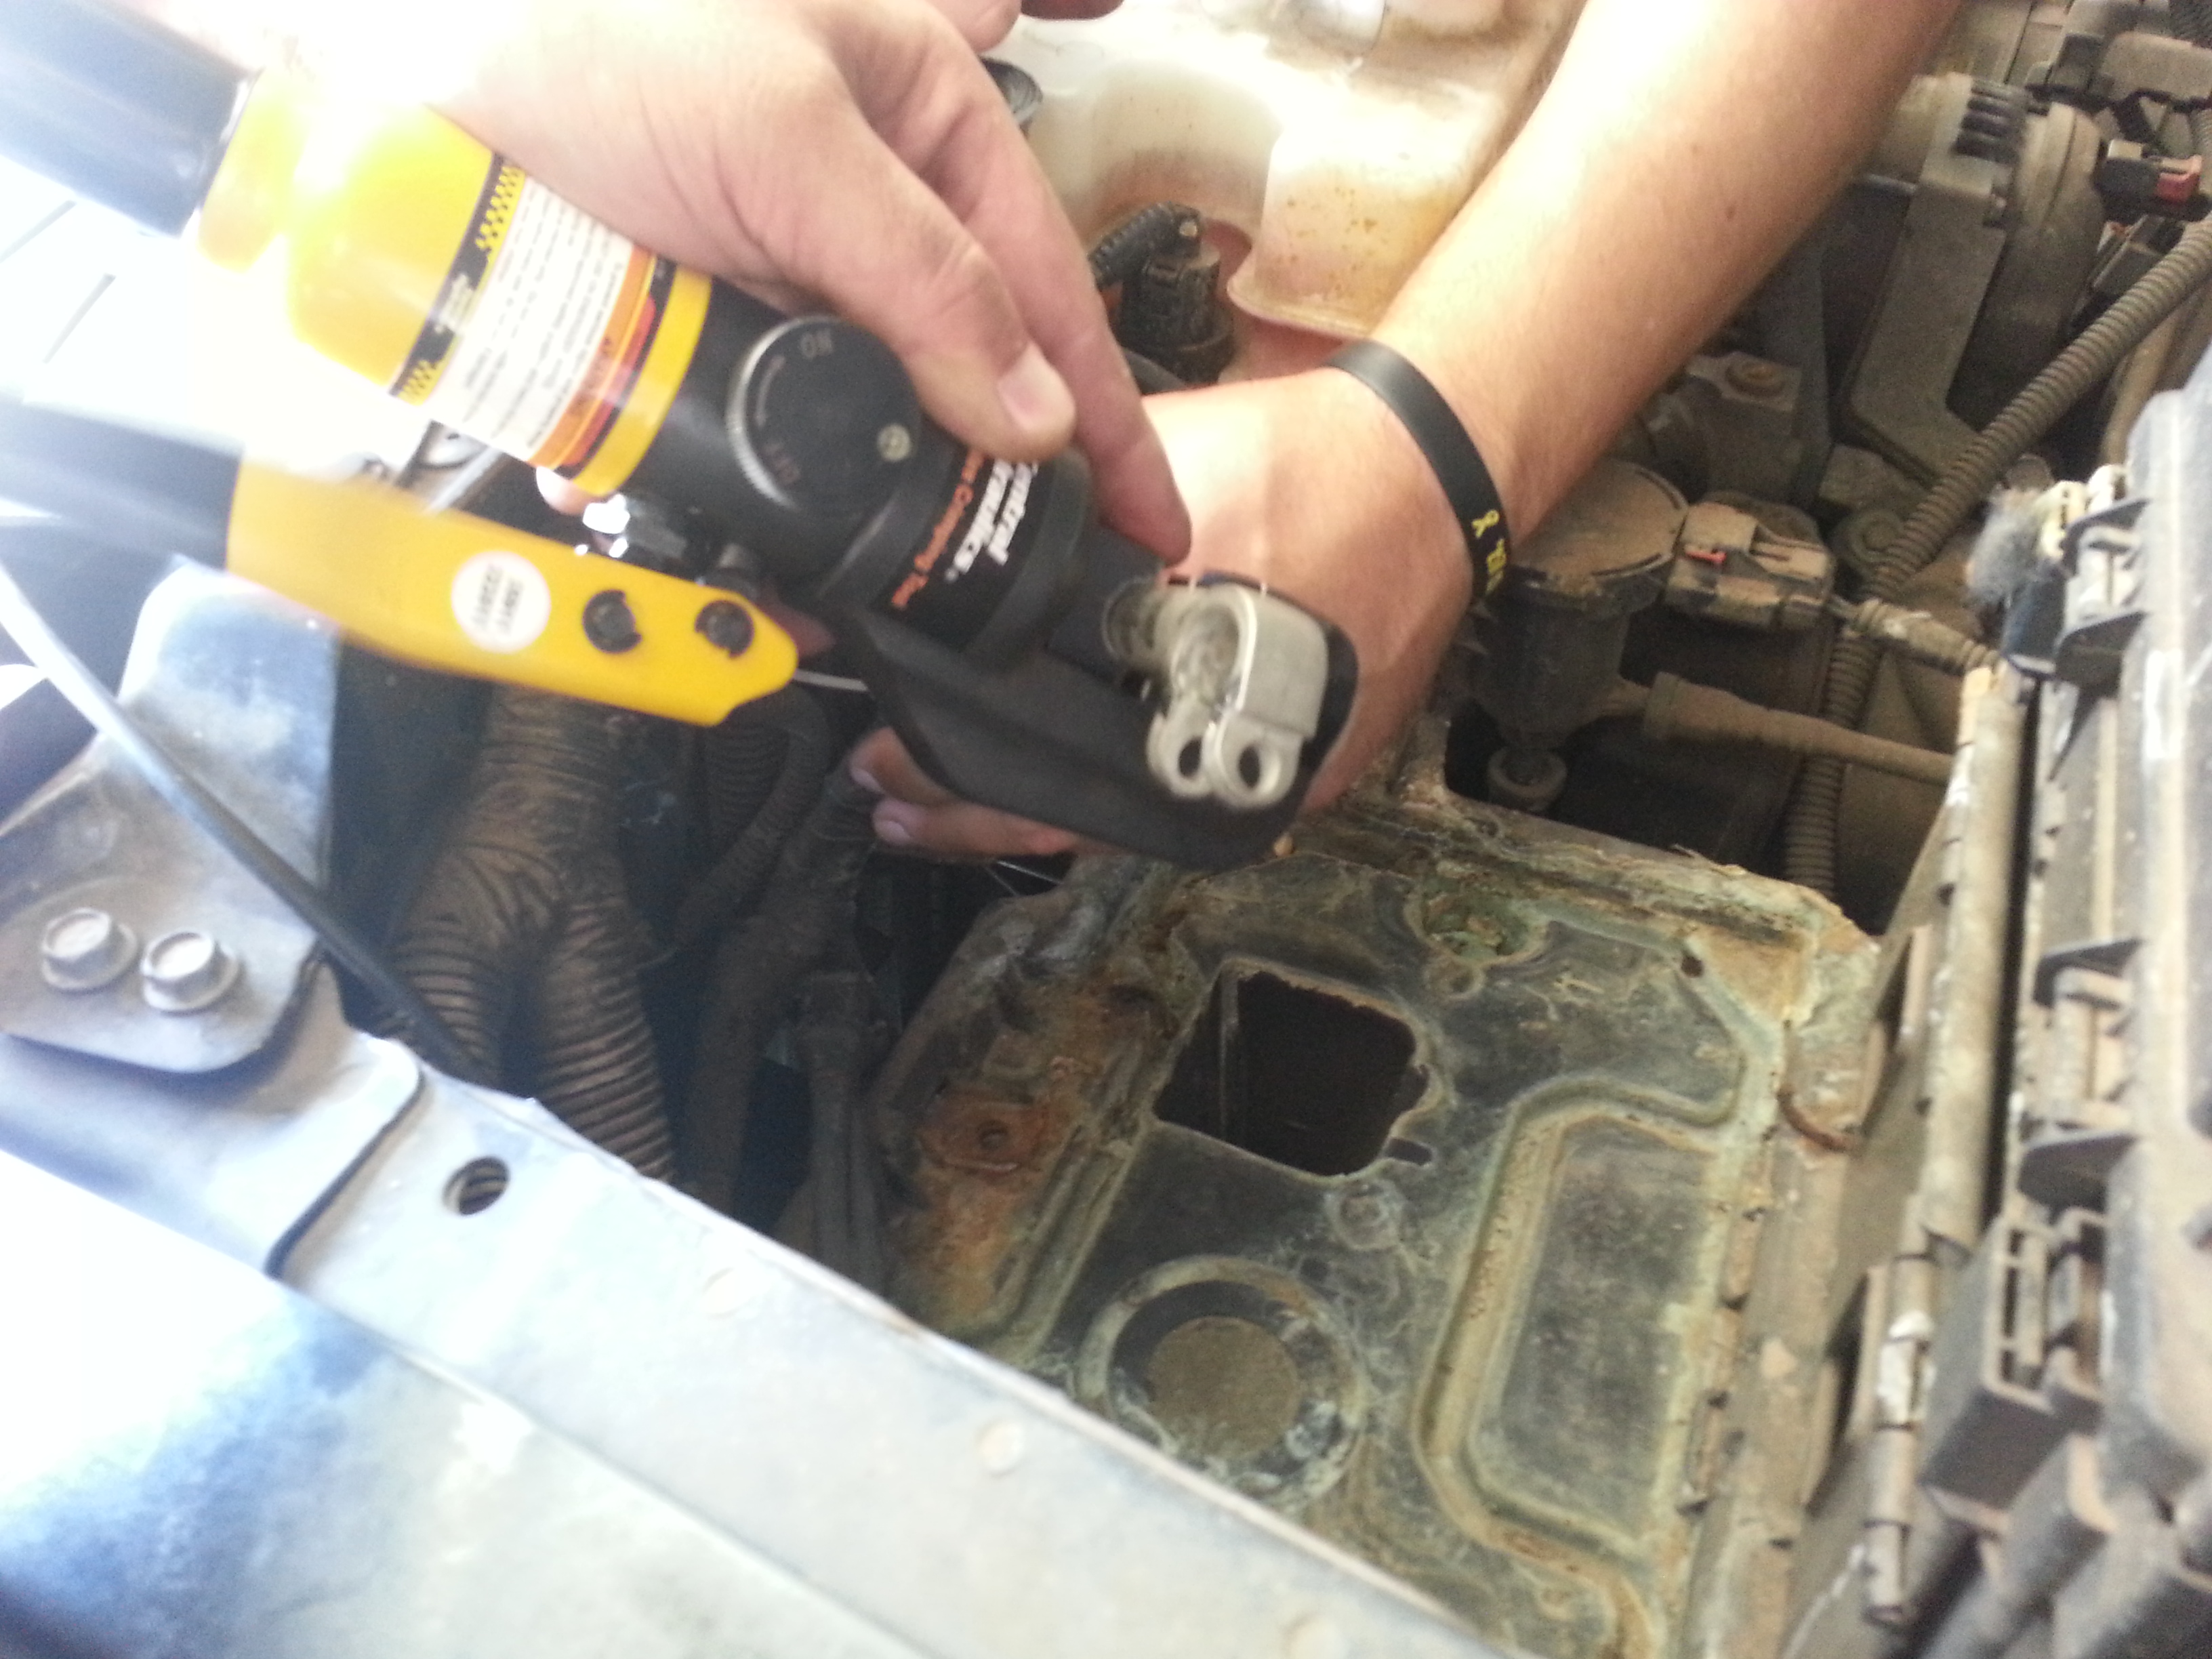
So JagGuy mentioned at lunch on Friday that he had a freon sniffer. Such a handy device.
He was keen on my idea to swap the AC compressor for a more common unit from a Chevy. The hoses would need to be custom-made. Before making all the effort to reinvent the system he said we should find out what has failed. Is the hoses? Is it the compressor? Is the radiator leaking? The only way to find out was to test for leaks.
I didn’t take a picture of the sniffer in action its sensor is an audio one. We sniffed the system and found that the front seal on the compressor had failed.
Freon going in.
JagGuy suggested I go to the company that bought out Oklahoma Auto Air. They do all manner of compressors and hoses. The compressor on the Range Rover is basically a Sanden 709. So next week I’m going to drop by their shop and get the details. Hopefully I’ll have some air conditioning the week after I get back from my 25th wedding anniversary trip.
The weather is going to cool off this next week so my daily commute won’t be the 35 minute drive in an oven. Mrs. JagGuy has told JagGuy that she wants to drive a Land Rover Discovery II. They are looking for a good one. I can’t wait for them to go with us on a jaunt.
EGD is working with a company that has some pretty cool lighting solutions. I’m looking at them for some possible trail lighting. I’ll get back to that when I investigate further.
And in other news…he was only kidding about buying a Dodge.