Back in the day when we fixed the head gasket issue.
I had some issues with the site since I upgraded to the “fancy” theme. What I have learned is this managing of a WordPress site and all the plugins to make it secure and backed up is really hard. So instead of learning how to use my new welder, today I’m working on the site.
I guess I’ll need to seek some outside assistance. I’ll probably look for one of those public support groups. Anyway, hopefully the site is back up and you can find the content you are looking for.
Rust. The ever present issue in every Land Rover. While investigating the rust in the rear floor board I found some really nasty rust on the sills. So much so in some places that additional cutting and repair will need to be planned.
The passenger side B Pillar is rusted out. This will need some major work to rebuild. I have prices for the steel and a welder. I just need to pull the trigger on them both. I also need to source about a case of zinc based primer like Seymour 20-1675 PBE Professional Primer [Amazon.com] More research is needed for this. I’ve seen and read some things that give be some doubt about this process.
For now, I’ve coated the bare metal with some primer. Now on to the video…
When I last repaired my windshield wiper motor I did a terrible job getting the wiper blades set in the correct position. I was pretty frustrated with myself when I finished that job and realized I did it wrong.
I lived with it for several years. When I started this recent restoration I decided I would get that sorted out. The job has a couple of benefits:
I get the blades set correct on their home
I have the cowling off so I can replace the windscreen seal when I get the windscreen replaced.
I made a video of the job and explained several of the more complicated points to getting this job right.
Imitation is the sincerest form of flattery that mediocrity can pay to greatness. – Oscar Wilde.
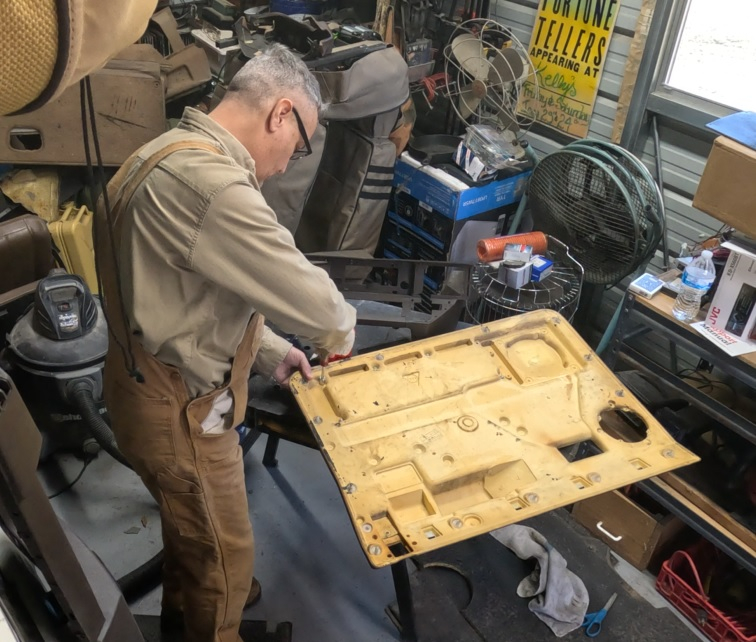
I’ve put together a video of me assembling the refurbished door cards for the Range Rover Classic. I didn’t record an intro nor did I record an outro. It’s just me assembling the cards. If you watch the Working Axle YouTube channel [YouTube.com] you will see some of the prettiest videos. If you aren’t watching him, you are missing out. His videos are simple, cinematic, and yet informative, and he doesn’t say a lot. So this is my homage to his brilliant work. Unfortunately for you, my videos aren’t as pretty or well shot, suck to be you, never-the-less I appreciate you visiting me and sincerely hope this content assists you.
So there’s no pithy commentary. I had to stop at one point and run to the hardware store to get more nuts and bolts. Just some assembling of door cards.
Brown is back!!! I think these door cards look great now with a new coat of paint. The dark brown is very similar to some of the interiors of modern cars today. I seriously looked at getting dark brown seat covers. But in the end I went with the Knightsbridge seat covers so they ain’t going to be brown.
Looking for the thread specification was pretty easy with a Google search. I stumbled on this thread on Rangerovers.net. “Tex” from Italy states its a M10x1.5. “LanceL” had a novel idea to use a M10 Rivnut.
I decided to use a M10x1.5 nyloc nut. I also bought a bolt to go with it which provides a clean threaded path to the nyloc nut. I also used some of my supply of Dr. Crafty Clear Epoxy Resin [Amazon.com]. As you will see in the video. I cleaned out the shift knob. I also carved “channels” in the knob to provide “keys” to keep the resin from someday rotating inside the perfectly cylindrical knob.
I then placed the bolt with the nyloc nut on it down inside the knob. Mixed up my resin and poured it in. It took 72 hours to cure. I let it sit for a full week, due to work, and a living history camping trip I had planned at Ft. Towson [Oklahoma Historical Society].
This project turned out great. It was easy, didn’t require any tools that most Land Rover owners don’t already own. I was genuinely surprised this actually work as I had hoped it would. Now I can turn to the rest of the 3000+ things I need to do to the Big Whit Bus to get her back on the trail.
I decided that my existing cell phone and tablet mount in the Range Rover Classic needed to be replaced. Mr. Fisher and I went to the MOORE Expo [Moore Expo] in 2022. We saw lots of products and gear. One of the cool pieces of gear was the Bulletpoint Mounting System.
Mr. Fisher bought a system for his new Chevy Silverado. Once we got home, I decided I needed a system for my F150. My existing cell phone mount was disappointing and needed to be replaced. I got to thinking that I should upgrade the mounts in the Range Rover Classic. I took some measurements and emailed the company to ask which of their existing system would fit best for the measurements. I chose not to cut up my coin tray. I did have a thought that I would mount the system over the tray. But it would have had to be cut and would have been useless if I wanted to remove the system and do something else.
As you can see in the video, not everything goes according to plan when you are “fabricating” stuff. I had to make a makeshift painting “booth” in the sunroom in the house. The temps in the shoppe were too cold to be painting, but it was a toasty 76F in the sunroom.
Mrs. Okierover didn’t fuss too much this time about the fumes.
Overall I spent four or so hours putting that together. The assembly was a lot of trial and error. I think it looks good and is very sturdy and will be perfect for holding my cell phone and a new tablet once I decide what that might be.
There are lots of accessories for this mounting system. I’m thinking of the handheld radio and or the microphone mount. Of course I have to decide on a radio before buying.
I’ve add a Patreon account. The costs of maintaining the website add up each year and if you like the content I provide chip in. Contributions are appreciated.