Refurbishing / Replacing the Subwoofer (Post #633) 11/26/2023

Subwoofer work

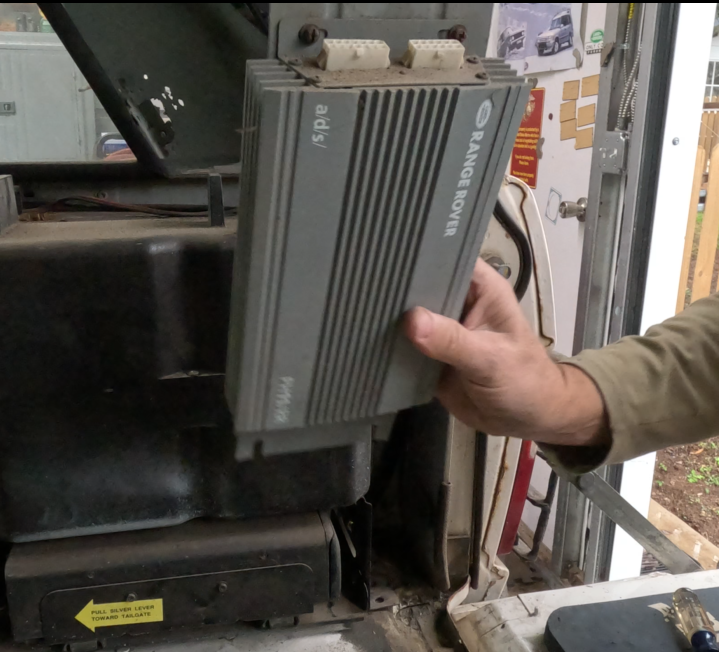
Ever wonder what is inside of that gigantic custom-fit subwoofer box in the back of your Range Rover Classic…well wonder no more. I had to pull all the parts of the sound system out of the Big White Bus to investigate my rust issues.

It takes a few bolts to get it out but everything is easy-ish to get to and you don’t need any special tools. Take the amplifier off the subwoofer box. Then tackle all the bolts. Once the subwoofer is out you can get to the antique CD changer. Actually in 1993 a six disc CD changer was straight up gangster. My CD changer worked for a few years. It then got a little buggy. You could get it to work if you slid it out and slammed it back in. Most of the time it started to be available at the head unit after that.

It all has to come out. I have a new head unit. I have new speakers. I don’t know if the amplifier still works. I will have to sit down at some point and try to figure out all the plugs and see if the amplifier will be part of the equation. Having a working subwoofer would be a nice addition.

Once the subwoofer is out it takes 10 screws and a little gentle encouraging and the box will come apart. It’s a relatively simple setup. There is a dual cone speaker inside and that’s it. Mine as you will see in the video is toast. the cone has disintegrated. It is at least 30 years old probably closer to 33 considering assembly line technology of the day.

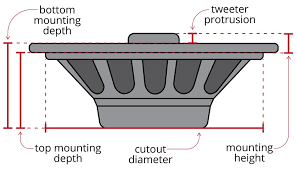
So the speaker will need to be replaced. In the video I speculate about the size but it turns out to be:

  • Cutout Diameter 6.5 inches
  • Top Depth mounting 3 inches
  • Bottom Depth Mounting 3.25
speaker measuring graphic

There are a LOT of speakers to choose from online. I went to Crutchfield.com. They don’t sponsor me, I wish they did, but they don’t. They have great customer service and the spec’s for everything are easy to find on their site.

I found a speaker that looks like it will fit.

That’s not a lot of money and 4 people think it’s pretty awesome. Mounting that is still a question, but I’m not worried. I will figure it out if that is the direction I go.

There is some debate going on in my head about replacing the old one with a NEW subwoofer. I found a Kenwood on Crutchfield that was not all that expensive.

Kenwood Excelon
ribbed polypropylene cone, sounds naughty….

It’s pretty small too. Just a little under 18x12x6 inches. I’m certain I’d have to cover the speaker cause it would almost certainly get damaged if I didn’t. I am confident it would fit in the space. But the real question outside of would it be better is…. am I really saving enough space to matter? I’m not sure I would gain anything. The space would have to be VERY creatively designed to take advantage of a few inches more here or there.

This gives us the cheaper option of just buying the speaker and figuring out how to wire it to the old AMP and the new head unit. Another plus of this operation was the elimination of the CD player gives me 12 volt switched power line back in that corner. That might come in handy, who knows.

I like tunes as much as the next guy. I even have a playlist named, “Can’t Be Too Loud”. It’s got some songs that you turn up until your ears bleed.

  • Van Halen’s Eruption
  • AC/DC Back In Black
  • Living Colour’s Cult of Personality
  • Beastie Boys Sabotage
  • Black Sabbath’s Iron Man
  • Wagner’s Die Walküre (Ride of the Valkyrie)
  • Carl Orff’s O Fortuna from Carmina Burana

There are more, but you get the picture…you probably have a list of your own. Whenever I hear these songs I turn them up to maximum volume.

Mostly today…I listen to audio books. Sooooo many audio books. It’s not uncommon for me to just drive, no music, just the window down and the sound of the engine and the tires on the road. That recharges my batteries almost as just sitting in the woods next to a fire.

There is a lot left to do to get the sound system installed. I’ve got to sort out the plugs and get everything wired up. The dash is still not installed. There is an order to putting the BWB back together…and the windshield needs to be first. I’m almost certain there is water leaking in and the last thing I want is to get his all put back together and still having water coming in.

That’s it for this week. As soon as I make a decision I’ll post it up and when I starting putting the sound system together.

Your sponsorship on Patreon would be appreciated if that is in your budget. Otherwise LIKE and SUBSCRIBE to the YouTube channel. Leave me a comment…I love talking to people about Land Rovers.

Thanks for reading and Happy Rovering.
Passenger Side Rear Wheel Well Rust – Part 1 (Post #631) 11/14/2023

rats

Now that I have the Range Rover flopped in the shoppe I can start on the rust abatement. But first, I thought I should get some oil and some other fluids and do some fluid refreshing. That was a great idea if I had done that BEFORE I started the Big White Bus. But the fact I was doing it AFTER I ran the engine, -2 points.

I loaded up one 5 gallon barrel of oil and headed to my favorite O’Reilly’s. When I got out of the truck my folly was apparent. I had successfully done an Exxon Valdez [Wikipedia] imitation. The metal barrel had rusted through the bottom and dropped 5 gallons of used oil all over the back of my F-150 and on to their Prince William Sound parking lot. I ran in and bought two bags of kitty litter/oil soaker stuff and with the help of one of the guys we spread all that all over their parking lot. I haven’t been that embarrassed in a long time.

I finished up the clean up of the back of my F-150 when I got home and started getting the rear passenger wheel off to start the investigation. The video shows I had a mostly optimistic view when I started scraping the rust. In comparison…the passenger side is no where near as bad as the drivers side wheel well. The rear window is another issue entirely but let me attack these one at a time.

I’ve got two holes SO FAR. I still have to get the wire wheel out and take the rubber back to metal where there are brown spots. The worst looking SO FAR is the bottom of the C Pillar is rusted out. The reason for the rust there is the sunroof drain hose exits there and the crappy plastic grommet did not keep water out. And it is entirely likely that there was nothing inside the C Pillar that would pass for paint. So that was an obvious place for rust.

I’m going to replace the sunroof drain tubing and possibly fit a “Hose Barb Thru-Bulk Head Hex Union 90 Degree L Right Angle Elbow Barbed Brass Fitting with Flat Washer Gasket Water/Fuel/Air” fitting. Something like this….

I’ll add a rubber washer to assist in keeping the water out. I’ve got to measure the tubing and get the right one ordered. They can be found on Amazon.com. Not sure if they are using ID (inside diameter) or OD (outside diameter) to determine if I get 3/8″ or 1/2″.

This may be complete folly but what the hell right? If it works, I’m a genius. If it doesn’t work, I’m still a genius, just a terribly misguided one. Half of me says extend the drain line to behind the mudflap. It would not be that hard to add a little more distance to the hose and NOT put it back in the same poorly designed place. I mean seriously, lots of water and ice and mud and road salt and roadkill chunks (mostly opossums and armadillos and skunks) and all kinds of crap fly off the tires at extreme tangential velocity [Study.com]. The fact that plastic gromet is even able to not be dislodge is a miracle. So…let’s try to make it better!

The headline came out also so I could get the sunroof drain. It had to come out anyway, because it needed to be replaced…again. This will be the third and final. If this is needed again while I own this rig, it will be painted and forgotten.

More next week. Like and subscribe my Youtube channel. Send me a comment too…I love to converse with you.

Thanks for reading and Happy Rovering.

patreon.com/okierover

Starting and Moving the Big White Bus (Post #630) November 6, 2023

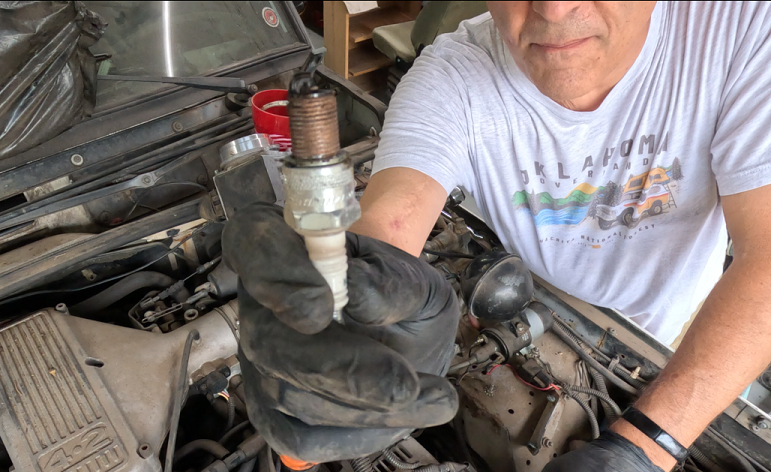
holding a spark plug

This weekend I had to get the Big White Bus running so I could turn her around in the shoppe bay. This required me to reinstall the spark plugs and fashion some kind of a temporary seat.

The plugs went in just fine. I applied a new coat of copper anti-seize. It’s time to buy some more as the tube I have is getting a bit dry. But it was sufficiently lube-y to pass for grease.

I got all the plugs in and the wires on without an issue. I got the coil hooked back up. I then stared at the engine bay to confirm everything was ready to go.

Next I needed a seat. I had a lovely 12 inch wide, 16 inch long pine board that covered the electronics and made a lovely “field expedient” seat. And I was ready to start her up…..

….then the GoPro decided to stop recording. Right when I needed it to be recording…it wasn’t. Heavy sigh.

So everyone misses out on the magic moment. Typical.

I turned the key and heard the fuel pump do it’s initial pump. I turned the key and she fired up as expected. Victory! Well, a battle was won, let’s just leave it at that.

I moved all the flotsam and jetsam from around the Range Rover and moved the F-150. I jumped in and drove her up the drive way, made a flawless, 4 point turn :/ and brought back down to the shoppe. The windshield was so dirty I had to clean in order to see how to line her up in the bay.

My daughter RovErica left me a sweet message on the windshield the last time she was home visiting. I left the side with the message undisturbed.

Now the BWB is flipped around. I can now begin to abate the rust on that side. HOPEFULLY these repairs will not be as extensive as the driver’s side. The driver’s side has been the side with the most trauma from being rear-ended by inattentive drivers. My welder and the power for that welder are on that side of the shoppe so turning her around was required.

That’s all I’ve got for this week. Like and subscribe the YouTube video. Comment if you like too…I love to hear from my readers. I also have a Patreon that sadly has NO current membership. Every little bit helps and if you feel my content is worthy of a couple of bucks a month…I promise not to spend it on rum.

Thanks for reading and Happy Rovering.
Reviewing the Painting of the Interior Trim (Post #628) October 16, 2023

I painted the interior trim last year. I didn’t publish it…not sure why. Anyway, I cover some of the details of painting the interior trim while looking like Kip from Kip’s Big Boy fame. We had a Kip’s in OKC 40+ years ago…I remember eating there once.

Anyway…I guess I hadn’t looked in the mirror that day and my hair is doing it’s own thing. And apparently I can’t dress myself either. I’m slowly moving toward “crazy old man who don’t give a damn” mode.

In this installment I talk about my work on the interior and what might be next. Like stripping the shellac off the wood trim and re-staining it a darker color to match the dark chocolate interior.

I added two USB charging ports that show the voltage from the battery. I don’t smoke in the Big White Bus so I really didn’t need the cigarette lighters. These are way more functional for all the USB powered “everythings” that we all need to carry. I’m fooling myself that I only need four of these. When I wire up the rest of the battery system for the back I’ll have quite a few more that will be pulling from the auxiliary battery I’m planning to have onboard.

It’s a short video shot back in November of 2022.

Thanks for reading and Happy Rovering.

The Big White Bus Will Not Start (Post #625) September 25, 2023

spark plugs

In this post I am sort of after the fact prepping the motor for it’s first start in several years (at least 3 years). I was given some advise that I should lubricate the cylinders prior to starting for the first time. The reason is obvious. The cylinders are dry.

I’ve already tried to crank the engine. That was evident in the last video. So perhaps doing this NOW is a bit superfluous. Meaning I’ve probably already damaged something. But maybe not, I’ll know when I get the engine started.

I’ve pulled plugs and I’ve squirted some WD-40 inside each cylinder. How much you say? That’s a great question. I was told at least a couple of seconds of spray. The WD-40 fluid is going to adhere to the cylinder walls and if the rings were stuck, would have acted on them hopefully freeing them. They make a special “foggy spray” for this application but I was told just to use WD-40. I highly recommend you do your own research on this. I’m damaging my own stuff. I don’t want you to damage your stuff if I’m wrong.

The fuel pump is on the way and might arrive today 9/25. That would make it 8 days since I ordered it. They don’t work on Saturday or Sunday so Monday was the first time they started to “fullfill” the order. I am also in the farthest away region from their shipping hub. So a minimum of 5 days of transit. Looking at their location, I could have driven up there, picked up the part in person, and arrived back at base camp before the shipped part arrived.

Next step is to get a fuel pump installed and the Big White Bus started. Drive it to the top of the driveway. Hose off the parts so I can coat them with rust conversion paint. I will then turn her around and have the starboard side on the same side of the shoppe as the welder. I have some rust under the starboard rear wheel well the might need some patching. I also have the repairs to the existing rust spots identified in other videos. B pillar, D pillar.

You can support me on Patreon if this content is appealing. I would be greatly appreciated. Like and subscribe to the video channel.

Thanks for reading and Happy Rovering.

The Big White Bus Will Not Start (Post #624) September 18, 2023

Fuel pump

Well, awesome. The Big White Bus won’t start.

I have fired it up once since I parked it in my newly constructed shoppe 5 years ago. I guess I should have expected there would be “issues”. But I wasn’t expecting the issue to be this one.

Mr. Fisher came over and we diagnosed the issue. We started with checking the power at the pump. As you may be aware, when you turn the key over it powers the pump briefly. So if you just “turn on the key” and go back there to check the voltage you won’t find any. That’s why it takes either some seriously creative use of a volt meter or you get one of the bestest friends to come over and turn the key for you. We had voltage all the way through the wiring harness.

We then confirmed we have spark from the ignition system. I pulled the number 1 plug and with a screwdriver I grounded it and watched for spark. You can buy a fancy spark tester, matter of fact I think I own one. I have no idea where it is though. Spark confirmed.

So we have two of the three things (Meatloaf would say that “ain’t bad”) to make the vehicle run. Air and Spark. Now why aren’t we getting fuel.

I pulled the gas line off at the regulator on the back side top of the engine and had Mr. Fisher crank the ignition. We should have had gas squirting out if it worked. It did not. This fit with me NOT hearing the pump run when the ignition was turned over.

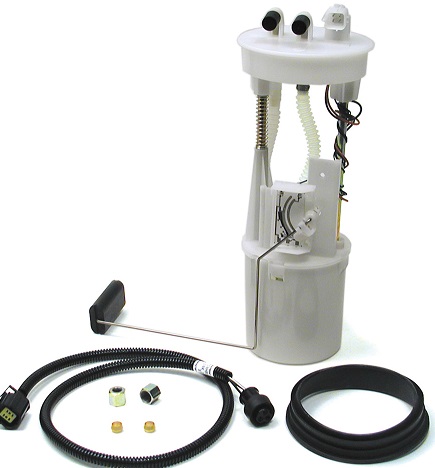
The only thing left was to pull the fuel pump and do a visual inspection. What I found was not expected. I said, “Wow.” a lot in the video. There were several parts that were obviously degrading due to being submerged in petrol for so long. There was visible rust on the steel parts as well. Generally the pump was in a terrible state. I was not aware that petrol would do that to those parts. The only gas I ever put in my Classic is 100% real gas, unless I am in Texas where they only sell ethanol (at least the last time I was buying gas there). You would expect ethanol to eventually separate and turn to water. You can read all about that on the Road Guardians website.

I will be replacing the fuel pump and have ordered the part from Atlantic British. I found some that were cheaper on Amazon. But my skepticism and need to have it delivered before next October weighed heavily on my decision where to purchase. The pictures all looked like the pumps were manufactured in the same place. Same white plastic. Same blue plugs.

Fuel pump
PRC9409K

If you look on Amazon you’ll see the pumps look like the same ones. If I had unlimited funds or sponsorship, I’d buy one from everyone and do a side-by-side comparison.

All this “BUY IT NEW” has me thinking about what this would cost if we just fixed the pump. All you need to do is replace the pump in the collector can (that bottom part). I’ll do a post about that in the coming weeks.

So…do I drain the tank too? If the gasoline HAS turned to varnish I should probably put some treatment in there. I’m thinking I’m gonna add a silly amount of STP Fuel Injector cleaner in that tank. I can say, WHEN I get it running It will run for quite a while before I shut her down. I want to give the truck plenty of time to dislodge any crap in the fuel lines. I’m also guessing I’ll need to swap the fuel filter too.

If its not one thing, its another. It really, never ends.

Mr. Fisher also brought over his Viair Compressor. We spent some time looking at it and checking out all its features.

Thanks for reading and Happy Rovering.