Footwell Repair Part 9: Seam Sealer (Post #656) 6/3/2024

In this installment I apply seam sealer to the most recently welded “L”. Seam sealer was not how I wanted to seal this joint up. I wanted it to be welded closed. That is just not possible. It wasn’t originally built that way. I can only hope the seam sealer I’m using will last long enough for me to quit this Overlanding Hobby.

I also look at the floor patch I’m going to need to build. I talk about the two structural bends in the panel. I saw the guy on Make It Kustom [Youtube] build a jig and a tool to make these kinds of bends. You can look through his videos to find it. I’m going to think long and hard about this before I tackle this problem.

It might be fun to build the jig. I will need to buy a router bit to get the jig in the right shape. I’ll probably need to build a special air hammer bit like he did too. It would be a one off fix. I don’t think I will ever tear this apart again.

It’s a short video and I know it’s über riveting content watching me smear seam sealer. In my defense I didn’t have time to produce anything else this weekend. Saturday we visited the Evil German Dude and his lovely wife. Paparazzi Ford was there too. The Evil German Broad made brunch for us and we all got to catchup on the latest happenings and see their almost finished “cabana”. That’s what the county commissioners called it for tax purposes.

It’s an amazing space and it took a lot of forethought, planning, engineering to make it as awesome as it is. Several things I saw had me comparing how much time I’ve spent thinking about the future state of the Big White Bus. I know I’ll have some great ideas that will need additional thought and probably re-engineering to get them right.

I picked up a parts washer from EGD too while I was there. So that’s pretty cool. That’s all for this week. Like and subscribe to the blog and the Youtube channel.

Patreon.

Thanks for reading and Happy Rovering.
Footwell Repair Part 8: Finishing an “L” for the Bulkhead (Post #655) 5/26/2024

I have some good news and I have some bad news….

The good news…I have the swimming pool setup and I’ve been in it twice this weekend.

The bad news…I still suck at welding. In my defense this part of the Range Rover Classic is a mish-mash of panels converging into a very small space. There are no less that three different pieces in this area that are plug welded and the gaps filled with seam sealer. In a future video when I build the rest of of the upper wheel well, I will point out the three layers of panels that go into building the wheel well. It’s so convoluted that screws were even used to hold the parts together. SCREWS!

Anyway. I build my replacement parts and attempted to get them married together. Ironically I have three pieces of metal to get this done. Well four if you count the patch of the side bulkhead.

Did I say it was hard to weld under there? NO? Well it’s damn hard to weld under there. You have basically two positions. Mashed up against the wheel hub and laying on the ground with welding slag (molten metal) falling on you. Both, super awesome as you can well imagine.

I said I was swimming earlier in this post. While sitting on the patio drying off Mrs. Okierover noted the weird red scratches on my right arm. I told her they were from being mashed up against the hub.

Manufacturing the repair pieces was a bit of folly too. I had to make the “L” three times. First time was an experiment to see if I could make a bended L. The second was because I measured the piece without the floor panel in the right place. The third time was a charm or I decided that was going to be the last time I made it and I made it work.

Don’t get me wrong, careful thought was expended. A LOT of thought. And in the end I was still wrong but not by much.

With a lot of clamping and grinding and grunting I have the pieces welded together. The welds are ugly. A lot of seam sealer will be used to discourage water from coming in these seams. Probably about as much as was used by the factor but the difference is my metal is covered with primer. Theirs was not. To protect this section I will rely on primer, at least three coats. Rust encapsulator will also be liberally applied. And over that, rhino/bed liner. Inside the cab will also be a layer of Fat Mat.

Will all this work and product prevent rust? Probably not. Who are we kidding? The Range Rover Classic was built to rust. The goal was that it rusted out on the second or third owner. I had the added bad luck that my Range Rover was a victim of a front end wreck before I owned it. Sports and Classics did the best they could to weld a donor front end on to the rear half. And I’m doing my best to keep rust at bay the best I can.

There were 19 segments filmed over two days. I left a lot of the welding out of the video. Mostly because it was difficult enough for me to get into place to weld, there really wasn’t any room for a camera.

It was hot in the shoppe too. Temps at or above 100F (37.8 C for those of you living in countries that have never had a man on the moon). The camera overheats when I’m filming in these temps. So the camera sat on the air conditioner when I wasn’t filming. I wonder if anyone makes a camera that can do warmer temps? My next camera will be evaluated for temps.

This weekend was Memorial Day.
Freedom is not free. So many have given everything they had to keep you free.
Remember those and their great sacrifice.

Thanks for reading and Happy Rovering.
Like and subscribe.

Footwell Repair Part 2: Disassembly (Post #649) 3/24/2024

Thumbnail Footwell Repair Part 2

In this installment I begin the disassembly of the front fender to expose more rust. And I was NOT disappointed. I found just about what I expected. A rusted through footwell. On a positive note…I think I found where the water was getting in to soak my carpets. I have no idea how to correct it, but at least I found it.

In order to get to all the rust the front fender had to come off. I encountered a bunch of rusted screws and bolts. I had to cut several of them off. I even used an air chisel to remove some spring type U nuts (yeah I had to look that name up, I had no idea what they were called). I can tell you they were a bitch to remove. But after you deconstruct them a bit they came right off. I’ll likely replace the U nuts with stainless steel bolts and nuts.

The fender didn’t put up much resistance after I got the U nuts off. I then had to remove a plastic fender piece. You can probably guess that the plastic clips weren’t going to survive being taken off.

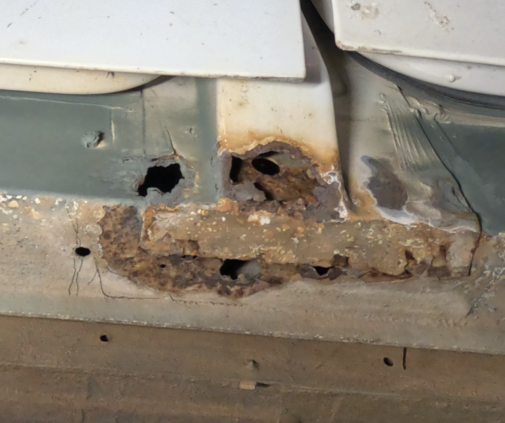
Underneath I found a lot of surface rust. I put the angle grinder with a wire wheel to work. I cleaned up some of the rust and found a bunch of really bad metal.

In the seem between the wheel well and the footwell I found what I think is the source of my wet carpets. This spot is going to be hard to fix. I don’t know what needs to be cut away and what needs to be welded on.

Inside where this failed bulkhead is is covered with Fat Mat. That will need to be removed. Heat gun and patience I hope will assist me in getting it removed. There is a nice cluster of wires and relays right there too. So joy of joys I’ll get to relocated all that too!!! Woot!

I also took the lug nuts and cleaned all the rust off them. I have the first coat of paint on them. They’ll get a second before I put them back on.

That’s about it for this week. I got to watch some severe weather out in western Oklahoma on Sunday. It all petered out before it got to the Okierover Base Camp.

Like and subscribe the video.

Never trust quotes in social media.

https://youtu.be/Hr4vN39uf8c

B Pillar Post Repair Part 2 (Post #647) 3/10/2024

Thumbnail B Pillar Part 2

Part 2 of a 2 part video series for repair of the B Pillar. In this video I cut (poorly) and weld (even more poorly) the premanufactured B pillar end cap on to the Big White Bus.

All the measuring in the world could not have prevented me from screwing up the B pillar end cap. Not having the right tool, I should have used a bandsaw for the cut, led to me making a bad cut. Probably didn’t help that my measurement was off by 1/8 of an inch. Leading me to attempt to bridge that gap with welds. I had…mixed results.

I was careful, real careful, measured more than once. None of that kept me from cutting this wrong. What’s worse cutting too long and then cutting too much off trying to fix it OR cutting it too short on the first try???!!!?

Thankfully this entire section will be reinforced and protected with a rock slider at some point in the future. My worst fear is this rusting out again. Or maybe its not… at some point this entire vehicle may become scrap. Only the Fates know.

Thanks for watching. Like and subscribe.

Thanks for reading and as always Happy Rovering.

Getting close to finishing this side.

Hyperlink to the video https://youtu.be/rQdrRkAOw_k

Prep for Welding, Part 2(Post #637) 1/1/2024

B pillar rust

Happy New Year everyone!!!

The plan this weekend was to do some welding. Unfortunately the welding supply store was closed. So I was unable to source the shielding gas I needed. That…was frustrating. I instead knocked out a project my wife has asked for “she claims” for 18 months. I’ll admit it was a while…but maybe only a year. In any event, the pantry portion of the former laundry room now has fancy shelves.

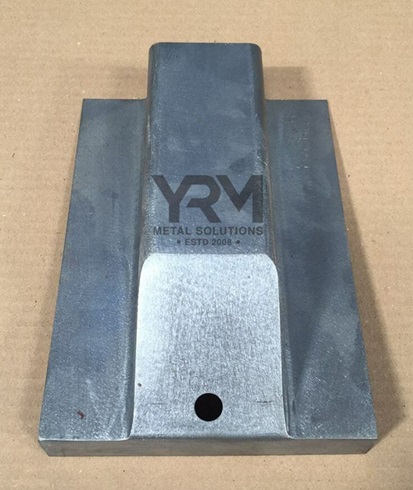
So today I did some more investigating of the rust, primarily on the A and B pillars at the sill. The B pillar is mostly rusted out. It is as bad as it looks and I’ll need to source the ready made B pillar lower portion. I’ve seen them online…but don’t remember if they are available in the US of A. I’ve found at least three businesses in the UK. Part is only about $33.00(US) the shipping to the US is the same amount. More research is needed, or I weld up my own version.

YRM B Pillar Replacement Part
YRM B Pillar for Range Rover Classics and Disco 1

The A pillar has a hole next to it in the sill. I think it would be an easy patch to fix.

So this week I’ll get some more shielding gas and I’ll be ready to do some repairing next weekend.

Once again thanks for stopping by and for watching the videos.

Like and subscribe… Patreon if you like this content and want to help me keep this site up.

Thanks for reading and Happy Rovering….

Fixing the D Pillar Rust (Post #634) 12/11/2023

I can see my breath!

If you follow the blog you have seen the rust damage from open cell foam in the upper D Pillar. The foam got wet and over time ate through the pillar and caused a hole that allowed water into the rear. It wasn’t likely a “stream” of water as the pillar had a cover and the foam also blocked the hole.

In any event, it had to be repaired. I went to some effort to research the removal of the rear quarter panel windows. Damaging the seal is a non-starter. Replacement seals cost in the neighborhood of $500.00(US). And there is also a chance of breaking a window.

I had the Evil German Dude over for Thanksgiving and showed him the damage. He was pretty certain that I could weld a patch there WITHOUT removing the seal and window. Using caution and allowing time for the welds to cool, he was sure that the welding would not be a problem.

Trusting he was right, I proceeded to build a patch and weld it in. The patch was pretty easy to make. You’ll need a bench vise or a metal brake to bend the steel. Well…if you have to bend steel for your patch. I got the patch in place, wire wheeled the paint and primer away and started welding.

My first welds didn’t stick. I had to work through that. Some of the issue was a crappy ground point. The other could be paint I hadn’t removed. I finally sorted that out and made the weld around the piece. I will come back with some seam sealer and make sure there are no holes by sealing them with a bead of sealant.

I was a bit surprised at how well this went. I was expecting a much more complicated repair. I’m not in love with the welds. But such is the way you have to weld thin steel. They also are not in sight so they didn’t have to be pretty…and they aren’t pretty.

The temp cooled off this week. It was 40F degrees when I finished up. Funny how two and a half months ago the temp was three times that in the shop. We got a little reprieve on Sunday and it got above 50F degrees.

I’ve been kicking around an idea if the window had broken. Building in wing window storage boxes. I could use them to pass through power to solar panels, shore power, a heating tube for a propane heater, and the most exciting, water for showers and cooking/washing hands and such. I’ve got the bug so I may build a mockup with cardboard to see if it would work the way I’m thinking. It’s maybe a project for another day. You can check out this video which served as a good portion of the inspiration. Dirt Lifestyle has two videos on gullwing windows for his Discovery II. This is the latest [YouTube], and is an improvement of the original, enjoy.

I hope you enjoy the video of my work. Like and subscribe and if you want to help through a recurring contribution, Patreon is helpful way to do that.

Thanks for reading and Happy Rovering.