During my recent repairs of radiator cooling fans and power steering hoses I came across a couple of broken bits. While discussing the electric cooling fan project with the Evil German Dude we noticed the belt that drives the air conditioning compressor was very loose. So while I was under the bonnet for the hoses I thought I’d just sort that out. I didn’t have the replacement hose and it was New Year’s Day so there was no way to get the hose.
I got the pulley in place and began tightening the bolt on the belt tensioner. It never got tight. At some point I decided something was not right at all. At first I figured the bolt was stripped. That has been my experience in the past so my brain naturally went to that first.
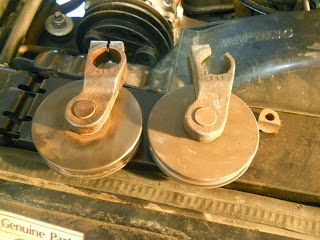
I removed the bolt and the bracket and found…
it was broken. Wow. That is disappointing. As you can see in the picture above there are two of these on a Range Rover Classic 1987-1994. The 1995 model has a spring driven unit. This spring driven unit is common to most “modern” cars. This friction method is serious old school. I didn’t say better, I said old school.
I knew finding this part was going to be a nightmare. I immediately called Paul Grant. He is a master of parts and he told me he thought he had one in inventory. I ordered it. It should be sitting in my mail box when I get home today. According to Paul, these are threaded on opposite sides so the one that works for the AC belt will not work for the water pump belt. I’m guessing this is going to added to the list of parts I pull from Range Rovers I find in the breaker’s yards. If you are looking for parts I highly recommend Paul. Stop by his eBay Store and buy something.
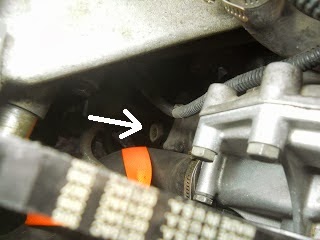
The second wasn’t really visible until I had the belts out of the way. Some how the Oil Pressure Switch lost its spade connector. I had noticed a couple of wires loose but was unsure where they went. The spade end doesn’t look like any thing I’ve ever seen before.
The oil pressure switch is found on the side of the engine right where the oil filter is screwed on. I know I’ve changed my oil at least once recently and I should have noticed this but didn’t.
I did find an interesting thing when researching parts sites. Rover’s North lists this part with a really great diagram of it’s identification and location. It also lists for 54.95$(US). However on the Atlantic British site it lists for 7.95$(US). On the Rovers North site similar ones for Discovery II’s also list for 8.95$(US).
I find that a helluva difference in price. I’m almost afraid to ask why. I think I’ll order the 7.95$(US) one from Atlantic British. I’m running out of funds for this round of repairs and I still need to purchase some oxygen sensors.
In my quest for improving the gas mileage by swapping to electric fans I will need to only change one variable at a time. There are potentially four things I believe I can do to improve gas mileage:
- Remove roof rack (this one is obvious)
- Replace oxygen sensors (when they begin to fail you will notice fuel use go up)
- Replace my mechanical fan to electric fans (increased torque and horsepower)
- Reinstall the air dam (another obvious one)
For the sake of the scientific process I think I’ll change only one variable at a time. I can run a couple of tanks of fuel and get a few MPG readings. I’ll report them all back as soon as I get the data.
Thanks for reading,
You are driving a brick what do you expect your gas mileage to be?
and Happy Rovering.