Flatbed of Shame…again (Post #517) 11/18/2014


Well it happened again. The Big White Bus came home on the back of a wrecker. Sorry, no pictures this time…I just didn’t have it in me.

The 5:00 rush hour had me turning off the highway to take the back roads. I had just started down North Kelley in OKC. I was talking to my wife about the neighborhood I was in. I will be kind and say this is a “rough” area in Oklahoma City. Shootings after dark are not uncommon.

I no more said I’d be out of the bad part in a mile when I heard “BING” and a lovely grinding sound. Of course there was a lot of traffic on this side road just when this happened. I put it in PARK and then back into gear. Nothing but grinding. I put it in PARK and got out to see if anything was obvious underneath. She was rolling down the street as I got out.

I set the emergency brake and climbed under. Nothing obvious. A nice gentleman stopped to help immediately. He directed traffic while I coasted back to the side street and off the main artery I was on. He was very helpful. I was very aware of my surroundings and this is not a place I should be after dark. That was confirmed when the gentleman said to me, “You got dem doctor clothes on so you should be alright.” Continue reading “Flatbed of Shame…again (Post #517) 11/18/2014”

Gearing Up for SCARR, Part Four, More Maintenance (Post #465) 3/14/2014

8150025_cst_06812_pri_largI can’t be the only person who gets that special warm feeling inside when all the tick boxes are filled in on maintenance. I love it when I’ve gone over my Land Rover and done all the maintenance.

Fluid and filter swap for the transmission. Also a fluid swap for the transaxle and viscous coupling this weekend. I bought 20 quarts of Castrol® Transmax™ High Mileage – Automatic Transmission Fluid. I had never heard of it until I went to research my options.

It was cheaper than the first fluid I was considering. Royal Purple MAX ATF® was 14.99$(US) a quart. Royal Purple got rave reviews online but at twice the cost I don’t believe it will be 100% better than Castrol. I’ve never been let down by Castrol and I will continue to use it until someone can give me a solid reason to stop. The Transmax was just 6.39$(US) a quart from Advanced Auto Parts. O’Reilly’s did not carry it even though the Castrol’s website said they did.

My new oxygen sensors should also be in today so I will be putting those in as well. As near as my crappy record keeping can determine the last time I swapped O2 sensors was 6 years ago. So with 205,000 miles on the clock it’s time.

I am also installing the new power steering pump this weekend. This is going to be a very busy weekend. I should have probably scheduled a Garage Day with The Evil German Dude and Paparazzi Ford. Paparazzi Ford’s dad is not well and this was EGD’s “on weekend” at work. I don’t have any more time before S.C.A.R.R. so I’m going for it.

This is part four(-ish) of my Mega-Maintenance Month. I’ll pop some pictures up on the individual jobs as I have time to complete blog posts.

Gearing Up for SCARR, Part One
Gearing Up for SCARR, Part Two
Gearing Up for SCARR, Part Three

Thanks for reading and Happy Rovering.

Gearing Up for SCARR, Part Three, Maintenance (Post #463) 3/13/2014

A big part of not breaking down on the trail or on the highway for that matter is maintenance. Most Americans neglect maintenance. It’s easy to forget about maintenance. You go out to the driveway you jump in you turn the key and you drive. Our Land Rovers become “magic boxes that take us places”. If you don’t see a light blinking nothing is wrong, right?

Well partly, nothing is wrong most of the time, but that doesn’t mean something isn’t GOING WRONG. Let us take tonight’s maintenance. Grease zerks needing grease. If you let these go dry you lose your drive train. Universal joints can fail and then you have large heavy objects spinning very quickly. JagGuy lost his Range Rover Classic due to a failed u-joint. The drive shaft went through the side of the transmission. You don’t want that. Thankfully I have a storm shelter drive bay in my garage now and that should make greasing an easier task and it did.
There’s more after the jump…

Bloody Viscous Coupling (Post #209) 10/13/2010

My best friend’s wife commented on Facebook this week that the term “viscous coupling” sounded real nasty and ask if I should be posting about such a thing. Well I’d have to agree. Viscous coupling…(dramatic reverb)it does sound bad. Well thankfully the bad part is only in the difficulty of replacing one. On the OkieRover Difficulty Scale, this one is a SOLID FOUR. It was physically demanding and very frustrating at least from the point of view of lying underneath the Rangie to do the job.

I have been dreading this job for 4 weeks. I knew it would not be easy. I knew it would be a long day. I knew from the start this job was going to challenge me. None of these statements proved false.

In a technical sense this job was a straight forward bolts off, replace part, bolts on, job. The difficulty came in getting the bolts off and the tight spaces you have to work in if you are laying down under the Rover as I was. Thankfully the weather was nice and I had a relatively clean area to work in.

The first thing off was the front driveshaft. The nuts are nyloc and I’m pretty sure made out of a previously unheard of combination alloy known as “Leadoround”. Sound it out, break it down. As I told JagGuy on the phone, “I swear these nuts were half lead.” And boy, were they were quick round off.

Lets look at the tool options I had available to remove these nuts and their subsequent failure point…
Twelve and six sided sockets in 3/8th size 
Twelve sided
Improper tool, rounds off eventually 
Both sets of Sockets
Angle of the drive shaft and the size of the sockets prevented the sockets from being used

14 mm wrenches
Open ended
Improper tool, which rounds immediately
Box ended
Box end would not go over the end of the nuts due to the location of the drive shaft yokes

Vise-grips
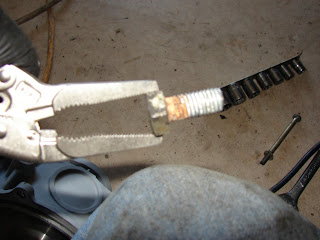
I had every size that is made. No seriously, I went down to Lowe’s and bought one of each. None were able to grab without tearing up the nut

I tried, no seriously, I really, really tried. Eventually the nuts were so damaged I had to cut them off with the angle grinder and a cutting wheel. I got some nicks on the yokes of the drive shaft but they are not structurally significant. At least I don’t think so.

Two things I must immediately mention. First, this job would ideally be done without the exhaust in the way. The second, dropping the drive shaft at the universal joint. Both of these would have made this job easier. I chose not to do either for the simple fact that every time I touch something I get two more projects to fix. With that I’ll continue…

I managed to get one bolt off conventionally with the wrenches, this left three to cut. So with red hot magma sparks flying all over the place and most notably resting in the palm of my hand, I got the bolts cut. That hot ember resting in my palm while I held the angle grinder tested my United States Marine Corps instilled discipline to its maximum peace time setting.

In some manner or other I got the nuts cut off. Two required additional persuasion with a chisel and hammer. They provided little resistance to these brutal tools.

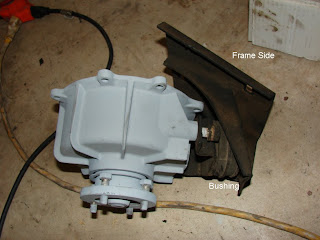
The bolts holding the viscous coupling (VC) were next. Thankfully these came off with just a little elbow grease. You can get to most of them with a little effort. Except for the one located under the transmission mount bushing. To get the bushing off you have to remove the frame mount and its three bolts. That was not a problem. One of these was a badly stripped bolt, most likely from the factory. That will have to be replaced, with a grade 8 bolt and nut, which I bought the next day.

Getting the frame mount loose from the bushing is only sticky point here. Once those two are separated, you can remove the bushing and its mount from the VC which is held in place with 19mm bolts. That just so happens to be the largest socket in my set. One of these bolts was badly corroded.

I have laid out the three parts here on the garage floor so you can see another (all be it useless) picture of how all the parts are assembled.

I also took a picture and labeled it with the various mounting points.

The next thing to remove is the transmission brace. For some ungodly reason the original designers felt that a bushing mounted to a frame member wasn’t enough bracing for this part. They added another brace that runs up to the transmission housing.

I removed those bolts and now had the VC ready to remove from the transaxle housing. You can see that the two are sealed with gasket maker. This has been a point of confusion for me.

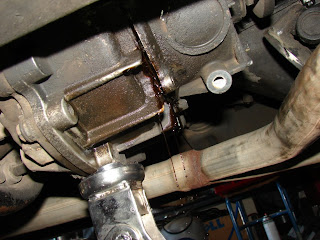
I cracked the case and immediately black fluid came out. I had planned for this and had a drip pan ready. I slid it into place and let it drain.

You can see the fluid that came out. Very black, and smelled mostly burned.

What I did not plan for was what I spent the better part of Tuesday reading about. There should have been lots of fluid in there. Matter of fact I should have drained the transfer case before I did this project.

Now I’m sitting here wondering, “what have I done?”

I have a sick feeling in my stomach.

I read through this forum post on RangeRovers.net. I learned a lot. I learned what type of fluid to put back in the transfer case, automatic transmission fluid. I learned that the fluid that was supposed to be in there is important for COOLING and the obvious, lubrication.

And from what I read, I deduced this:
Fact: The VC failed in my Range Rover. The failure could have been from either a broken rear drive shaft or lack of fluid, which may have damaged the VC. I may have destroyed my transfer case or significantly reduced its life. The transfer case has 180,000+ miles on it and perhaps I’m lucky it still works at all, at this point.

So where to go from here? I am going to drain what little fluid is left in the transfer case out and fill it with transmission fluid. I’m going to get the LWB out of the garage and drive it this weekend. One: to test the brakes. Two: to test the viscous coupling I just installed.

FACT: At this point I’m pretty embarrassed.
People look to me for answers and this was a huge rookie mistake. I’ve changed the transfer case fluid on my Discovery 2. Why I didn’t think to check my Range Rover transfer case is just stupid. So if you are reading this, remember to do your scheduled maintenance. Just because nothing is wrong doesn’t mean something isn’t GOING WRONG.

Well that’s all for now. More from this front as I learn it…

Thanks for reading and Happy Rovering.

Not much going on (Post #143) 5/6/2009

Just a post to let my readers know,

  • I’m not dead
  • Not much is going on
  • Still have stuff to sell from my Discovery
  • My beloved Big White Bus is nearly mine again

We have one more payment on the now wrecked-totalled-dead Discovery 2 and it’s off to the auto lots to buy my wife and possibly my son cars. I also have the rims and some other bits I need to sell from the Discovery. And, I get to begin driving my beloved Range Rover Classic again.

A few projects wait for me.

  1. The sunroof is malfunctioning.
  2. Rust on the lower tail gate.
  3. Headliner will need to be replaced again.
  4. Viscous coupler needs to be replaced/rebuilt.
  5. The fluid in the passenger side floor board needs to be sorted.
  6. New radio.
  7. Tint the windows.
  8. Air condition needs to be repaired/recharged.

The sunroof will be a chore I’m afraid. It drops down to slide and then slides about an inch and then stops. I’m sure it is fixable, I’m not sure what it is causing the problem. This will be easily accessible when I pull the headliner for a replacement.

The rust on the tailgate is another of the normal problems with Range Rover Classics. I have all the stickers to repair and repaint and rebadge the lower gate. I’ve watched Edd China do this type of job on Wheeler Dealers so many times I’m sure with a little guidance from JagGuy I should be able to sort this out in a single Saturday in his shop. I need to protect my upper lift gate while I’m back there and will learn what he did to prevent his from rusting out. I will post the procedure when I have it done.

A new one at Atlantic British
The viscous coupler failure is a very annoying problem. And could be the most difficult of this list to fix. I’m thinking the repair will be a used replacement. I will then have one on the shelf to rebuild in case the used replacement fails me.

The wet floor boards is most likely a leaking wind screen seal. There are some small holes in the floor pan that need filling as well. I will pay a auto glass company to replace the seal and refit the window. It’s not worth it to mess with this when doing it wrong could cost me a wind screen and more wet floor boards. I will pull the carpets and seal the holes most likely with welding.

Tinting the windows is a necessity of driving in Oklahoma. The afternoon sun can bake you like a cake. The air conditioning since it was converted to R134a does not cool like the R12 did before. I will replace the expansion valve and get the system recharged. Hopefully it won’t be a continuing problem.

A new radio will be a nice addition. The stock unit has a famously failed display. A used replacement unit is a couple of hundred dollars. There is a fellow in Arkansas, Roverville Radio that refurbishes your unit for less than 200$(US).

If I can’t find a good unit on eBay, I think I’ll just buy a new “modern unit”. That way I can get Sirius OR an iPod OR a memory stick OR Bluetooth my phone OR whatever is available right now to get tunes in my Classic. I’m sure what ever I buy the next technology will be release a week after I have it installed. So get your money together this summer for your own sound system upgrade.

Land Rovers and Music (Post #95) 6/19/2008


So I’m firing up Pandora.com and what do I see in the advert section? LAND ROVER! That made for a pretty nice start to my day. Sadly though it was an advert for LR2 and LR3. Neither of which I own nor will anytime soon. I’m not going to rant about diesel motors again…I’ll just let it go.

This weekend is going to be warm and I’m going to change out the plug wires and the plugs. I’m also going to swap the transaxle fluid again. It looked burned a bit when I checked it the other day. I’ve been getting the classic high pitched hum from the transaxle and decided I might see if another fluid swap will help with that.

I still have to find the time to do the bushing job on the Classic. I really don’t want to wait until fall when it’s cooler. I’ll probably just see if JagGuy will let me use his lift again. Some day (after I win the lottery) I’m going to get me a lift.

For Father’s Day my dear sweet wife let me road trip it to Frisco, Texas, aka The Surface of the Sun (108F after the game ended at 5pmCDT), for a Chicago Fire (my team) and FC Dallas soccer match. It was a great time. I got to meet a bunch of Fire fans I’ve been messaging on boards with and got to meet the Head Coach. Which is a funny story. The guy on the back row, far right is the Coach’s brother-in-law, and said we needed to pick up the tickets at a hotel. So we stroll into the hotel and Denis Hamlett stands up and introduces himself and hands us the tickets. SO AWESOME! So where’s the photo of you and the coach you might ask? Well my buddy and I had no idea who we were getting the tickets from so we were totally surprised and left the camera in the car. Well we’ll get pictures next time.

Thanks for reading and happy rovering.