

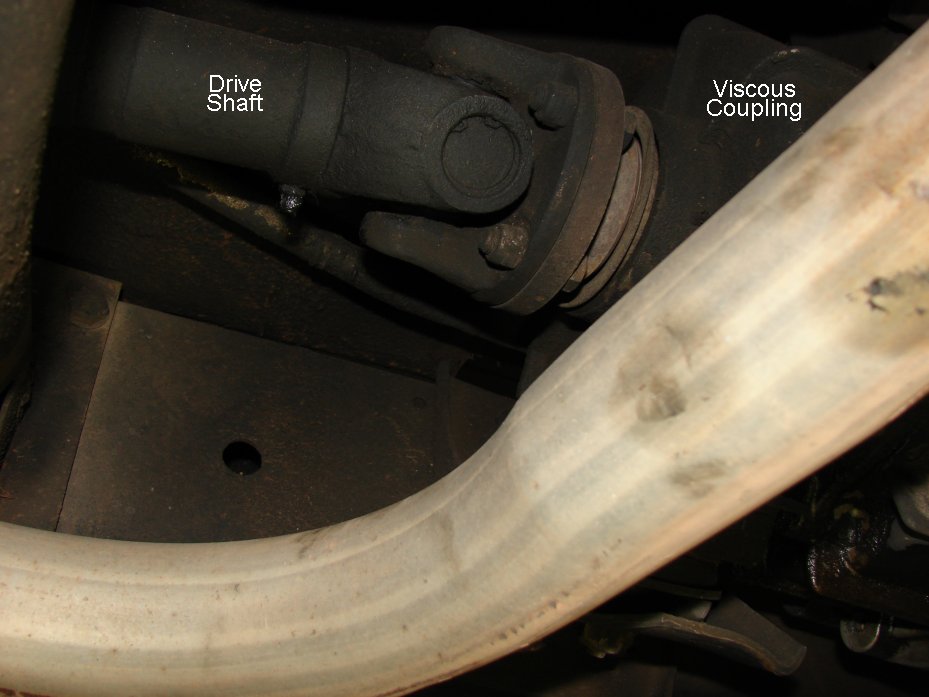
My best friend’s wife commented on Facebook this week that the term “viscous coupling” sounded real nasty and ask if I should be posting about such a thing. Well I’d have to agree. Viscous coupling…(dramatic reverb)it does sound bad. Well thankfully the bad part is only in the difficulty of replacing one. On the OkieRover Difficulty Scale, this one is a SOLID FOUR. It was physically demanding and very frustrating at least from the point of view of lying underneath the Rangie to do the job.
I have been dreading this job for 4 weeks. I knew it would not be easy. I knew it would be a long day. I knew from the start this job was going to challenge me. None of these statements proved false.
In a technical sense this job was a straight forward bolts off, replace part, bolts on, job. The difficulty came in getting the bolts off and the tight spaces you have to work in if you are laying down under the Rover as I was. Thankfully the weather was nice and I had a relatively clean area to work in.
The first thing off was the front driveshaft. The nuts are nyloc and I’m pretty sure made out of a previously unheard of combination alloy known as “Leadoround”. Sound it out, break it down. As I told JagGuy on the phone, “I swear these nuts were half lead.” And boy, were they were quick round off.
Lets look at the tool options I had available to remove these nuts and their subsequent failure point…
Twelve and six sided sockets in 3/8th size
Twelve sided
Improper tool, rounds off eventually
Both sets of Sockets
Angle of the drive shaft and the size of the sockets prevented the sockets from being used
14 mm wrenches
Open ended
Improper tool, which rounds immediately
Box ended
Box end would not go over the end of the nuts due to the location of the drive shaft yokes
Vise-grips
I had every size that is made. No seriously, I went down to Lowe’s and bought one of each. None were able to grab without tearing up the nut
I tried, no seriously, I really, really tried. Eventually the nuts were so damaged I had to cut them off with the angle grinder and a cutting wheel. I got some nicks on the yokes of the drive shaft but they are not structurally significant. At least I don’t think so.
Two things I must immediately mention. First, this job would ideally be done without the exhaust in the way. The second, dropping the drive shaft at the universal joint. Both of these would have made this job easier. I chose not to do either for the simple fact that every time I touch something I get two more projects to fix. With that I’ll continue…
I managed to get one bolt off conventionally with the wrenches, this left three to cut. So with red hot magma sparks flying all over the place and most notably resting in the palm of my hand, I got the bolts cut. That hot ember resting in my palm while I held the angle grinder tested my United States Marine Corps instilled discipline to its maximum peace time setting.
In some manner or other I got the nuts cut off. Two required additional persuasion with a chisel and hammer. They provided little resistance to these brutal tools.
The bolts holding the viscous coupling (VC) were next. Thankfully these came off with just a little elbow grease. You can get to most of them with a little effort. Except for the one located under the transmission mount bushing. To get the bushing off you have to remove the frame mount and its three bolts. That was not a problem. One of these was a badly stripped bolt, most likely from the factory. That will have to be replaced, with a grade 8 bolt and nut, which I bought the next day.
Getting the frame mount loose from the bushing is only sticky point here. Once those two are separated, you can remove the bushing and its mount from the VC which is held in place with 19mm bolts. That just so happens to be the largest socket in my set. One of these bolts was badly corroded.

I have laid out the three parts here on the garage floor so you can see another (all be it useless) picture of how all the parts are assembled.
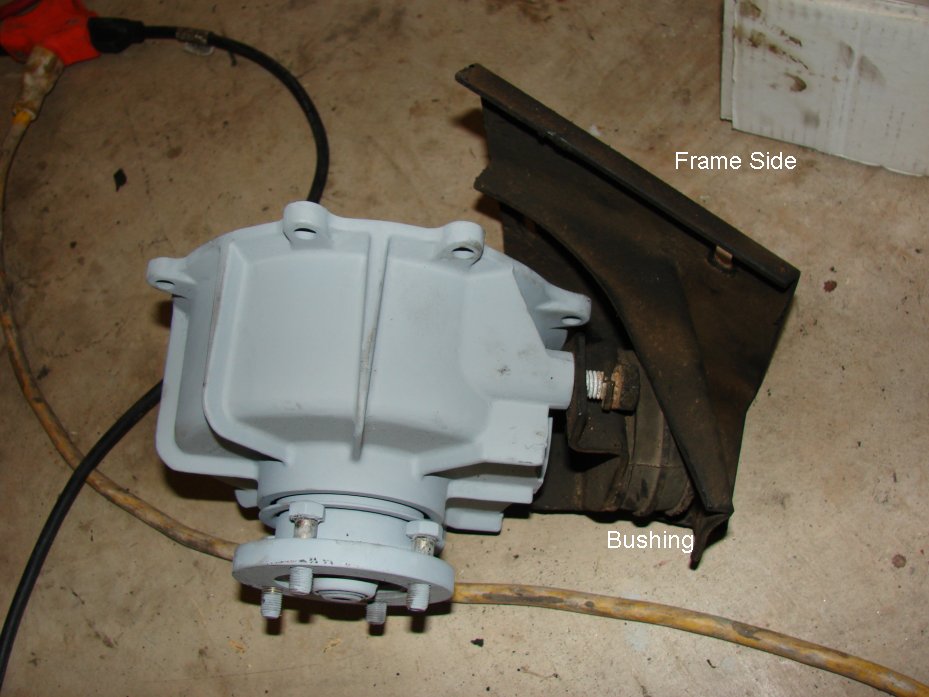
I also took a picture and labeled it with the various mounting points.

The next thing to remove is the transmission brace. For some ungodly reason the original designers felt that a bushing mounted to a frame member wasn’t enough bracing for this part. They added another brace that runs up to the transmission housing.
I removed those bolts and now had the VC ready to remove from the transaxle housing. You can see that the two are sealed with gasket maker. This has been a point of confusion for me.
I cracked the case and immediately black fluid came out. I had planned for this and had a drip pan ready. I slid it into place and let it drain.

You can see the fluid that came out. Very black, and smelled mostly burned.

What I did not plan for was what I spent the better part of Tuesday reading about. There should have been lots of fluid in there. Matter of fact I should have drained the transfer case before I did this project.
Now I’m sitting here wondering, “what have I done?”
I have a sick feeling in my stomach.
I read through this forum post on RangeRovers.net. I learned a lot. I learned what type of fluid to put back in the transfer case, automatic transmission fluid. I learned that the fluid that was supposed to be in there is important for COOLING and the obvious, lubrication.
And from what I read, I deduced this:
Fact: The VC failed in my Range Rover. The failure could have been from either a broken rear drive shaft or lack of fluid, which may have damaged the VC. I may have destroyed my transfer case or significantly reduced its life. The transfer case has 180,000+ miles on it and perhaps I’m lucky it still works at all, at this point.
So where to go from here? I am going to drain what little fluid is left in the transfer case out and fill it with transmission fluid. I’m going to get the LWB out of the garage and drive it this weekend. One: to test the brakes. Two: to test the viscous coupling I just installed.
FACT: At this point I’m pretty embarrassed.
People look to me for answers and this was a huge rookie mistake. I’ve changed the transfer case fluid on my Discovery 2. Why I didn’t think to check my Range Rover transfer case is just stupid. So if you are reading this, remember to do your scheduled maintenance. Just because nothing is wrong doesn’t mean something isn’t GOING WRONG.
Well that’s all for now. More from this front as I learn it…
Thanks for reading and Happy Rovering.
Hi,
can you tell me which fluid you put in? My VC on an ALFA ROMEO 155 Q4 2.0 Turbo has stopped the work. My garage tries to fix it for over a year. Maybe you can help. We tried 100000 cts silicon-fluid and 150000cts.
tommynocka@gmx.de
Thanks