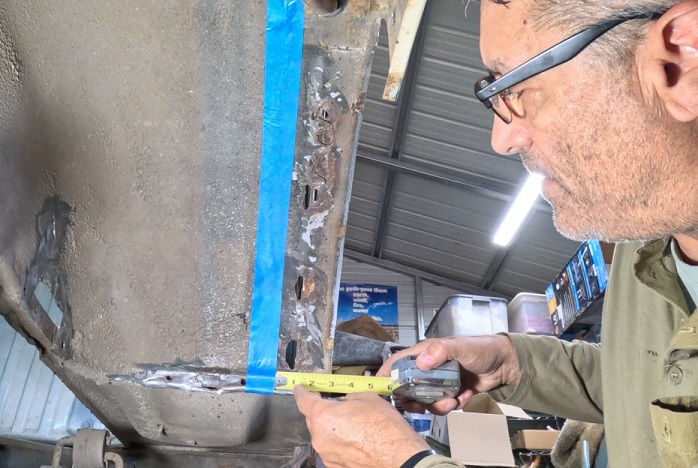
In this installment I spent two days preparing the fender well for welding in the patches. Two days (4 to 5 hours each) of wire-wheeling and grinding and cutting. It was a dirty job with lots of rust dust and rubber flying all over.
My spinal cord didn’t enjoy sitting on the hard shoppe floor for so long. And, it was hot. Deep in the Congo humid Africa hot in the shoppe. It would rain in the morning, then the sun would come out and crank up the air temp along with the humidity. Temps from 95F to 100F plus 90% humidity, AND I’m in the metal hot box of the shoppe where the temp is 105F to 115F. Brutal. I need an exhaust fan for the heat.
My shooting of video was mostly terrible. It also was extremely long. I’m not sure what I should have done differently to make this more consumable. Watching other Youtubers I see they sometimes have longer videos. I would have most likely had to skip some of the work. How much grinding does one need to watch? I sped those parts up to cut time.
I’m prepping the first of the welding videos now and should have it out this week.
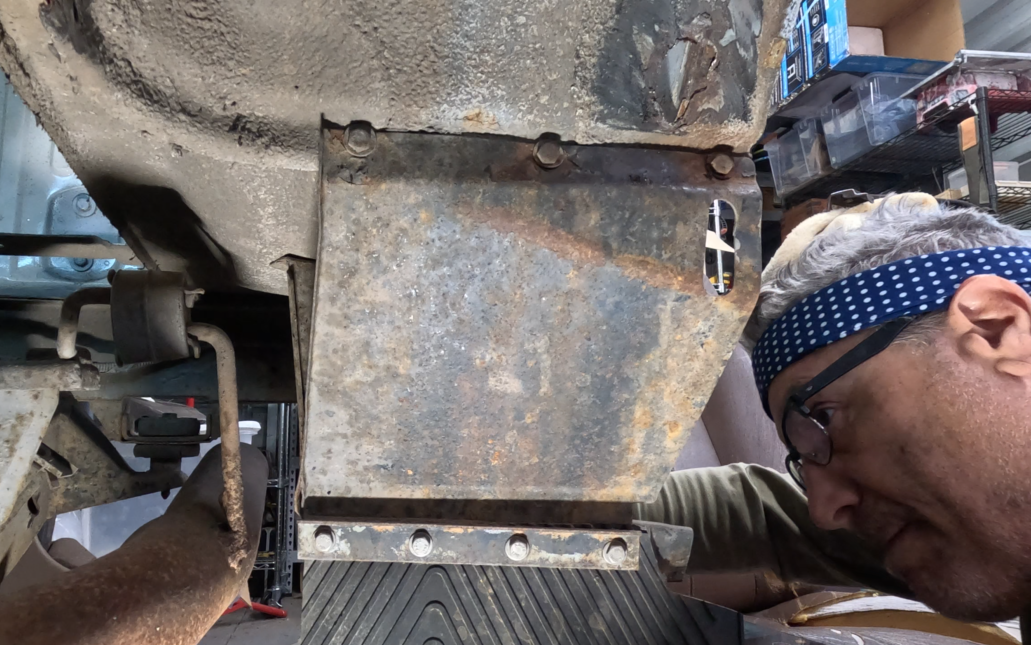
In this installment of me removing rust I work on the mud flaps. They were in the way of me grinding the rust spots in the wheel well. So I removed them, and good thing I did. The driver’s side (port side) mud flap steel was nearly rusted through under the flap.
The pitting was impressive and the amount of rust stuck on the flap was amusing too. So instead of welding my rust holes in the wheel well I had to take a day to fix the mud flaps. I went ahead and did both sides. The passenger side (starboard side) did not exhibit the same amount of rust as the other.
I got them cleaned off and applied the Duplicolor Rust Preventative to them. This is the stuff that is supposed to take surface rust and transform it into “not rust”. Through the magic of chemistry this “paint” converts the rust to I’m guessing zinc? hell I don’t know I got a “D” in Chemstry 1 and Chemistry 2 at the University of Oklahoma. In my defense, I drank more than I studied, and I had a nearly full-time job, and served a weekend a month as a Field Artilleryman in the USMCR.
Whatever, it’s magic and I’m not likely to do that job again on this Range Rover. Once I’m ready to reinstall them they will also receive a coating of rattle-can bedliner/rhino lining/stone seal or whatever they call this stuff in other countries.
The week had a lot more work done and filmed but I’ve run out of time as it is now Sunday. I’ll post another video this week of the rust cutting and removal under the fender well.
As we say here in Oklahoma, my hands and knees and back hurt “something fierce” [Merriam-Webster]. I haven’t done this much wrenching/grinding/hammering in at least a year. I ain’t gettin’ any younger so I gotta play through the pain.
In this installment I talk about how I will attack the rust in the driver’s side rear wheel well. I bought some shielding gas for my mig welder and will be welding patches and fixes this week. My GoPro camera decided not to record audio on the underside review so you’ll have to settle for a lovely voice over (which is terrible). You’re welcome.
Hope you enjoy the content. You can contribute to help with the cost of keeping this site on the internet through my Patreon account.
If you were to rate the most annoying things on a Range Rover Classic at the top of that list would be the Questionable Use of Paint and Seam Sealer to Prevent Rust. I think we could all agree with that. The second item has GOT to be the Door Handles.
At some point in owning a Range Rover Classic or a Discovery 1 you will have a door handle fail. I’m not sure what specific material the door handles are made from. I’ve speculated in another post that they were made from Play-DohTM. I’m pretty sure they are made from some kind of aluminum mache’ and hope. You might as well say they were made of Unobtainium [Wikipedia] because finding a set of new/old stock (ran out decades ago) or on a rig in a breaker’s yard (aka junk yard in the USA). I haven’t seen a Range Rover in a junk yard since 2016 [Okierover.com]. The odd one may have snuck past me in that time…suffice to say they are getting rare. Spotted one in 2015 and 2011.
It was quite frankly a surprise to me that it took so long for some smart guy or girl to machine their own. I am surprised no longer. A gentleman right here in my home state of Oklahoma is making them. This is the best of all possible situations, Made in Oklahoma, Small Business, genuinely nice guy, and almost certainly better than OEM.
Chris McCune‘s [Facebook] handles are made from 6061 aluminum. I am but a simple caveman and your systems of measurements of specific metals frightens and confuses me, but when I get in my Range Rover Classic and drive to the mall through the outback, I want to open the doors with the handles and not crawl in the window like psychopath.
(Apologies to the, now deceased, genius of Phil Hartman for the paraphrase above.)
You are more likely to pull the entire handle assembly off the door, than to have one of these break like the OEM handles. He’s so confident in his design he is offering a Limited Lifetime Warranty. Basically as long as you aren’t using the handle as recovery point when you get stuck, he’ll make it right if one of his handles fail.
This is an unsponsored product recommendation. I have not been compensated in any way to promote Chris’s products. I’m just helping out a fellow Okie with his small business in this niche market.
The next time you tear your door handle remember Chris and order some handles. I would publish the price, but prices of metals change and I don’t want someone in the future who may be reading this post to get the wrong idea about what the handles cost. At the time of this post (June 2023), they are fairly priced. I’ve seen them for sale for more than this and have purchased some crappy OEM ones for this same price. Click the link above and send him a Private Message.
I looked up my previous posts on door handles, check those out too. One contains the instructions for replacing your door handles.
Rocky Mountain Printed Rover Parts Find them on Facebook
The sun is very hard on your plastic parts. Oklahoma City (the nearest metropolis) receives an average of 235 days of sunlight every year. That means about 68% of the time the sun is shining down on our British rust buckets providing something like 3,089 hours of sun in an average year. And all that sun with its ultraviolet rays really does a number of certain kinds of plastics. This is an excerpt from “UV and its effect on plastics: an overview” [www.essentracomponents.com].
But what about plastic – how is it affected by the varying types of UV?
If plastic has been affected by ultraviolet rays, you may notice:a
a chalky appearance
the component surface becoming brittle
a color change on the surface of the material
In terms of the components more likely to be at risk of UV damage, automotive parts are high on the list. The effects will predominantly result in a change of the material’s surface layer – and some plastics, if damaged by UV, will ultimately lead to the component failing altogether – not good news when a project is near completion or has been finalized.
If you need to know more about the sun’s effect on plastic head over there for details.
So what did I do to slow the inevitable? I’ve painted my surfaces and given them a coat of matte finish sealer. Will it work, probably not! But at least I tried something. Only time will tell.
As you will see in the video below, my dash vents are knackered. I reached out to some vehicle-parters and wasn’t happy with the parts they offered. I mean, I’m going to buy 30 year old vents that haven’t had quite as many hours of sun on them than mine? Nah. Then I stumbled on Rocky Mountain Printed Rover Parts [Facebook]. I messaged Jordan and asked if he had the vents. He said he would need to make them and sure enough he did. I ordered 4. I painted two of them to match the new dash color and as you will see in the video got them installed.
Two things need to be adapted, no holes in the sides for the vent hose adapter and the pins for the restrictor plate were not defined enough for the plate to stay in place. So I drilled the holes and glued the plate on. I used 1/8th pop rivets so I drilled a 9/64th hole and popped them in.
Pro Tip: Drill the holes where it will be easiest to use the pop rivet tool to install the rivets. Think about it and lay it out first.
I’m super happy I found him. I mentioned the vents in the D pillar would probably be another great item to 3d print. He agreed.
I bought these, they weren’t given to me for any publicity. I like supporting innovation and small businesses. I hope he does well in this venture. So if you are interested, give Jordan a message or email at RMRPrintedParts@gmail.com.
Thanks for visiting and Happy Rovering.
You can support this content and this website on Patreon.