Changing Oil on a Range Rover Classic (Post #669) 8/31/2024

In this episode I change the oil the my Range Rover Classic. My grandson Grady came over to help so we tried to make this mundane task fun!

The good news is we got the Big White Bus running and drove it out of the shoppe! This was huge. It’s been a while and to see her running and driving was pretty awesome.

Not much to say about the oil change, I done this somewhere around 73 or 74 times. Every 3,000 miles, or in this case, after sitting for 4 years. I know, I know, but it all worked out. It’s got fresh oil for now and we’ll be starting and running the Range Rover Classic every week from here on out.

We also gave her a bath. 4 years of dust had settled on her and it was badly needed. Also helps me keep a cleaner shoppe.

That’s about it for this week. Hopefully Mrs. Okierover has won her third straight Oklahoma Senior Games Over 55 Women’s 3v3 Basketball tournament. With a win, they advance once again to Nationals. I’ll report back next week with the results.

Like and Subscribe. Thanks for reading and Happy Rovering.

https://youtu.be/8GifXAydNmU

Air Compressor Failed (Post #638) 1/8/2024

Failed piston

Sometimes we have to take time out to repair our tools. Well, that was what I had HOPED I was doing, repairing my Husky (aka Campbell Hausfeld) air compressor. A few weeks ago while the air compressor was running I heard a loud BINK sound. It was actually kinda scary and I’m not gonna lie, I thought twice about exiting the area. Instead, I went over and turned it off. This compressor would not hold air overnight…ever, so something was not so great about the Chinese components used to build it.

The next time I started it up (to nail some baseboards in the pantry) it ran and ran and ran and ran…. The pressure never got above 50psi. I tried the nail gun and it wouldn’t even fire a nail. I googled a bit, and the most obvious issue was likely a failed piston seal.

I took the compressor apart and yep….there was an obvious failure.
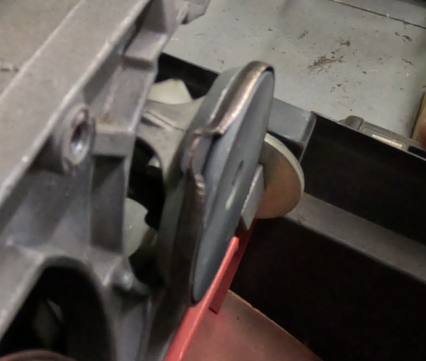
That’s not good.

The piston block was pretty rough too. It’s been in use in my garage and shop for 10 years (maybe 15) and who knows how long my neighbor used it before he gave it to me.

I got online and looked for the replacement part, which turned out to be unobtanium. They discontinued that pump and only a few parts were still available for it. I first contemplated trying to find a new compressor to mate to the tank. One of the things I hate most about the stuff that is built today is most of it is throw-away. If it has a failed part, you just toss it and buy another.

Ben at Tractor Supply was telling me about his air compressor which he inherited from his grandfather who bought it when Sears still sold quality stuff. He said it just runs and runs. Its industrial…bullet proof…and probably will out live him too.

They just don’t make stuff like that anymore. The really wasn’t an option to buy a new compressor for that tank. I’d probably have spent what a new compressor costs to upgrade/repair this crappy Chinese air compressor. So a new compressor was the solution.

I was resigned to buying Chinese-made again mostly because quality air compressors you could probably rely on for ever cost more than what my Range Rover is worth today. Don’t get me wrong if money wasn’t an issue my shop would have some seriously nice stuff, but that damn Money Tree will not sprout in my backyard.

I lucked out that this new DeWalt is “Made in America” (from foreign sourced parts). This is a win in the “employ Americans” as much as possible mindset. I also picked up an air chisel while I was there and it was made in Taiwan! That’s a double win cause it was cheap and I get to stick it to the Chinese Industrial Complex by supporting straight up dissidents. WIN WIN!

I’m a little poorer, but I now have reliable compressed air in my shop again. A compressor that can run a wider variety of tools due to its output capacity of 6.2 CFM.

Next week if it isn’t too cold I’ll be welding and the goal is to finish up the rear wheel well. I need to order a B pillar replacement. I found one online and it will be mine for about $65.00(US). Half that cost is shipping from jolly ole’ England.

Remember to Like and Subscribe both the videos AND this blog.

Patreon.com/Okierover

Thanks again for reading and Happy Rovering.

Surface Rust Under the Passenger Side Fender (Post #635) 12/18/2023

Thumbnail

In this short video I take care of the surface rust I found under the passenger side fender. There were some unpainted surfaces notably under the rubber washers at the top of the quarter panel. There were also some pin hole spots of rust.

They look like dirty spots until you put the wire wheel on them. Is that primer? this stuff Land Rover used under the panel just flaked off in spots. In the video there is a segment that has some leopard spots…that’s where the paint just came off.

The two rust spots in the arch will be ground down again. I don’t think I need to fix them, just stop the rust. The holes are on the outside of the vehicle so water getting in won’t be from these two spots.

I wire wheel all the rust I could see. Then I washed the panel with acetone. This was to remove any lingering dust, dirt, oil, whatever.

I then coated the panel with primer in a green color I really like. I could see myself driving a vehicle painted like that. I’ll watch the weather and give it all a second coat when it warms up a bit. The temp in the shoppe was 54F when I started the work and 52F when I started painting. That’s just barely above the paint range listed on the side of the can.

A big shout out to my fans in Norway. 31 views from that country on 12/12! Tusen takk!

If you are enjoying the content, like and subscribe. Okierover Patreon.

Thanks for reading and Happy Rovering.

Fixing the D Pillar Rust (Post #634) 12/11/2023

I can see my breath!

If you follow the blog you have seen the rust damage from open cell foam in the upper D Pillar. The foam got wet and over time ate through the pillar and caused a hole that allowed water into the rear. It wasn’t likely a “stream” of water as the pillar had a cover and the foam also blocked the hole.

In any event, it had to be repaired. I went to some effort to research the removal of the rear quarter panel windows. Damaging the seal is a non-starter. Replacement seals cost in the neighborhood of $500.00(US). And there is also a chance of breaking a window.

I had the Evil German Dude over for Thanksgiving and showed him the damage. He was pretty certain that I could weld a patch there WITHOUT removing the seal and window. Using caution and allowing time for the welds to cool, he was sure that the welding would not be a problem.

Trusting he was right, I proceeded to build a patch and weld it in. The patch was pretty easy to make. You’ll need a bench vise or a metal brake to bend the steel. Well…if you have to bend steel for your patch. I got the patch in place, wire wheeled the paint and primer away and started welding.

My first welds didn’t stick. I had to work through that. Some of the issue was a crappy ground point. The other could be paint I hadn’t removed. I finally sorted that out and made the weld around the piece. I will come back with some seam sealer and make sure there are no holes by sealing them with a bead of sealant.

I was a bit surprised at how well this went. I was expecting a much more complicated repair. I’m not in love with the welds. But such is the way you have to weld thin steel. They also are not in sight so they didn’t have to be pretty…and they aren’t pretty.

The temp cooled off this week. It was 40F degrees when I finished up. Funny how two and a half months ago the temp was three times that in the shop. We got a little reprieve on Sunday and it got above 50F degrees.

I’ve been kicking around an idea if the window had broken. Building in wing window storage boxes. I could use them to pass through power to solar panels, shore power, a heating tube for a propane heater, and the most exciting, water for showers and cooking/washing hands and such. I’ve got the bug so I may build a mockup with cardboard to see if it would work the way I’m thinking. It’s maybe a project for another day. You can check out this video which served as a good portion of the inspiration. Dirt Lifestyle has two videos on gullwing windows for his Discovery II. This is the latest [YouTube], and is an improvement of the original, enjoy.

I hope you enjoy the video of my work. Like and subscribe and if you want to help through a recurring contribution, Patreon is helpful way to do that.

Thanks for reading and Happy Rovering.

Passenger Side Rear Wheel Well Rust – Part 1 (Post #631) 11/14/2023

rats

Now that I have the Range Rover flopped in the shoppe I can start on the rust abatement. But first, I thought I should get some oil and some other fluids and do some fluid refreshing. That was a great idea if I had done that BEFORE I started the Big White Bus. But the fact I was doing it AFTER I ran the engine, -2 points.

I loaded up one 5 gallon barrel of oil and headed to my favorite O’Reilly’s. When I got out of the truck my folly was apparent. I had successfully done an Exxon Valdez [Wikipedia] imitation. The metal barrel had rusted through the bottom and dropped 5 gallons of used oil all over the back of my F-150 and on to their Prince William Sound parking lot. I ran in and bought two bags of kitty litter/oil soaker stuff and with the help of one of the guys we spread all that all over their parking lot. I haven’t been that embarrassed in a long time.

I finished up the clean up of the back of my F-150 when I got home and started getting the rear passenger wheel off to start the investigation. The video shows I had a mostly optimistic view when I started scraping the rust. In comparison…the passenger side is no where near as bad as the drivers side wheel well. The rear window is another issue entirely but let me attack these one at a time.

I’ve got two holes SO FAR. I still have to get the wire wheel out and take the rubber back to metal where there are brown spots. The worst looking SO FAR is the bottom of the C Pillar is rusted out. The reason for the rust there is the sunroof drain hose exits there and the crappy plastic grommet did not keep water out. And it is entirely likely that there was nothing inside the C Pillar that would pass for paint. So that was an obvious place for rust.

I’m going to replace the sunroof drain tubing and possibly fit a “Hose Barb Thru-Bulk Head Hex Union 90 Degree L Right Angle Elbow Barbed Brass Fitting with Flat Washer Gasket Water/Fuel/Air” fitting. Something like this….

I’ll add a rubber washer to assist in keeping the water out. I’ve got to measure the tubing and get the right one ordered. They can be found on Amazon.com. Not sure if they are using ID (inside diameter) or OD (outside diameter) to determine if I get 3/8″ or 1/2″.

This may be complete folly but what the hell right? If it works, I’m a genius. If it doesn’t work, I’m still a genius, just a terribly misguided one. Half of me says extend the drain line to behind the mudflap. It would not be that hard to add a little more distance to the hose and NOT put it back in the same poorly designed place. I mean seriously, lots of water and ice and mud and road salt and roadkill chunks (mostly opossums and armadillos and skunks) and all kinds of crap fly off the tires at extreme tangential velocity [Study.com]. The fact that plastic gromet is even able to not be dislodge is a miracle. So…let’s try to make it better!

The headline came out also so I could get the sunroof drain. It had to come out anyway, because it needed to be replaced…again. This will be the third and final. If this is needed again while I own this rig, it will be painted and forgotten.

More next week. Like and subscribe my Youtube channel. Send me a comment too…I love to converse with you.

Thanks for reading and Happy Rovering.

patreon.com/okierover

Starting and Moving the Big White Bus (Post #630) November 6, 2023

holding a spark plug

This weekend I had to get the Big White Bus running so I could turn her around in the shoppe bay. This required me to reinstall the spark plugs and fashion some kind of a temporary seat.

The plugs went in just fine. I applied a new coat of copper anti-seize. It’s time to buy some more as the tube I have is getting a bit dry. But it was sufficiently lube-y to pass for grease.

I got all the plugs in and the wires on without an issue. I got the coil hooked back up. I then stared at the engine bay to confirm everything was ready to go.

Next I needed a seat. I had a lovely 12 inch wide, 16 inch long pine board that covered the electronics and made a lovely “field expedient” seat. And I was ready to start her up…..

….then the GoPro decided to stop recording. Right when I needed it to be recording…it wasn’t. Heavy sigh.

So everyone misses out on the magic moment. Typical.

I turned the key and heard the fuel pump do it’s initial pump. I turned the key and she fired up as expected. Victory! Well, a battle was won, let’s just leave it at that.

I moved all the flotsam and jetsam from around the Range Rover and moved the F-150. I jumped in and drove her up the drive way, made a flawless, 4 point turn :/ and brought back down to the shoppe. The windshield was so dirty I had to clean in order to see how to line her up in the bay.

My daughter RovErica left me a sweet message on the windshield the last time she was home visiting. I left the side with the message undisturbed.

Now the BWB is flipped around. I can now begin to abate the rust on that side. HOPEFULLY these repairs will not be as extensive as the driver’s side. The driver’s side has been the side with the most trauma from being rear-ended by inattentive drivers. My welder and the power for that welder are on that side of the shoppe so turning her around was required.

That’s all I’ve got for this week. Like and subscribe the YouTube video. Comment if you like too…I love to hear from my readers. I also have a Patreon that sadly has NO current membership. Every little bit helps and if you feel my content is worthy of a couple of bucks a month…I promise not to spend it on rum.

Thanks for reading and Happy Rovering.