Sometimes we have to take time out to repair our tools. Well, that was what I had HOPED I was doing, repairing my Husky (aka Campbell Hausfeld) air compressor. A few weeks ago while the air compressor was running I heard a loud BINK sound. It was actually kinda scary and I’m not gonna lie, I thought twice about exiting the area. Instead, I went over and turned it off. This compressor would not hold air overnight…ever, so something was not so great about the Chinese components used to build it.
The next time I started it up (to nail some baseboards in the pantry) it ran and ran and ran and ran…. The pressure never got above 50psi. I tried the nail gun and it wouldn’t even fire a nail. I googled a bit, and the most obvious issue was likely a failed piston seal.
I took the compressor apart and yep….there was an obvious failure.
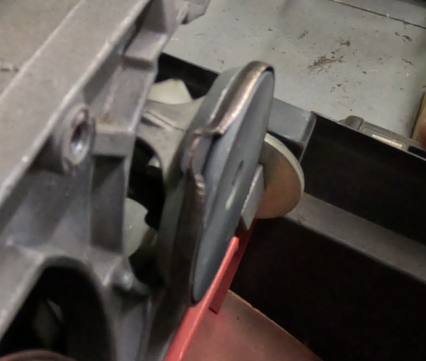
The piston block was pretty rough too. It’s been in use in my garage and shop for 10 years (maybe 15) and who knows how long my neighbor used it before he gave it to me.
I got online and looked for the replacement part, which turned out to be unobtanium. They discontinued that pump and only a few parts were still available for it. I first contemplated trying to find a new compressor to mate to the tank. One of the things I hate most about the stuff that is built today is most of it is throw-away. If it has a failed part, you just toss it and buy another.
Ben at Tractor Supply was telling me about his air compressor which he inherited from his grandfather who bought it when Sears still sold quality stuff. He said it just runs and runs. Its industrial…bullet proof…and probably will out live him too.
They just don’t make stuff like that anymore. The really wasn’t an option to buy a new compressor for that tank. I’d probably have spent what a new compressor costs to upgrade/repair this crappy Chinese air compressor. So a new compressor was the solution.
I was resigned to buying Chinese-made again mostly because quality air compressors you could probably rely on for ever cost more than what my Range Rover is worth today. Don’t get me wrong if money wasn’t an issue my shop would have some seriously nice stuff, but that damn Money Tree will not sprout in my backyard.
I lucked out that this new DeWalt is “Made in America” (from foreign sourced parts). This is a win in the “employ Americans” as much as possible mindset. I also picked up an air chisel while I was there and it was made in Taiwan! That’s a double win cause it was cheap and I get to stick it to the Chinese Industrial Complex by supporting straight up dissidents. WIN WIN!
I’m a little poorer, but I now have reliable compressed air in my shop again. A compressor that can run a wider variety of tools due to its output capacity of 6.2 CFM.
Next week if it isn’t too cold I’ll be welding and the goal is to finish up the rear wheel well. I need to order a B pillar replacement. I found one online and it will be mine for about $65.00(US). Half that cost is shipping from jolly ole’ England.
Remember to Like and Subscribe both the videos AND this blog.
Thanks again for reading and Happy Rovering.