Painting My Dash (Post #600) 9/19/2022

6 minutes of rambling about painting and rust.

My dash looks like hell. The sun has really taken it’s toll on the plastic. Several places are starting to turn into dust. It also is no longer uniform in color and some pieces aren’t even close to the original color. That color was/is Bokhara Green. Named from the color often found in oriental rugs from the Bokhara district of Turkestan. Traditionally made by the Turkmen tribes, the rugs were made almost entirely from locally obtained materials. Using wool from the herds and vegetable dyes, or other natural dyes from the land to create the Bokhara green color.

In my extensive research (30 minutes of distracted Google searching), I could not find a paint code I could take to a paint store. Nor could I find a can of paint on my side of the big pond (the Atlantic Ocean). You can’t ship paint, believe it or not, its flammable (the more you know…).

Before we get too far into this post…a disclaimer:

I have no idea if painting the plastic parts of my dash is going to work. I did not do any extensive research on best practices or if the products I had available would even bond properly with my very sun damaged dash. Undertake this at your own risk.

With OEM Bokhara Green unavailable, I started looking for colors and stumbled across Rust-Oleum Specialty Flat Earth Brown Camouflage Spray Paint [Ace Hardware]. I originally found the green color but once I saw the brown…I knew that was it.

I painted the dash pieces and have decided that the “flat” and “powdery” nature of this paint is going to be difficult to clean up later. Dust and whatever that will inevitably find its way on to these parts is going to be hard to wipe off. So I decided to experiment with coating the paint with a matte clear. It will also help with keeping the sun off the plastic. UV protection is right there on the label.

I stopped at the store on the way home and picked up the Matte Clear. I tested it on a piece of trim. It dried to a matte finish. This is a second wet coat in the picture.

Un-coated above, Matte finish below

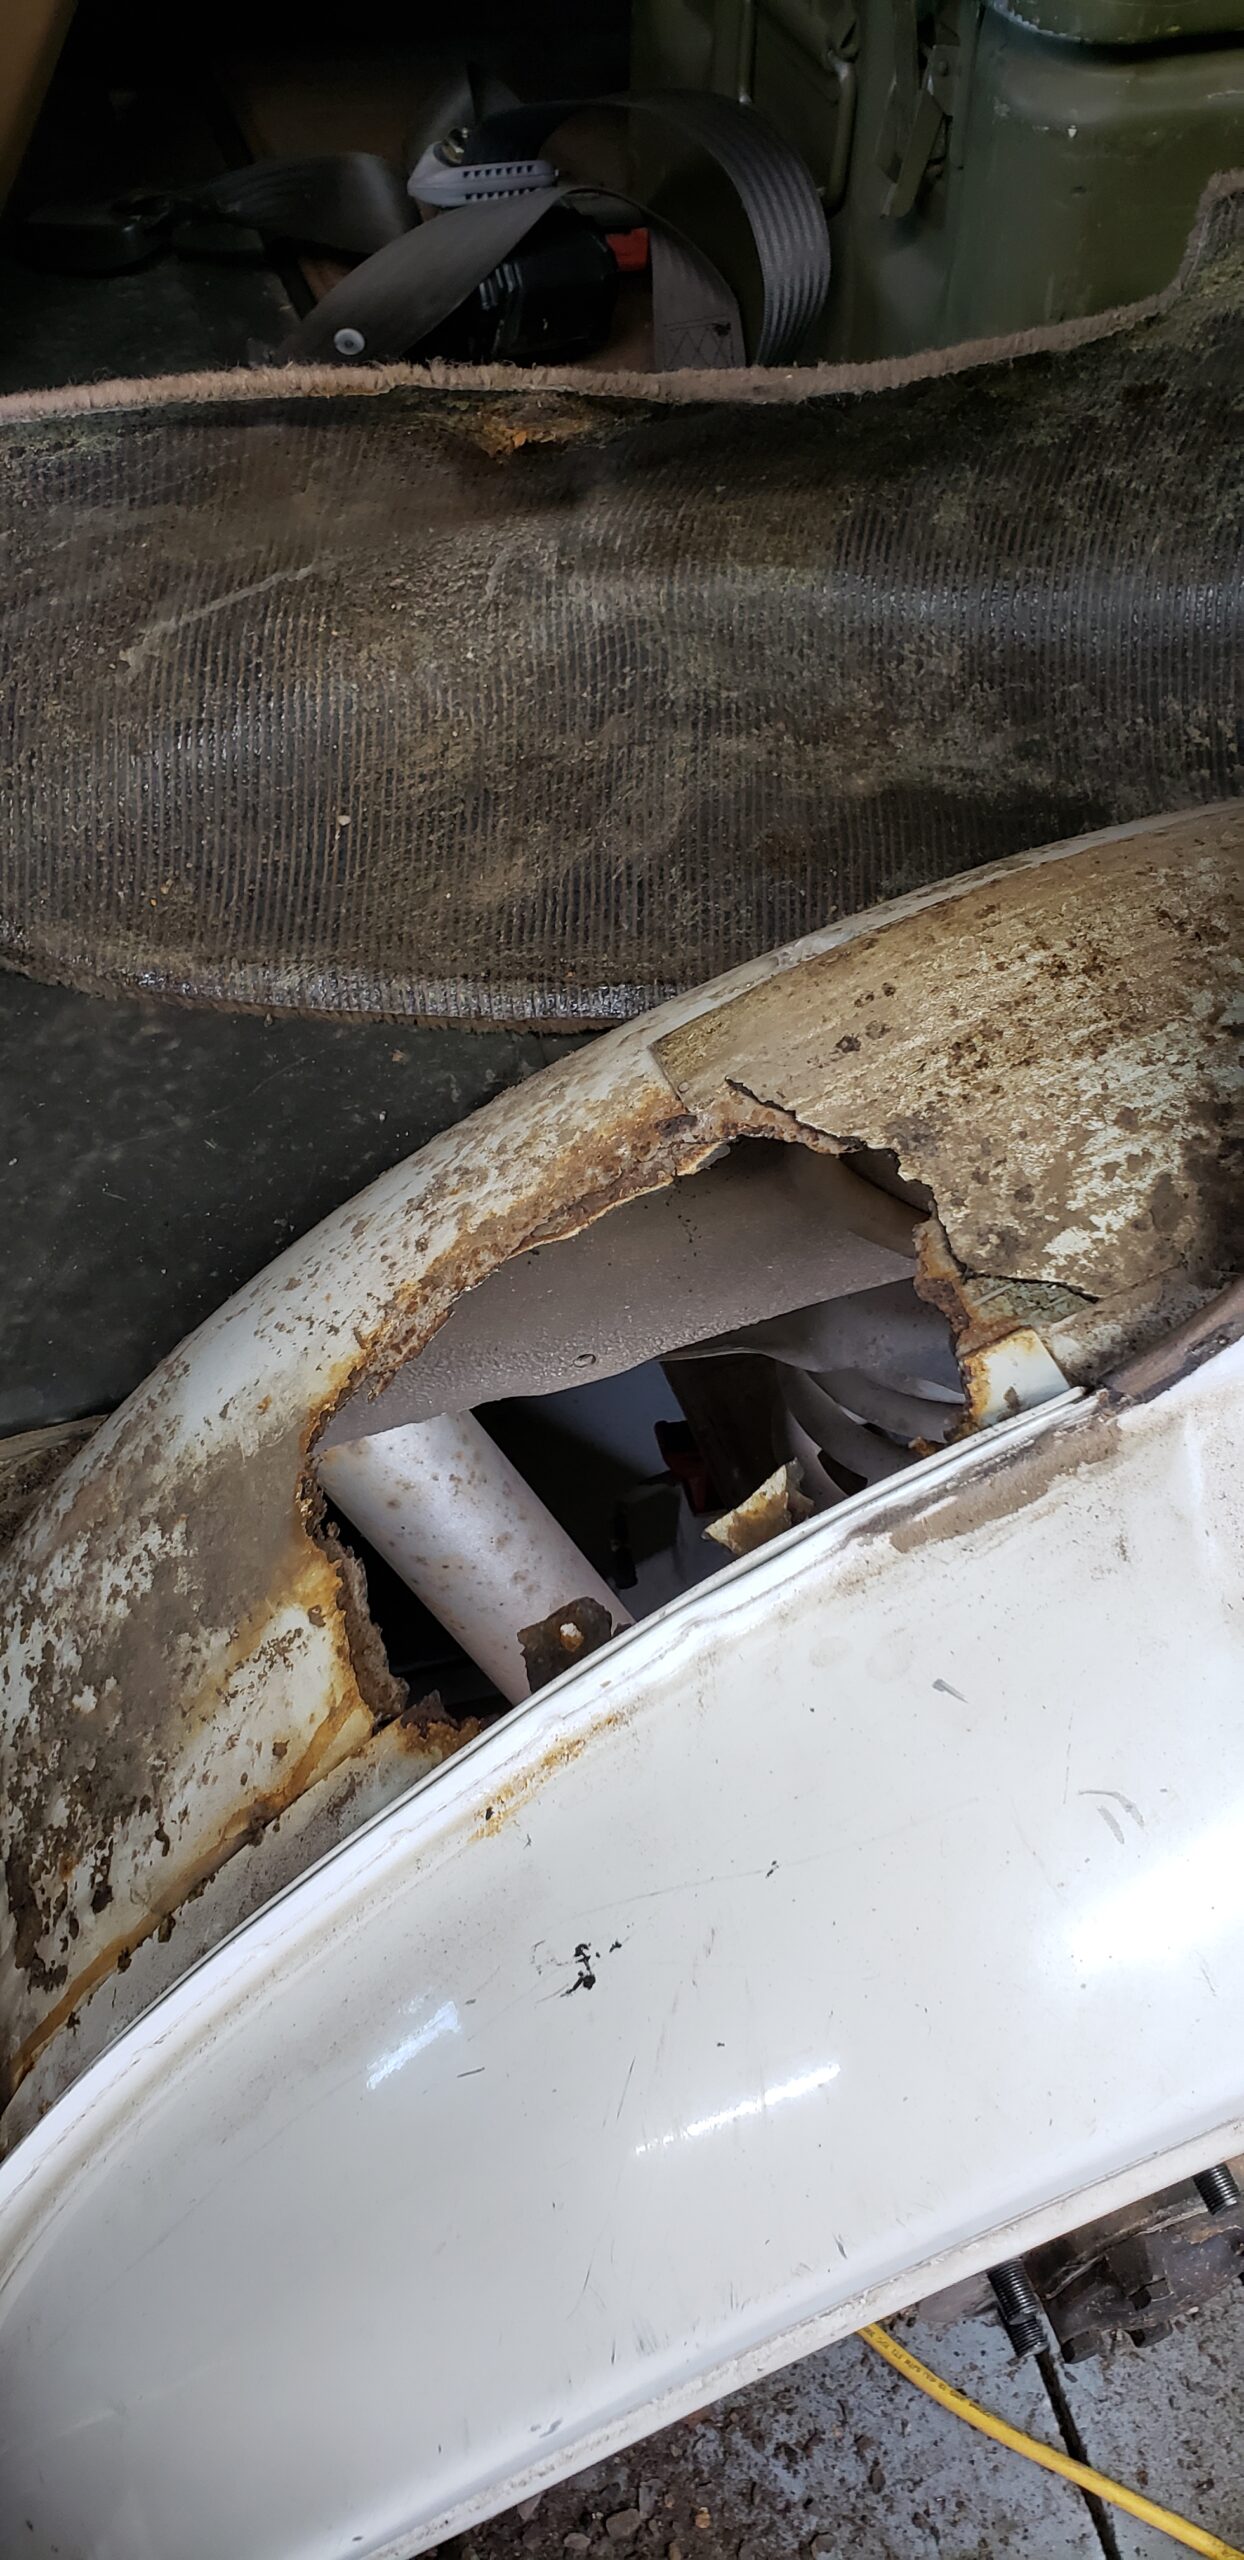
I’ve got a bunch more work to do. I found some more rust on the floorboard in the cargo area. To get this fixed I’m going to need to cut the floorboard out and patch it. The floorboard is supported by a piece of steel that is very rusted and failing in several places. To do this right, I need to replace the steel that is failing. I don’t know what that will entail at this time.

Rusty hole in the floorboard in the cargo area.

I also popped for this ridiculously expensive rust paint.

Hopefully this will magically do what it says it will do.

This paint was insanely expensive. Like 160$(US) for this gallon. I’m not going to lie, I’ve got high hopes for this stuff. Everything I’ve painted on this Range Rover has already begun to have surface rust. I see these types of products used on the YouTubes and TV shows and I’m hoping it works as well as it appears to in the magic of television and the interwebs.

To replace the rusted bits, I’m going to check with Mickey at Mickey’s Garage [Mickey’s Garage] as he indicated on the Facebook that he may have a donor vehicle that I could perhaps get some parts from.

Every one of these “new discoveries” just postpone the day I will get to drive the Big White Bus for pleasure again. It’s frustrating, but it is what it is. I need to fix this rust. The things I want to use this vehicle for will require the flooring to be fixed. No reason to spend a few hundred dollars on building a bed and drawer solution if its just going to get ruined when water gets inside. It’s fun to fix stuff…right? Am I having fun? I’m not sure yet.

My friend the Evil German Dude gave me some excellent advise recently. “You’ve got to leave work at work, and put things behind you so you can go out to the shop and do things you WANT to do.” He’s right, I’ve been very distracted by home repair, nursing our dog back to health again, and I have neglected myself and my wants and needs.

Thanks for reading and Happy Rovering.
Bumper Project Part 1 (Post #599) 9/7/2022

Part 1 of the Bumper Project

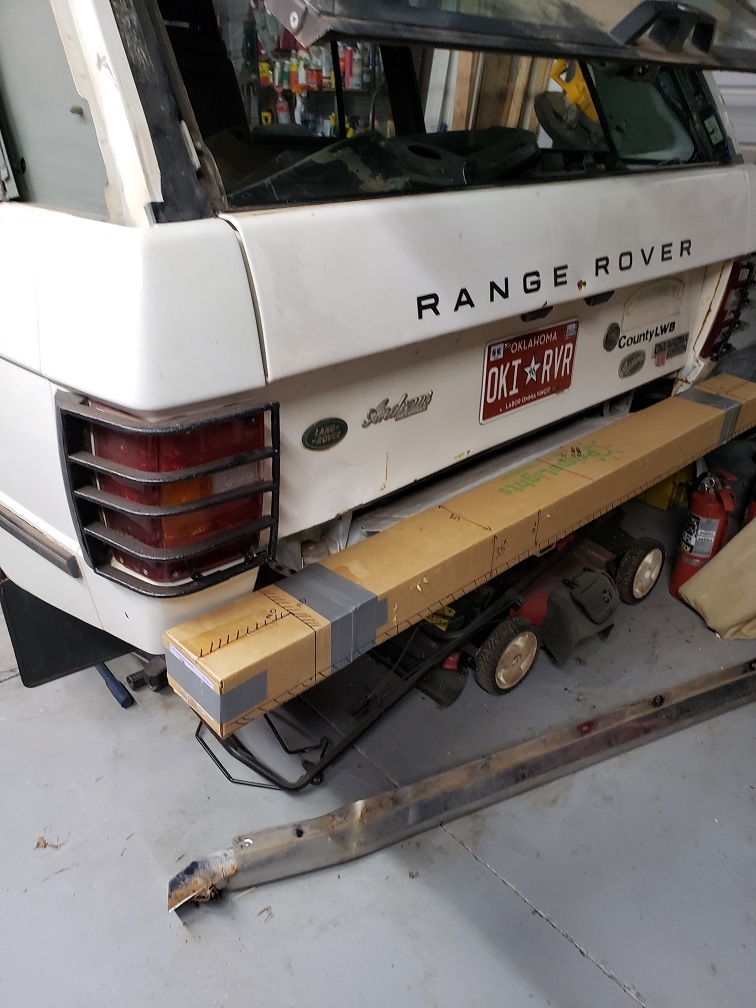
Part 1 of the Bumper Project. I mocked up a new bumper using cardboard. It will likely be 5×3 inch tube with rear fender protection. I got the idea from the PFab Youtube channel. You can check out his video in a link on mine.

If you remember the old bumper was damaged by an inattentive driver of a Hyundai reaching over to pick up a jar of spaghetti that had rolled off her seat [Okierover.com].

I’ll post another video when I get closer to pulling the trigger on this project. List of needs:

  • Welder
  • Plasma Cutter
  • Steel

I don’t have any of those things at the moment. I’ll have at least as much invested in those items as a new bumper from RTE would cost WITHOUT the tire carrier and jerry can holder. But I’ll have a welder at the minimum and maybe even a plasma cutter when I’m done.

If I hit the lottery, I’ll still buy the welder and plasma cutter, but I’d probably consider buy a RTE bumper built to spec.

Thanks for reading/watching and Happy Rovering.

Shipwright’s Disease (Post #598) 8/23/2022

Badges
Take a moment to consider the tragic condition known as Shipwrights Disease:

Sailor owns boat.

Boat has burned out light in galley.

Sailor decides to replace bulb.

Sailor notices socket is corroded, decides to change socket.

While changing the socket, sailor notices wiring is frayed.

Sailor decides to change wiring.

While replacing the wiring, sailor finds galley ceiling slats are rotted.

While replacing the galley ceiling slats, sailor notices …

… And so on, and pretty soon, the boat is in dry dock undergoing a major restoration because of a burned out light bulb.

Source: Robert Couse-Baker, flickr.

I‘m OFFENDED!

Wait, no I’m not, maybe I’m guilty. My best friend JagGuy diagnosed me. He’s probably right.

So let me defend myself. Why did I pull the Range Rover into my shoppe and park it four years ago? I had two major problems when she was parked:

  • Ignition system became entirely unreliable
  • The heater blower motor let some of the magic smoke out of its wires

Were there other things that needed some attention when I parked her. Yes, yes there were. I’ve listed them in another post. We can add rusted panels to that list.

In my defense, I believe it was time for the Big White Bus to get another restoration. She has 280,000 miles on her clock.

Do I want her to be a show queen? Not by a long shot. I’ve never owned a car I was afraid to drive through a barbed wire fence. But the interior is looking pretty rough. The condition of the interior and exterior directly affected the insurance pay out I received when that idiot was reaching for the jar of spasgetti (that’s how my grand kids say it) and slammed into the left rear. If you missed that post from 2016, you can read about that here [Okierover.com].

So I’d like to fix some things on the dash that failed after 30 years (she shipped out of Solihull in October of 1992) of sun and cold and sun and poor application of paint at the factory and the sun. You know what I’m talking about. Plastic will eventually break down if exposed to the unforgiving southern plains sun.

Air conditioning…does it make sense to fix the AC? Well hell’s bells I have the bloody dash off why not?!? Have you ever sat in bumper to bumper traffic on I-35 with 110F August heat? I can tell you it will make a man of you, well what’s left of you when you get home anyway.

Rust, I took a welding class just so I could fix the panels…

The paint on the outside is losing it’s clear coat and is badly oxidized….

Seat covers…definitely should be replaced…

Those D pillar vents are looking pretty bad…

Okay. I admit it, it is likely Shipwright’s Disease.

In all honesty, I don’t have the money lined up right now to fix everything and make the Big White Bus my daily driver again. Makin he my daily again makes moderately economical sense because I could drop the 2014 F-150 off my insurance, sell it for what I’m being told is north of 20,000(US)$. (The used auto market at the time of this post is incomprehensibly over blown.) That’s more than half what I paid for her 5 years ago. She’s been a good truck. The reason for her was to pull a camper we bought that my wife later decided was not going to be in our future plans for weekends. Cash out, spend some of that on the BWB, am I right?

Probably won’t happen. More likely the BWB will be my weekend overlanding vehicle. That works too. I miss driving her. I digress.

I’ve said this many times. Every job on the Range Rover becomes three projects. Every bolt you touch either needs to be replaced with stainless, or de-rusted, painted, and the panel you pulled it from rust abated.

Is this Shipwright’s Disease, probably. Am I going to change anything to cure myself? Nope.

Thanks for reading and Happy Rovering.

Fender Rust (Post #597) 4/5/2022

Big shocker!

I found some rust under the left rear fender wheel well. I know! you are probably as surprised as I am!! (/sarcasm).

There were some signs of rust under the wheel well. I pointed them out in another video. So I decided to investigate. I found a lot of rust.

I’ve watched a bunch of videos where guys fix the rusted body panels and sub-structures. I guess it is my turn. I took a welding class a few months back and this was exactly why I took the class. However, I don’t have the tools I need to do most of these repairs. Not yet, anyway.

I will need:

  • A welder ($400 to How much do you want to spend amount of dollars)
    • Welding hood (already own it)
    • Welding gloves (already own it)
    • Fancy pliers (already own it)
    • Training (already done did it)
  • Metal break ($50 to I’ll probably borrow JagGuy’s)
  • A bunch of wire wheels to remove rust ($6 to $15+ for the fancy name brand ones)

I’m going to take a couple week break. I need to do some remodeling on the house’s master bathroom (Mrs. Okierover will be happy when I get this done.) I’m going to the Midwest Overlanding and Off-Road Expo (aka MOORE EXPO).

If you are thinking, “when will you get the Big White Bus back out on the backroads?” Well, I don’t know. At this pace…probably in the Fall. Trust me when I say…I really want to get her fixed and reliable again. Funding does matter, so hopefully that won’t be too big a constraint.

There will be more on this rust issue as I get back in the shoppe and start to sort out this mess.

Thanks for reading/watching and Happy Rovering.

D Pillar Vinyl Replacement, Part 1 (Post #596) 3/24/2022

D Pillar Vinyl Replacement

In this video post I investigate my cracking vinyl on the D pillar of the Big White Bus. The Southern Plains is very unforgiving to fabric, even plastic fabric. Mine is cracking and looking pretty terrible. Time to pull it off and get it replaced.

I’m going to need to refresh the black paint on all the pillars and the door frames. I found the part number for a rattle can of Beluga Black. Lots of cleaning, light sanding, cleaning, taping, priming, sanding, and painting, and more painting coming this summer.

And…the headliner is going to need either regluing or replacing…..again. I might go with a fabric that I can stick my souvenir event patches can stick to, just.like.a.real.overlander.

I also find a lovely whole rusted in the passenger side D pillar that will need some repair. Lots of grinding away the rust (rust abatement), welding in a new piece of metal, priming and painting. Good thing I took a welding class last year.

This is part one of possibly two or three videos.

Thanks for watching and Happy Rovering.

Footpad Repair (Post #595) 2/24/2022

https://youtube.com/watch?v=YuB75PMaZA0%3Frel%3D0

Some time ago I noticed the footpad on my inner fender well would droop when I rested my foot on it. In the beginning I would just put my foot under it and lift it back up. But one day when doing that the footpad broke away from the fender well.

The bolts holding the footpad in place had rust welded to the fender well. So when I was lifting it back into place I was actually bending the fender well pieces, much like you wiggle a wire rapidly to break it. As I’ve said before I really have become accustom to resting my foot on the pad and I wanted it fixed.

So I took some time and investigated and repaired it. I used a Dremel tool with a 60 grit grinding wheel and got as much rust off the inner and outer fender well. While I was behind the quarter panel I also ground off some surface rust.

Once I had it all ground down, I applied some acid etching primer to the metal surfaces. I know it won’t last forever, but maybe it will slow down the rust.

Thanks for reading and watching the video. It’s low quality but hopefully entertaining.

Thanks for reading and Happy Rovering.