Fuel Pump Replacement (Post #326) 4/5/2013

196,000 miles out of one fuel pump. That’s pretty good. But as you have read in previous posts it was time for a new pump. Let’s first sort out the process for testing the fuel pump.
Checking for fuel at the fuel rail was first. I disconnected the fuel line from the fuel rail.
Remove the hose clamp. Place a rag, preferably a large one like a t-shirt under it. You are checking for fuel coming out. WARNING. When you turn the key to the on position it activates the fuel pump. The fuel pump will run for a short burst to pressurize the rail. It will then shut off. A lot of fuel will come out when you turn on the key. It may even shoot out on to the engine. DO NOT DO THIS WITH A HOT ENGINE.
When I disconnected mine, no fuel came out. So that told me the pump did not run. So I climbed in the back and disassembled the back to get to the fuel pump access panel. Some time in the late 1990 models they started manufacturing an access panel to repair the frequently failing pumps.
I wanted to first check to make sure I didn’t have a blown fuse. I couldn’t remember which fuse was the one for the pump. So I pulled all of these and checked for a blown one. I also reseated the fuel pump relay (silver one) located between the green and brown items. All the fuses were good. On to the pump.
Remove the carpet and the dogs from the rear of the vehicle and access the panel.

I don’t know why they think it is okay to get in the back of the Range Rover.
Luna and Paisley
Remove the six screws. Move them to a safe place. Remember you are about to open the fuel tank. If you have something that might fall in the tank…it will fall in the tank. Secure all loose items NOW.
After you are open you are dealing with two fuel lines, a ground wire, and the power connector.
There is also a fair amount of dirt under there. I used a shop vac to get as much as I could to eliminate debris from getting in the tank. Vacuum before you start to remove any bits. Vacuum again after you have knock the wrenches against stuff.
Pull the connector and set your volt-ohm meter to volts. Have someone turn on the ignition. You will see a voltage spike for a few seconds. Remember the pump only runs for a few seconds. I checked across all the combinations of wires. I had power to the plug so….it had to be the pump.
Disconnect the fuel lines and the ground wire.
You are going to use a mallet (I used a rubber one) to hit a large flat-head screwdriver to turn the ring. They make a special tool for this…I didn’t buy it. Take your time and lightly tap this ring until it spins enough times to remove it.
The next series of pictures is me pulling the pump from the tank. 

Holding the fuel supply lines out of the way.

Remember the fuel level indicator is connected to the float. So as you are pulling it out you will angle the pump to slide it out. The lower part of the pump is a sump that keeps fuel around the base of the pump. This way the vehicle is not starved for fuel when the tank is low and you turn a corner and slosh the fuel to one side.

So as you are pulling the pump assembly out. Let the fuel run out of the pump. This will prevent fuel being spilled in the cab.

Fuel draining out.

I inverted the pump and drained more fuel out. You can see the official Land Rover Tool Kit in this picture. I needed to use it due to having an insufficient collection of tools in my tool bag. I remedied this by purchasing a socket set for the on-board tool bag.

Once I was back in my garage I took the old pump apart. Look at the debris attached to the filter. NASTY!

Look at the debris in the bottom of the “starvation tank”. 

While I was sourcing a new part I just placed the access panel over the hole and replaced the carpet.

I ordered a new pump from Atlantic British and paid the up charge for it to be delivered in 3 days. 300$ for the kit. I originally intended to repair the old one. I talked myself out of that due to my schedule this week. Two assignments, a test, and the weather (four inches of rain in four days, thank you God.) made this an easy decision. I will rebuild the old pump with a replacement pump. I expect it will cost less than a hundred dollars to replace the pump portion.

With the new pump in hand, I went about installing it.

I placed the rubber seal in the tank and then fitted the pump through the seal. It was a tight fit. You then screw down with the red securing ring. Use the screwdriver and rubber mallet. Take it easy and take your time. No need to use the mallet like Thor uses Mjölnir (Wikipedia).
Connect the power connector pig tail thing they send in the kit. Reconnect the fuel lines. 
With the access panel still open, I started her up. I watched for fuel leaks. NONE. So I buttoned everything back up.
I drove the Range Rover over to Braum’s in Tri-City to have ice cream with my grand kids (and my daughter and son-in-law). I had a single dip of chocolate chip on a sugar cone. Yummo.
The Range Rover ran great. I noticed the fuel gauge had me at a quarter of a tank. With a new pump and new indicator I thought it prudent to fill the tank and make sure the gauge was working correctly. It was all good and showed a full tank.
I pulled over in the parking lot of the Chickasaw Nation Training facility. This is the old T.G.&Y. building. I really loved that job. I called JagGuy and chatted about lots of stuff and he looked up replacement pumps will we gabbed. I’m lucky to have him, both as an automotive resource and friend.
As I was chatting I saw the state bird of Oklahoma, a Scissor-tailed flycatcher fly by. Spring has officially come to Oklahoma.
On the Difficulty Scale I’d rate this a 2. It is not difficult, just a tad fiddly.
Thank you to Justin and Lecia for letting me maroon the Range Rover in their driveway. Thank you to Lecia for helping me check for electrical continuity by turning the key while I was in the back.
I am heading to Fort Washita for the annual rendezvous this weekend. Get out and support your local historical society this spring.
Thanks for reading and Happy Rovering.

Terrafirma Springs and Shocks (Post #314) 1/17/2013

Last week I ordered a set of Terrafirma shocks and springs for the Range Rover Classic from Atlantic British. They should be arriving any day now. The springs and shocks on her now are a bit tired.

I currently have a set of Old Man Emu shocks that I bought the same month I bought my Classic. That was June 2000. I figure they are probably ready for replacement. While working with the front shock in my recent attempt to repair the left front shock mount it seemed to perform as expected. I’m not a suspension expert but I figure 120,000 miles on a single set of shocks is a bit much. For the record, I did not have a single complaint with the Old Man Emu shocks.

The springs in my Range Rover were put in to replace a failing air ride system. I’ve always felt they were a bit tired and the install was always a concern too. I have it on good authority that it was done “as standard”. But with out retention rings I always thought something was going to go horribly wrong. Luckily it never did. So next week baring winter snow storms I’ll have new springs to install.

I’ll need to source a spring compressor but I think I can rent one from my local O’Reily’s Auto Parts store. That is if JagGuy doesn’t already have one.

I think the silver color will go nicely with all the gray bits I’ve painted over the last couple of years, don’t you?

 Thanks for reading and Happy Rovering.

Roof Rack Dilemma (Post #308) 12/16/2012

I was visiting the Atlantic British website (Did you know that have partnered with British Pacific?) yesterday looking for springs and shocks. I think I have that sorted out and am ready to purchase them. Bilstein shocks and Old Man Emu/ARB springs, medium duty. I may still look at TerraFirma equivalents but short of that I’ll go with this solution. This should give me a little lift and still be able to be loaded a bit. Heavy duty springs would stiffen the on highway ride too much. I won’t be using the Range Rover hard enough or often enough to require springs of that caliber.

So after I was scoping out the springs and shocks I got to thinking about stuff to ready the Range Rover for our Circumnavigation of the Great State of Oklahoma. I’ve been thinking about a vehicle wrap and other such silliness. Sponsors? Hey now that’s an idea.

A realistic concern is getting too far from a petrol station. The range on the fuel in the tank is just short of 250 miles. I am thinking perhaps I should plan to carry additional fuel in jerry-cans. And if you are going to do that, you need a roof rack. Seriously, trust me, that is sound logic.

I was also thinking how cool a roof rack would look on the Range Rover. We are going on an expedition, we need to look the part! Am I wrong? I don’t think so!


So I was looking through all the great posts on making your own roof rack at Expedition Portal. Guys have made some seriously awesome roof racks. I know I could made a roof rack. I’d need a welding unit, some grinding wheels, cutting wheels, a ruler, some angle magnet thingies, welding goggles, pipe benders, and some material. It would have to be metal so should I use round stock or square stock?

By the time I spent the money on the tools and stock I still wouldn’t have a roof rack. I could go to my mate JagGuy’s awesome shop and have the welder, bender, and goggles sorted out. A four pack of Boddington’s and perhaps a nice bottle of wine and I’d probably have the basic training needed. But I still wouldn’t have a roof rack.

I could just buy a roof rack. WHAT? You have to be insane. Why buy when you can make? Well, time mostly, that’s why.

I am still in school and next semester is a busy one. Also I’m thinking weight is a factor. So I’m thinking of buying.

$199.95 50″x50″ Roof Rack
$54.95 Roof Rack Gutter Mount
$29.03 FedEx Ground Home Delivery

For around 285$(US) I could have a functioning roof rack. Easy-peazy. No welding, no sourcing steel, no new tools. Hotsy-totsy! I bet you thought hotsy-totsy meant something else didn’t you?

Doesn’t that look great? That rack would look great on my Range Rover. I’ll still need to fabricate some jerry-can brackets. The price on-line was a bit too much for what I saw. The brackets are more expensive than the cans. That seems a bit silly.

If I hit the lottery tomorrow I could probably drop 3000$(US) on kitting out the Range Rover and would probably be short a few items. As it stands I’ll be out shipping and nearly 800$(US) for springs and new shocks. The price above for the roof rack plus 2-4 fuel 20 liter jerry-cans. With all this bolt on poser stuff I still haven’t addressed some serious issues.

  1. The air conditioning is still non-functional.
  2. The transmission still needs to be refurbished.
  3. The ABS system is still in fault.

The repair parts for that stuff will probably run up to 2000$(US). At the end however, I’ll be pretty confident I have a rig we can use at some events. Perhaps I’ll even be able to get Mrs. OkieRover to go camping with me. Wait…how much more money will I spend for that?

On this day there was a terrible tragedy in Connecticut  Remember it isn’t guns that kill kids, sick people kill kids. That sick bastard was going to commit a horrible crime. If he didn’t have a single firearm he’d have used a car or something else.

Say a prayer for the families that lost their children, say a prayer for the people who will deal with this for the rest of their lives.

And finally say a prayer for our country to come together in these difficult times.

Thanks for reading and Happy Rovering.

THE CHEAPEST REPLACEMENT PART for a Land Rover EVER (Post #226) 12/11/2010

I started this Saturday out with a cup of hot cocoa in my Fox Battery 2nd Battalion 14th Marines mug and a hope of getting a lot done. The weather report had today getting worse as the day progressed. By the time I knocked off for the day to watch the Army / Navy (Go Navy) football game, the wind was gusting over 30 mph from the north. With an air temperature around 48(F) that makes for an unpleasant work environment in my north facing garage. At a minimum, I wanted to finish what I had started last weekend.

Last weekend I was supposed to be scraping deer hides with my friends. Those plans changed and I was instead home for the weekend. Mrs. OkieRover and I went to a friends house to watch the last Big XII championship football game between our beloved University of Oklahoma Sooners and their long time rival the Nebraska Cornhuskers. The company of my friends is always welcome and it was good to sit and all six of us fuss about the play calling in a tight game. The Sooners triumphed over the bug eaters from the North.

My friend had prepared quite a spread for us. We had chili, lots of finger foods, sushi, and lots of sweets. We enjoyed a bottle of wine and had a great night. Well I can say it started great and ended the next morning with me in the toilet with either a food allergy or food poisoning. I ate the sushi as I always do, but something served did not agree with me. I say food allergy because at one point my hands and feet and ears itched. In any event it ended my weekend early.

The day before all the parts I ordered arrived. I went through the parts and sorted them.

Before the evening activities I was able to go to O’Reilly’s and get some power steering fluid and spare hose clamps. I also asked about replacing the power steering hose that runs from the pump to the reservoir. It is just a length of hose, no pressure fittings. O’Reilly’s did not carry any hoses that would hold up to oils and together we came up with P & K Equipment. They are a John Deere (TM) dealer and do a steady trade in equipment and parts.

View Larger Map

As I arrived I learned from the sign posted there at the counter that they make hoses. So that was good news for me as I knew they would have the type of hose I needed. I handed him the length of hose I wanted to replace and off he went. He was back in a few minutes with a cut length and asked if there was anything else. I described the flange types Land Rover uses for the power steering hoses and expected him to either stare blankly back at me or shrug me off. Instead, he said, “yeah that’s an inverted flange, we can make those.” No shit? No shit. I told him I’d bring the next hose that leaked down to him to see if he could make a replacement.

I was ready to go and he rung me up. I retrieved my debit card to pay for the hose and the young man said, “that’ll be a dollar fifty five.”
I said, “1.55?”
He said, “yep”.
I said, “hang on” as I had that in change in the car and went out to fetch it. With this purchase, I think I have set the record now for THE CHEAPEST REPLACEMENT PART for a Land Rover. Atlantic British lists this hose for 47.95$(US). For you math nerds out there that is a 96.77% savings. YES!

I’m very interested in seeing if they can indeed make the high pressure hoses and how much they might cost. I love finding savings like this.

I reattached all the hoses and today I filled it with power steering fluid. I chose power steering fluid instead of my normal routine of using automatic transmission fluid (ATF). I am looking for leaks and this area is already the location of the transmission cooling lines. We know those have the crimson ATF fluid running through them. So to differentiate I put power steering fluid in the power steering fluid system. The power steering fluid I bought is clear, that way if either are still leaking I’ll know which system has the leak by the color of the fluid leaking out.

In addition to all this steering work, I put the lamps in their sockets where the bulbs needed to be replaced. I then decided to take the Rover to the car wash to put some hot soapy water on the hoses. I need to find the leak and with clean dry hoses if there is a leak it should show up quickly. I should see weeping on the hoses or even a drip on the butcher paper I put down to watch for new leaks.

On the way to the car wash I was able to get the Range Rover through all the gears. As you remember I think I may have burned the 4th gear in my transmission. I put in fresh fluid and the shift points couldn’t have been better. I know this is no measurement of the condition of my transmission, but I was happy to see it shifting well.

Here is the list of projects as of today. I’ve struck the projects I’ve completed.
Projects

  • Brake discs
  • Brake reservoir
  • Bushings
  • Viscous Coupling
  • Rust in the bed
  • Rust on the lower tailgate
  • Rust in the front footwells
  • Broken axle
  • Transaxle shifter solenoid
  • Complete fluid service partially done
  • Power steering hoses
  • Head liner
  • Sun roof
  • Rusted floor pans
  • Windshield Seal
  • Tires
  • Sound system
  • Door locks
  • Transmission problems

Not vital but needed eventually.

  • Springs and shocks
  • Air conditioning

That is all for now. Thanks for reading and Happy Rovering.

Post Allergy Repairs (Post #206) 10/3/2010

The last of summer has finally left the building. Here in Oklahoma that means the temperatures drop, from 100s to 80s and it means allergies. Pollen this time of year consists of the big three: grass, ragweed, chenopods. It is hard on all those affected. The pollen count numbers we saw were ridiculous. On a twelve point scale, we had weeks where the number stayed in the eleven range. At one point, we had three 11.8 days in a row. I spend that weekend, inside as much as I could. As you can imagine this year was very hard on me. I did avoid getting pneumonia this year from the pending lung infections, so I had that going for me.

One of my dogs, Sophia, is allergic to grass. This time of year, she is a scratching insane ball of irritated canine. She is grumpy and needy of our attentions at the same time. She has finally turned the corner and will soon be scratching less. I too have turned the corner and was able to return to the garage to continue the death march of restoration.

I call it a death march because it seems like it will never end. You can imagine trudging on and on, day after day, with no end in sight. This Range Rover is trying my patience for sure. As I mentioned in other posts, every thing I touch produces two new projects. With that type of progress you can almost see yourself walking backward toward your goal.

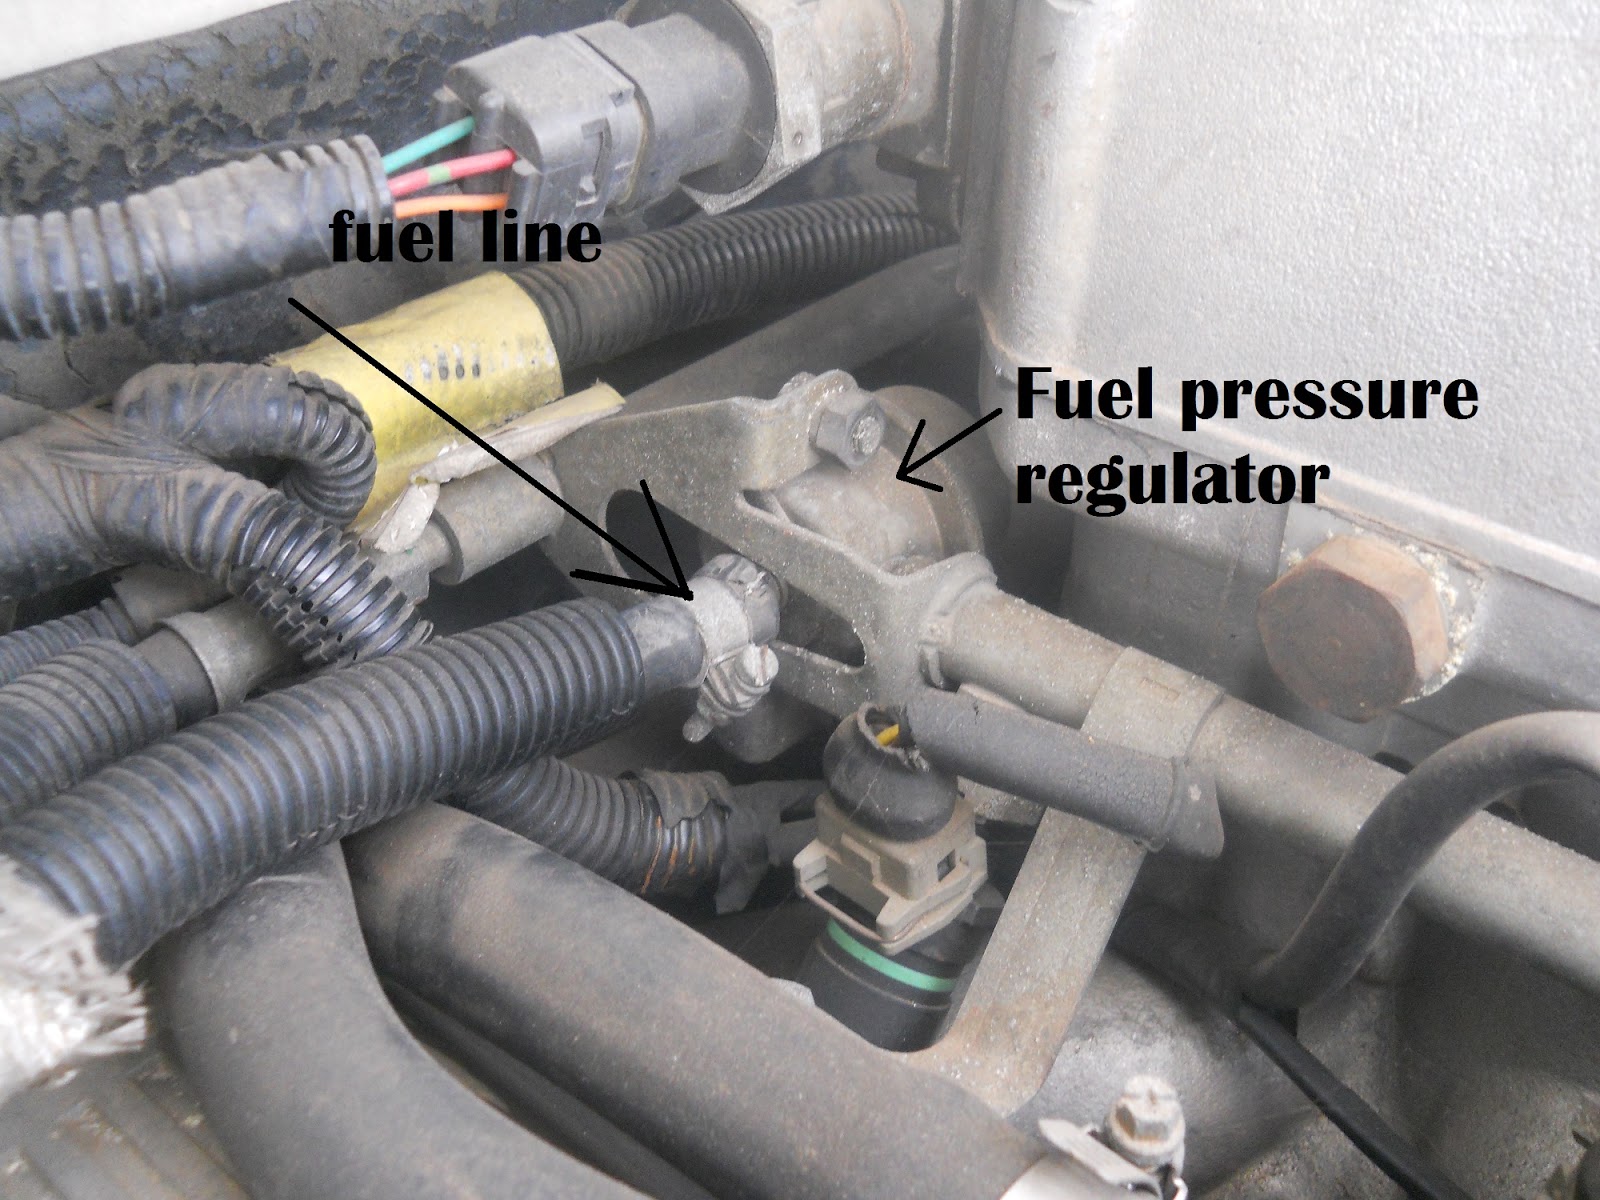
I have finally finished the installation of the brake rotors. I have repacked the bearings all the way around which is on a tick chart somewhere of maintenance NO ONE likes to do. When I fill the brake system with fresh fluid it will also allow us to check off another item on a “Not fun” tick chart somewhere.

I took the failed Craftsman tools back to my local Sears store for replacement. I had damaged or broken a screw driver, a punch, and a 1/2 inch 14mm twelve point socket. The socket as you may remember had traveled half way around the world with us to Guam and back. After the clerk had handed me the tools, I mentioned that fact to her. I told her the socket was at least 40 years old and had been half way around the world, twice. I also told her that as far as antique tools goes this one qualified and there was someone out there that collected them. As I left the store she was eyeing the socket with a little more interest.

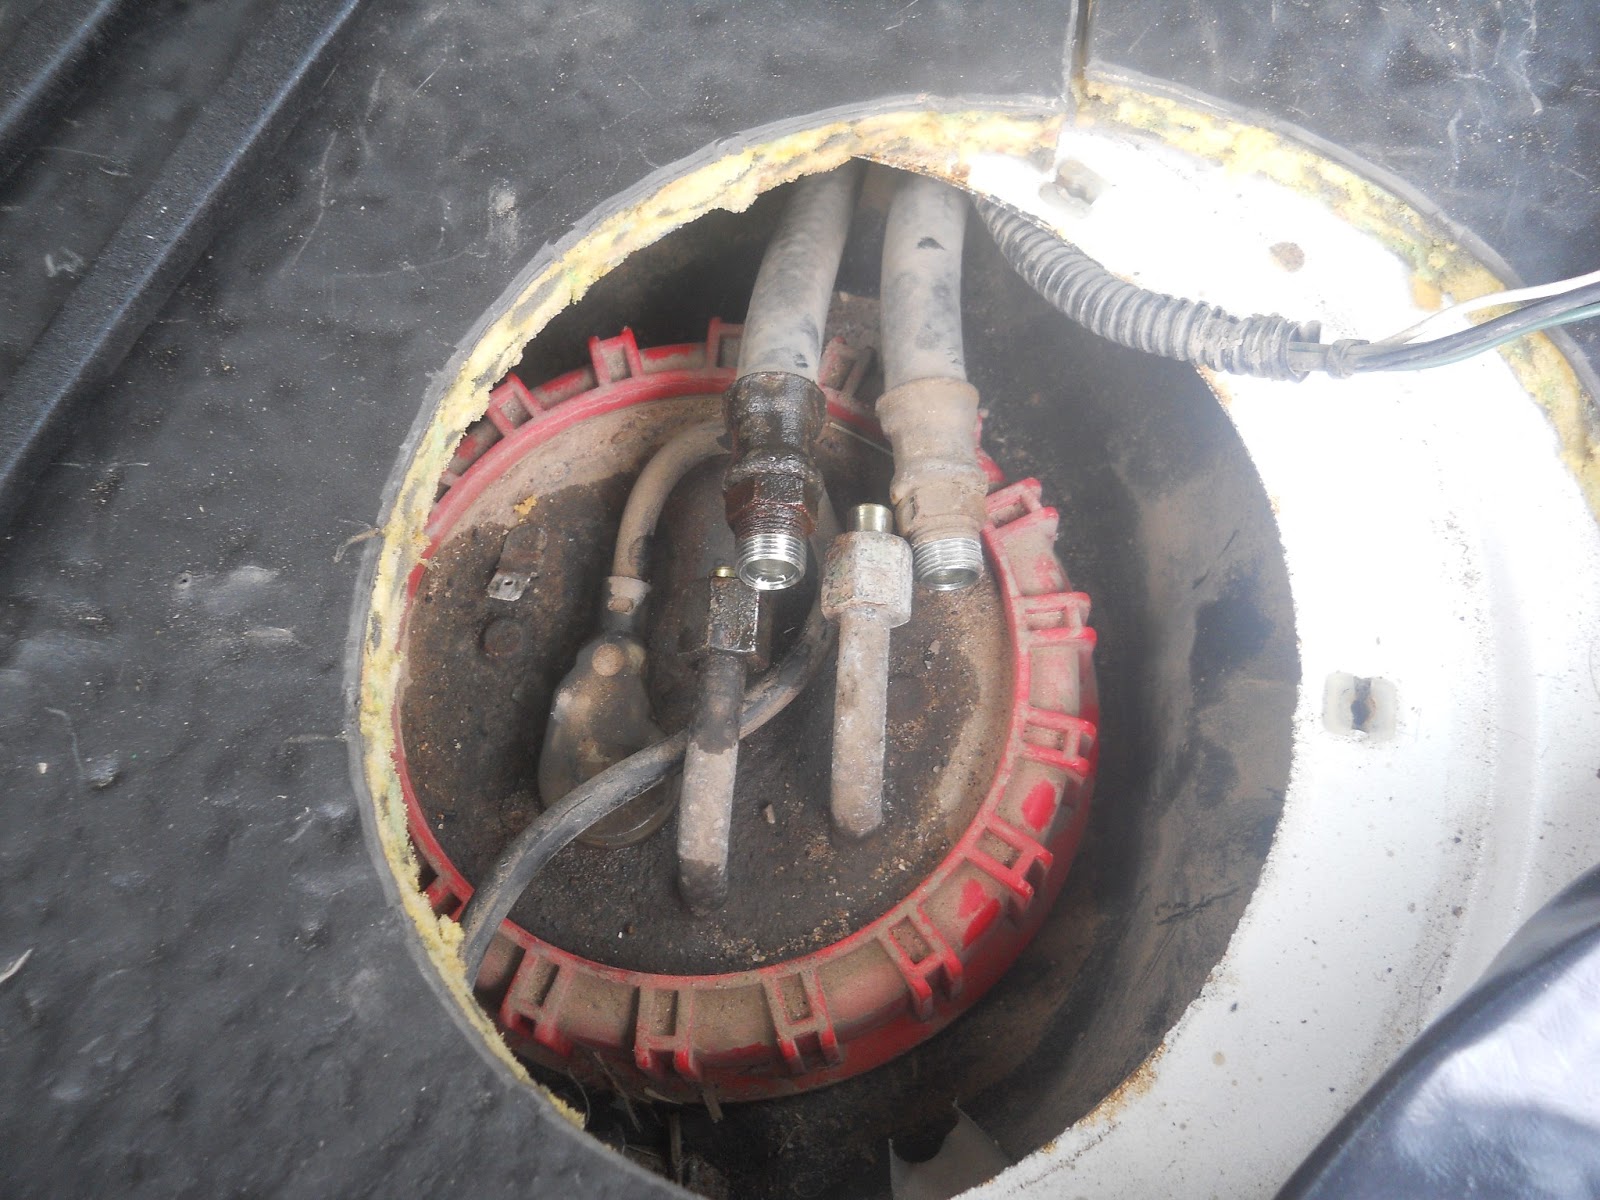
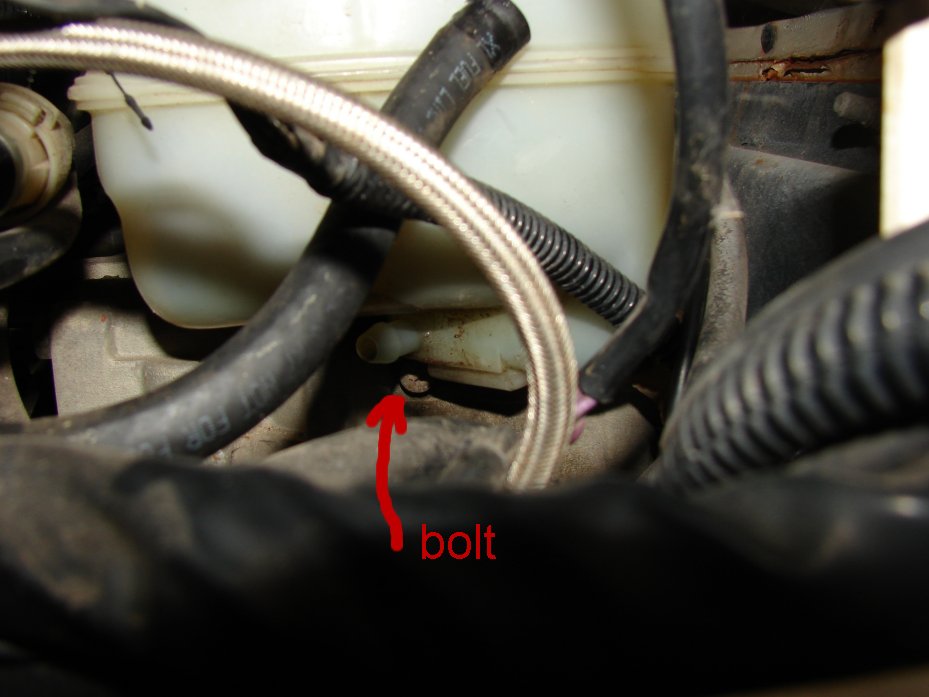
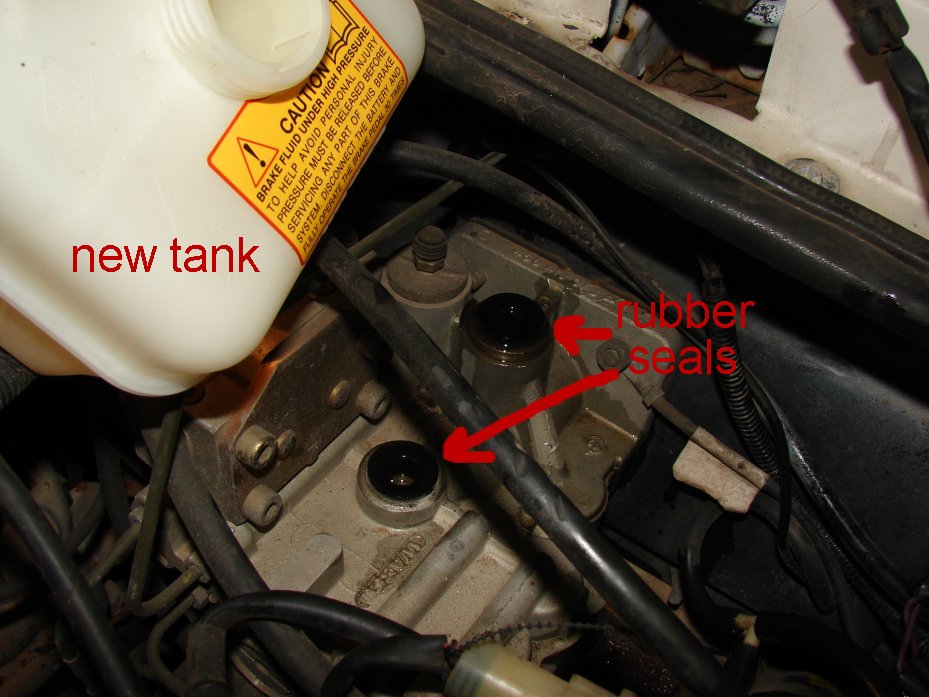
Over the years I have noticed the brake reservoir has some minor cracking on it. It resembles how a porcelain plate cracks. I knew there would be a day in the future when that broke and left me in a lurch. I bought a replacement reservoir and endeavored to replace it.

You can see the cracking in this picture. What I learned from this exercise is the reservoir is a lot sturdier than I believed it to be. The old reservoir would probably have lasted the life of the Range Rover. Instead I have a spare on the shelf now in the form of my old tank.

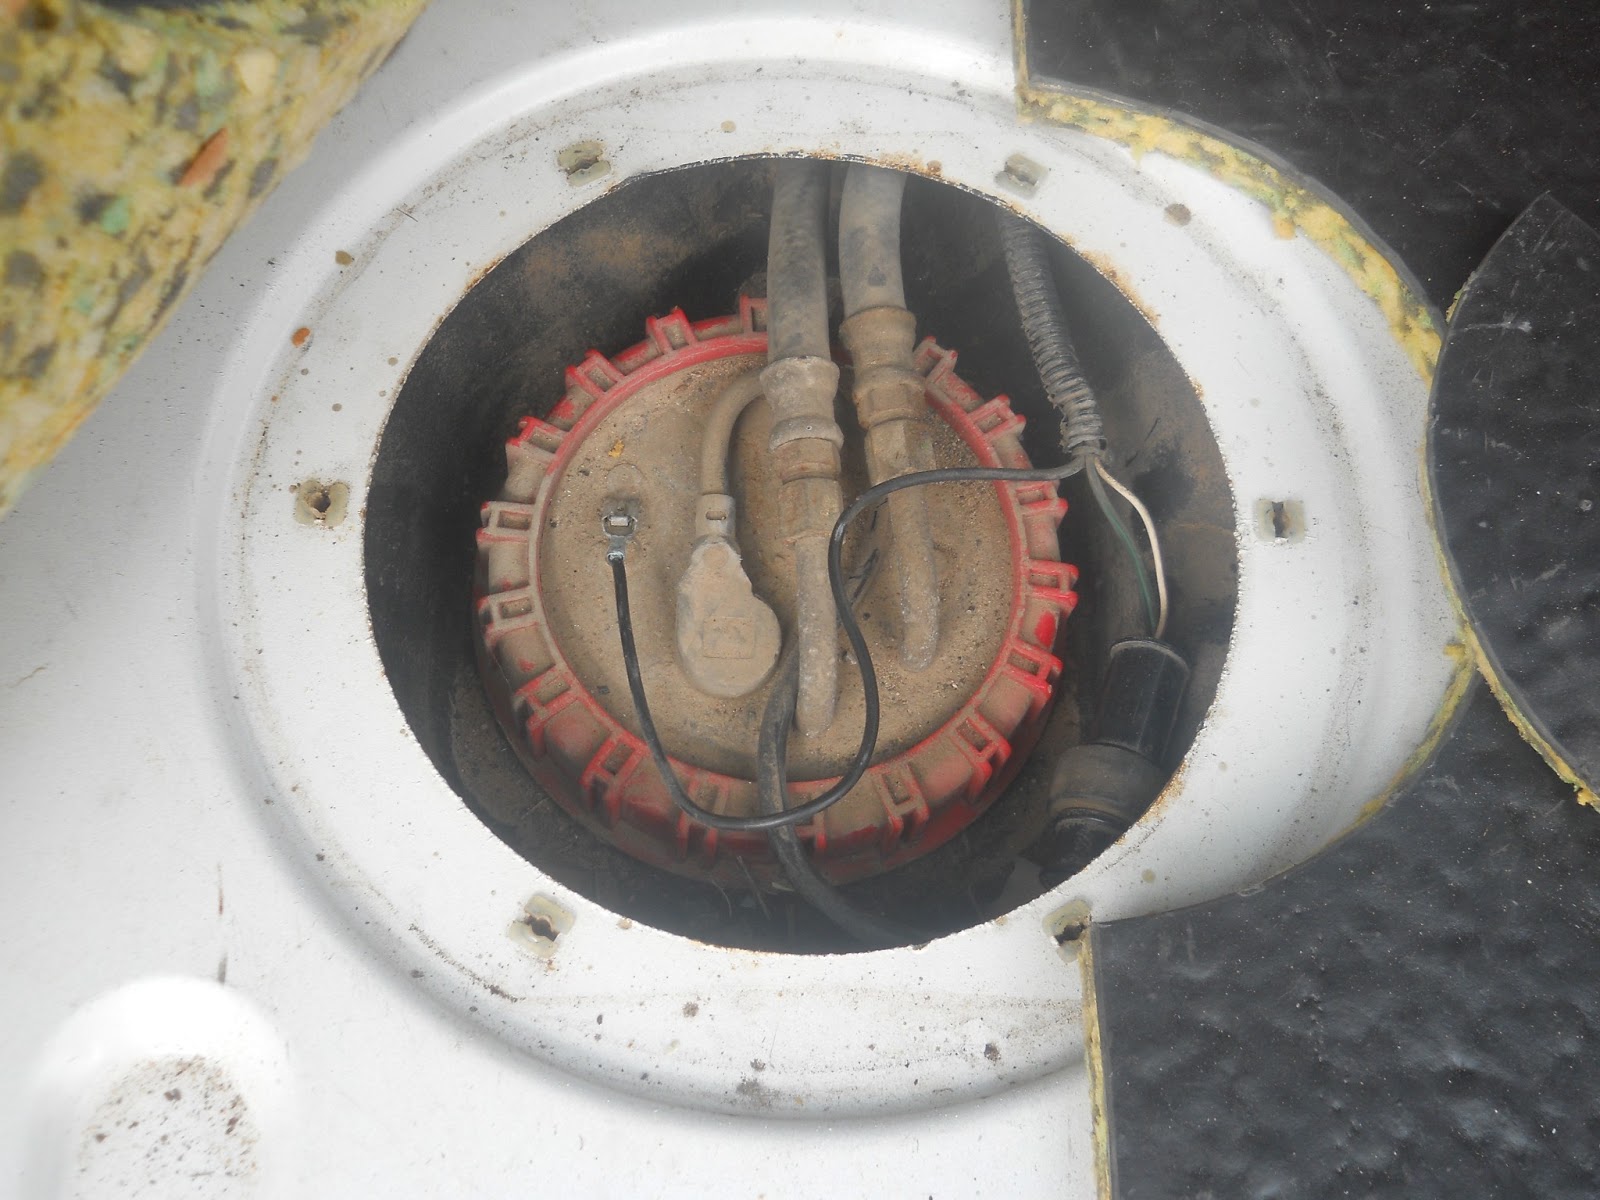
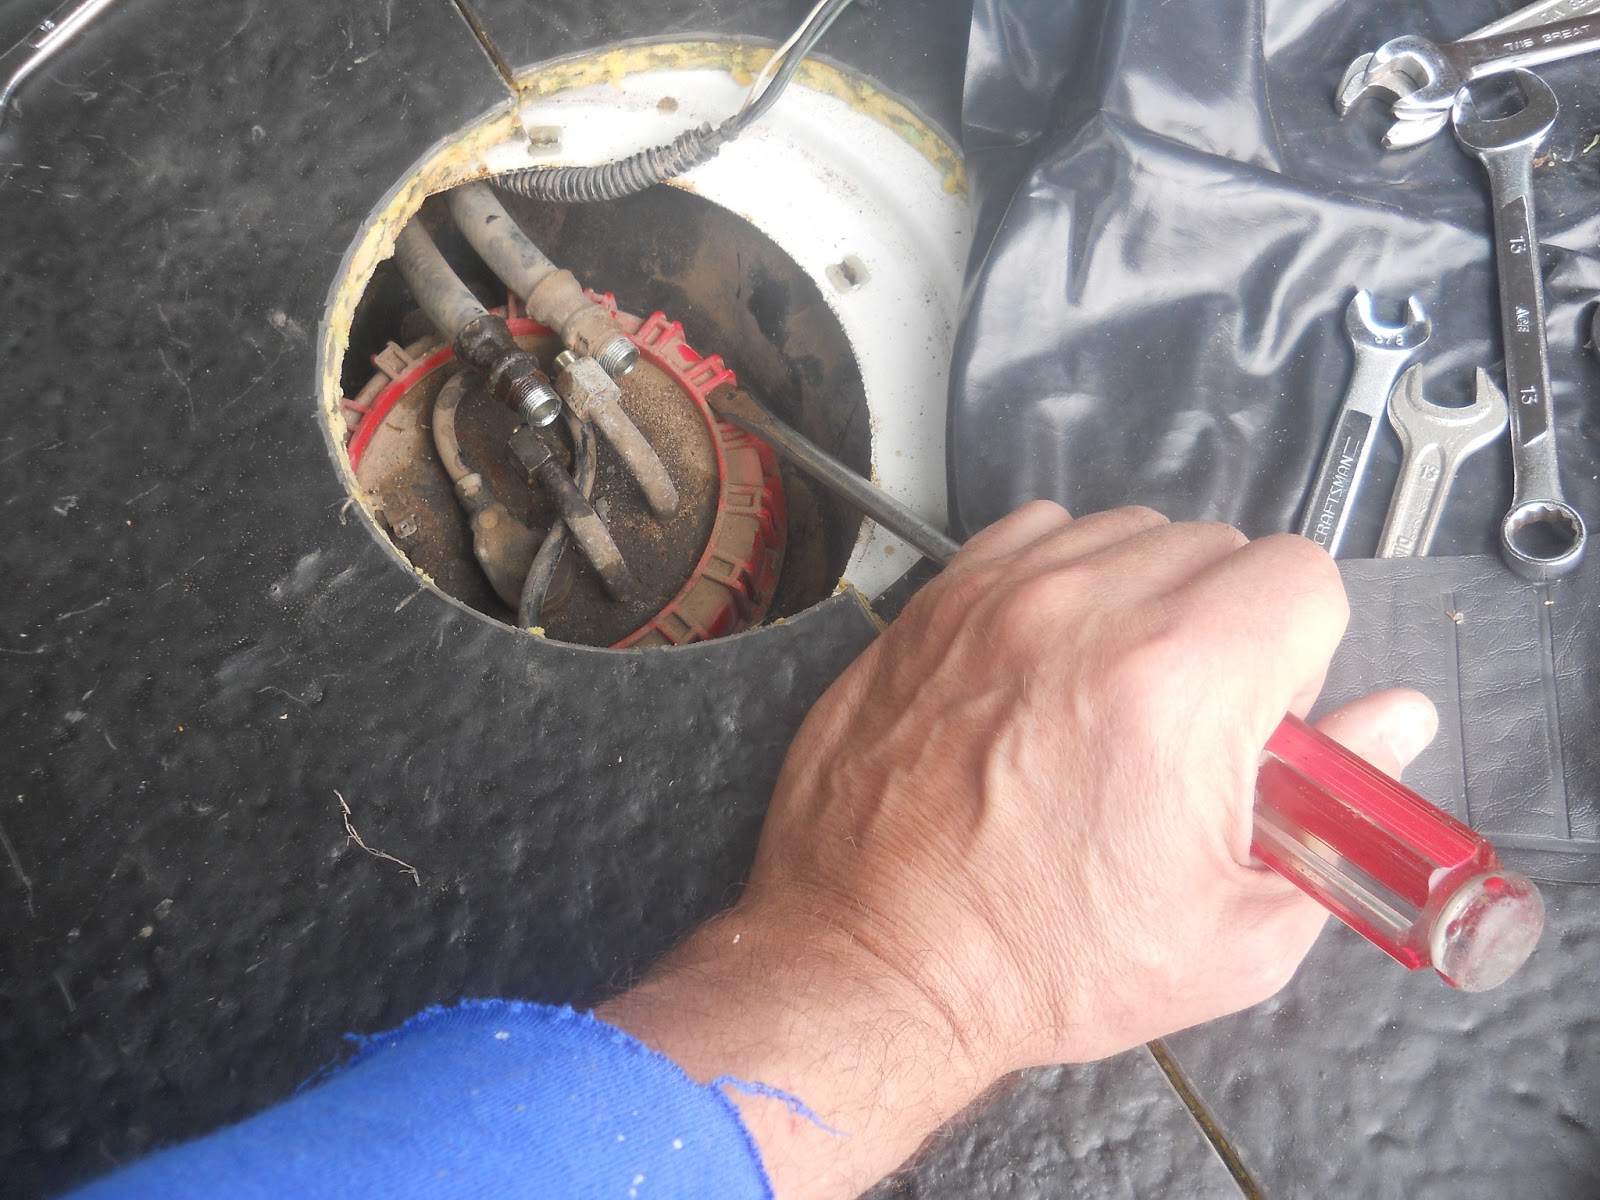
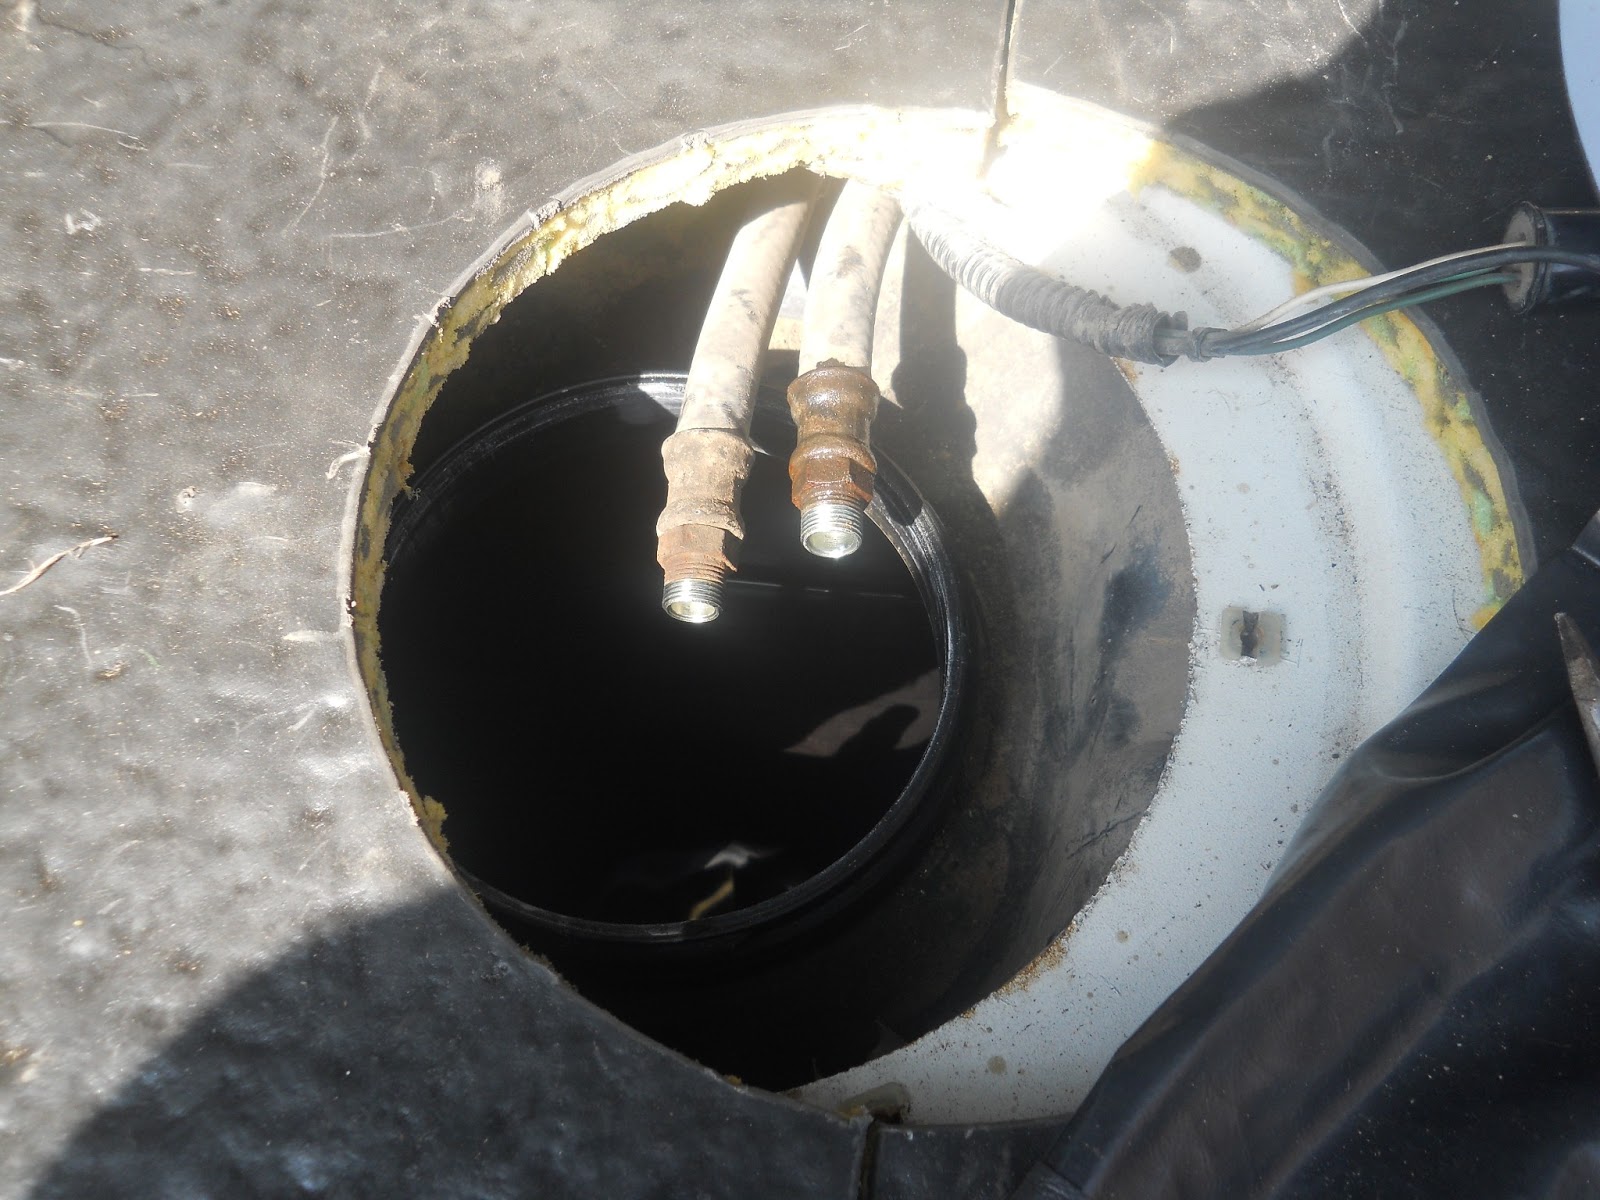
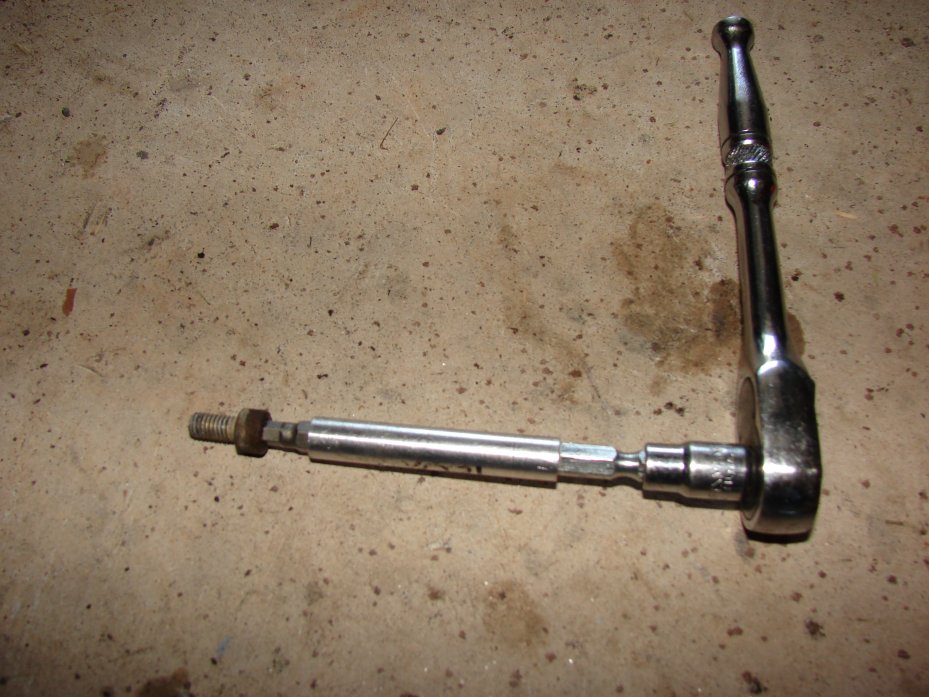
The removal is pretty easy. There is a single bolt holding the tank in place. The hardest part was getting the correct tools to remove the bolt. The head is a hex size 5. I put an extension on the end of a 1/4 inch socket and the hex head bit size 5 on the end of that. You have to remove a low pressure hose from the bottom held in place by a hose clamp. Most hose clamps in America have a 1/4 inch socket head on the drive nut. I have run into clamps with larger heads. Diet Mountain Drew’s friend SeaDawg’s BMW 325is has a hose clamp that was larger, but this one was a 1/4 incher.

I managed to get it under there and on the bolt. It came out with not too much effort.

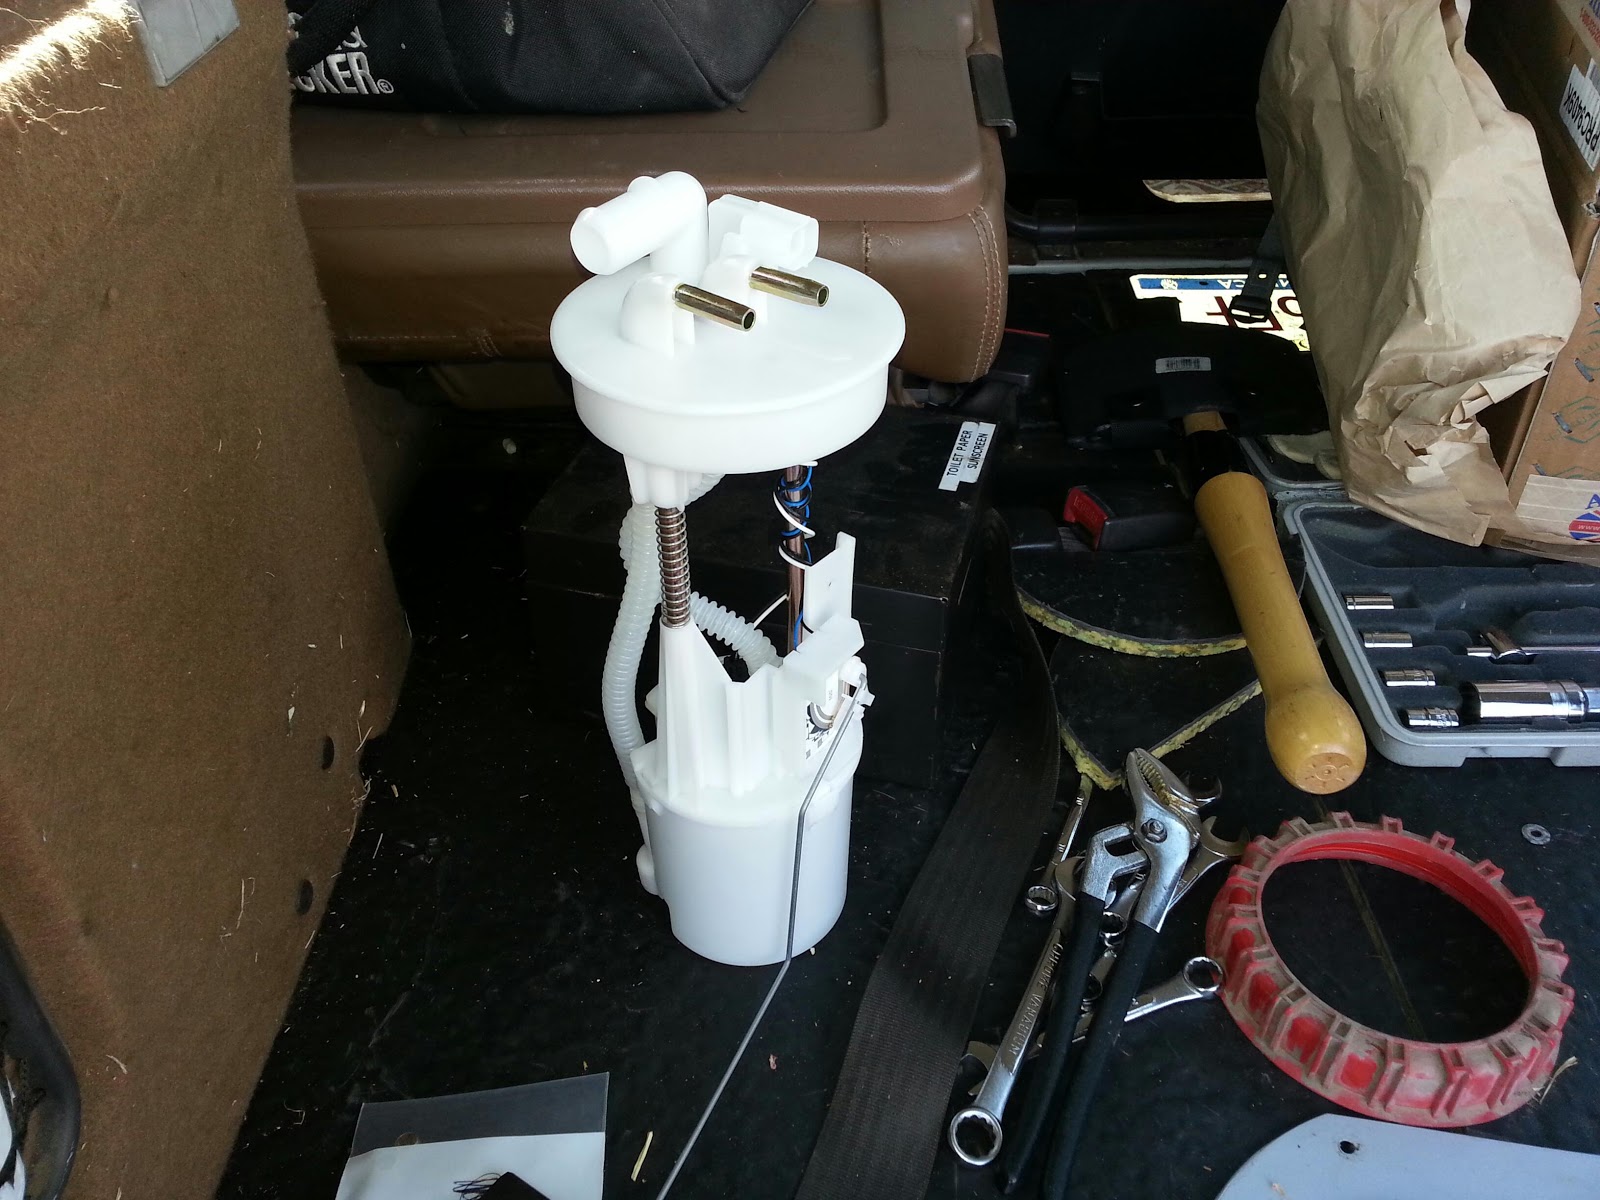
I had not at this point learned that my new tank came with a replacement so I put the rusted screw on the wire wheel to clean the rust off. I installed the new reservoir and went to put the old reservoir in the box and up on the shelf when I learned there was a new screw and a new set of rubber seals for the new tank to rest in. So I got to install the tank twice.

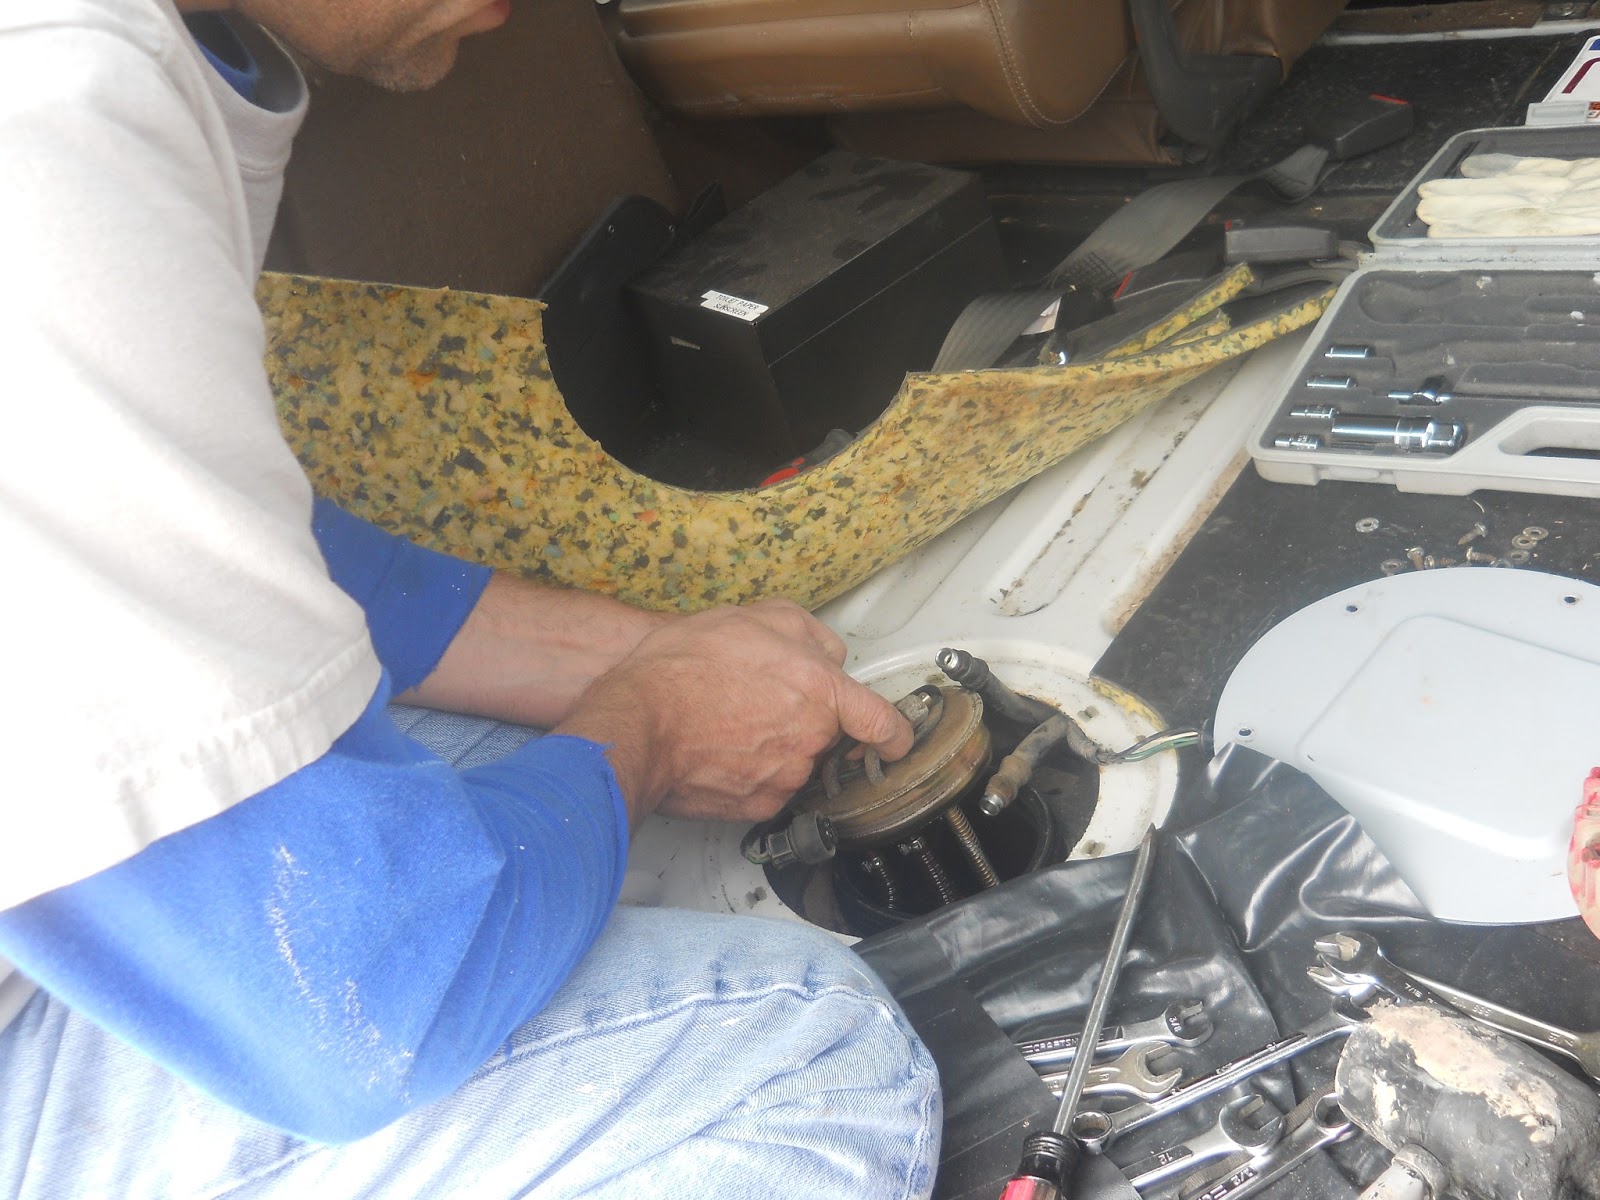
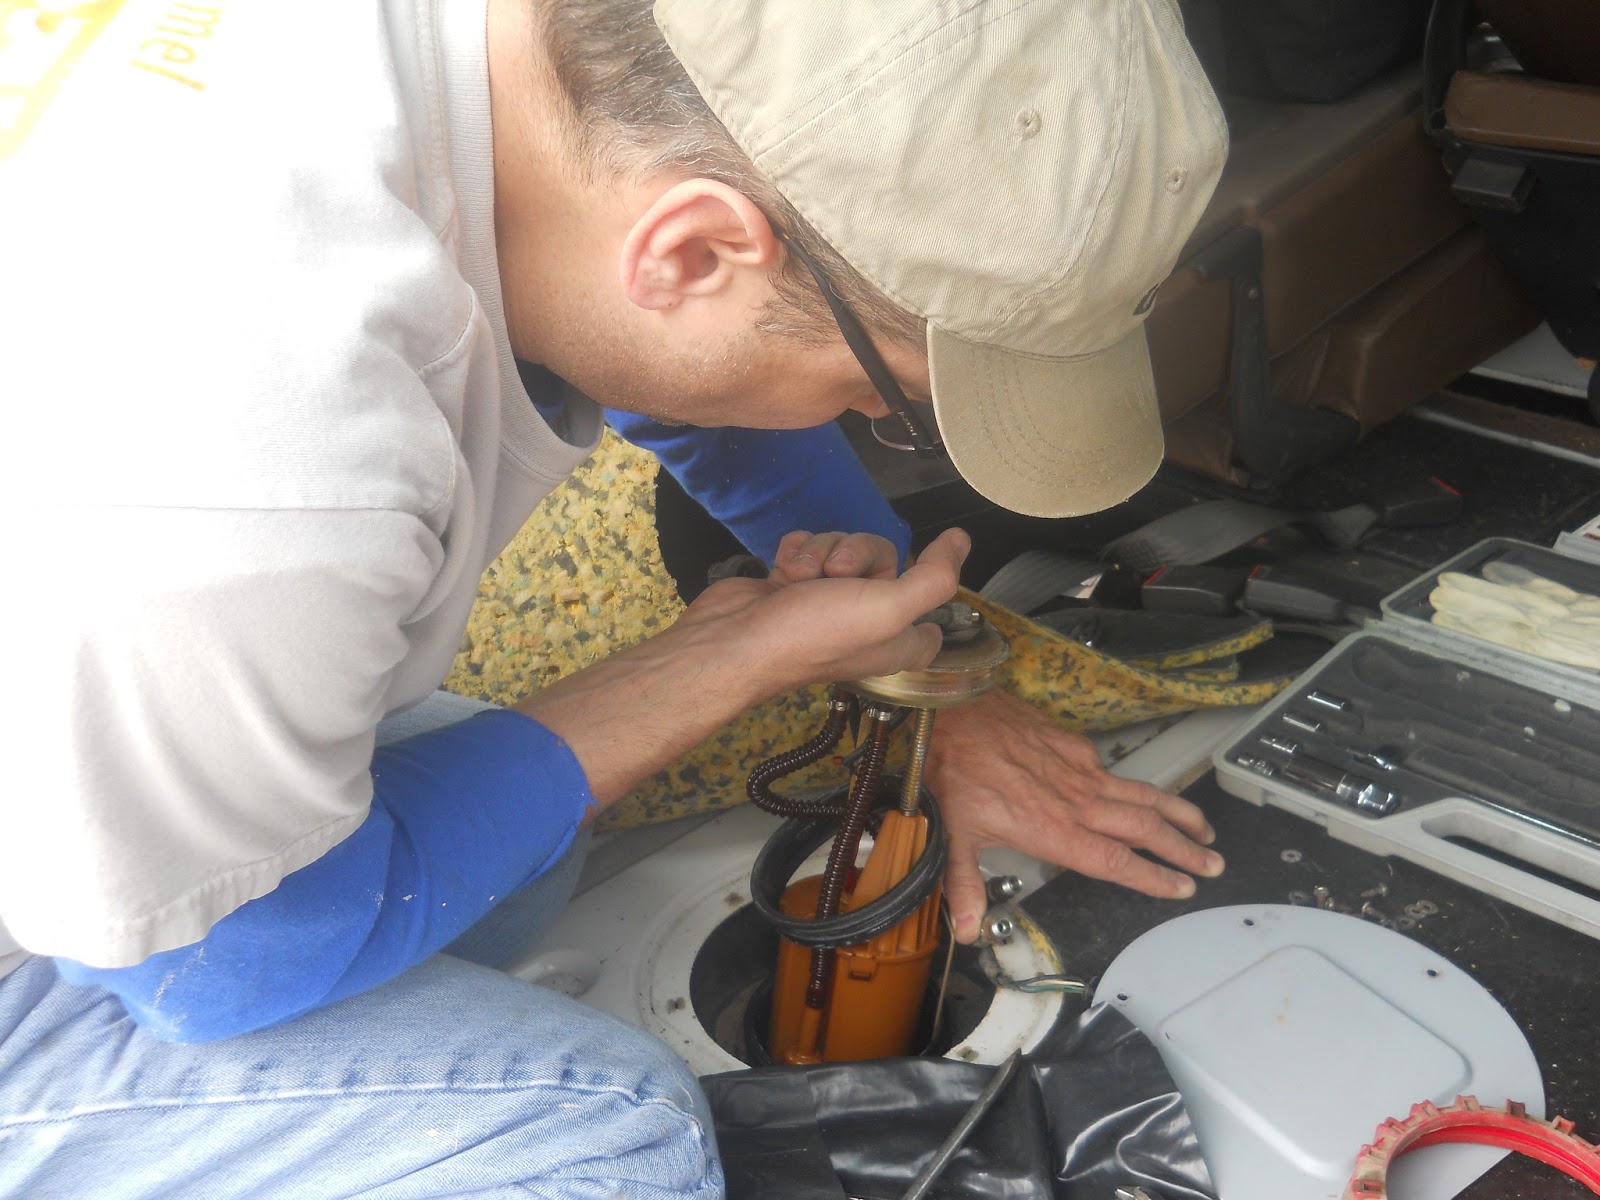
The install is pretty easy. Remove the old tank. I used a large screwdriver as a lever to lift the tank as I pulled up. I popped out the old rubber seats and replaced them with the new ones. Now, having done this twice I can tell you the secret to an easier time getting the bolt back in. The part I bought had a metal bracket held in place by a channel molded into the bottom of the tank. The metal bracket moves freely. Slide it out a bit and check the alignment BEFORE you push the new tank into the seals.

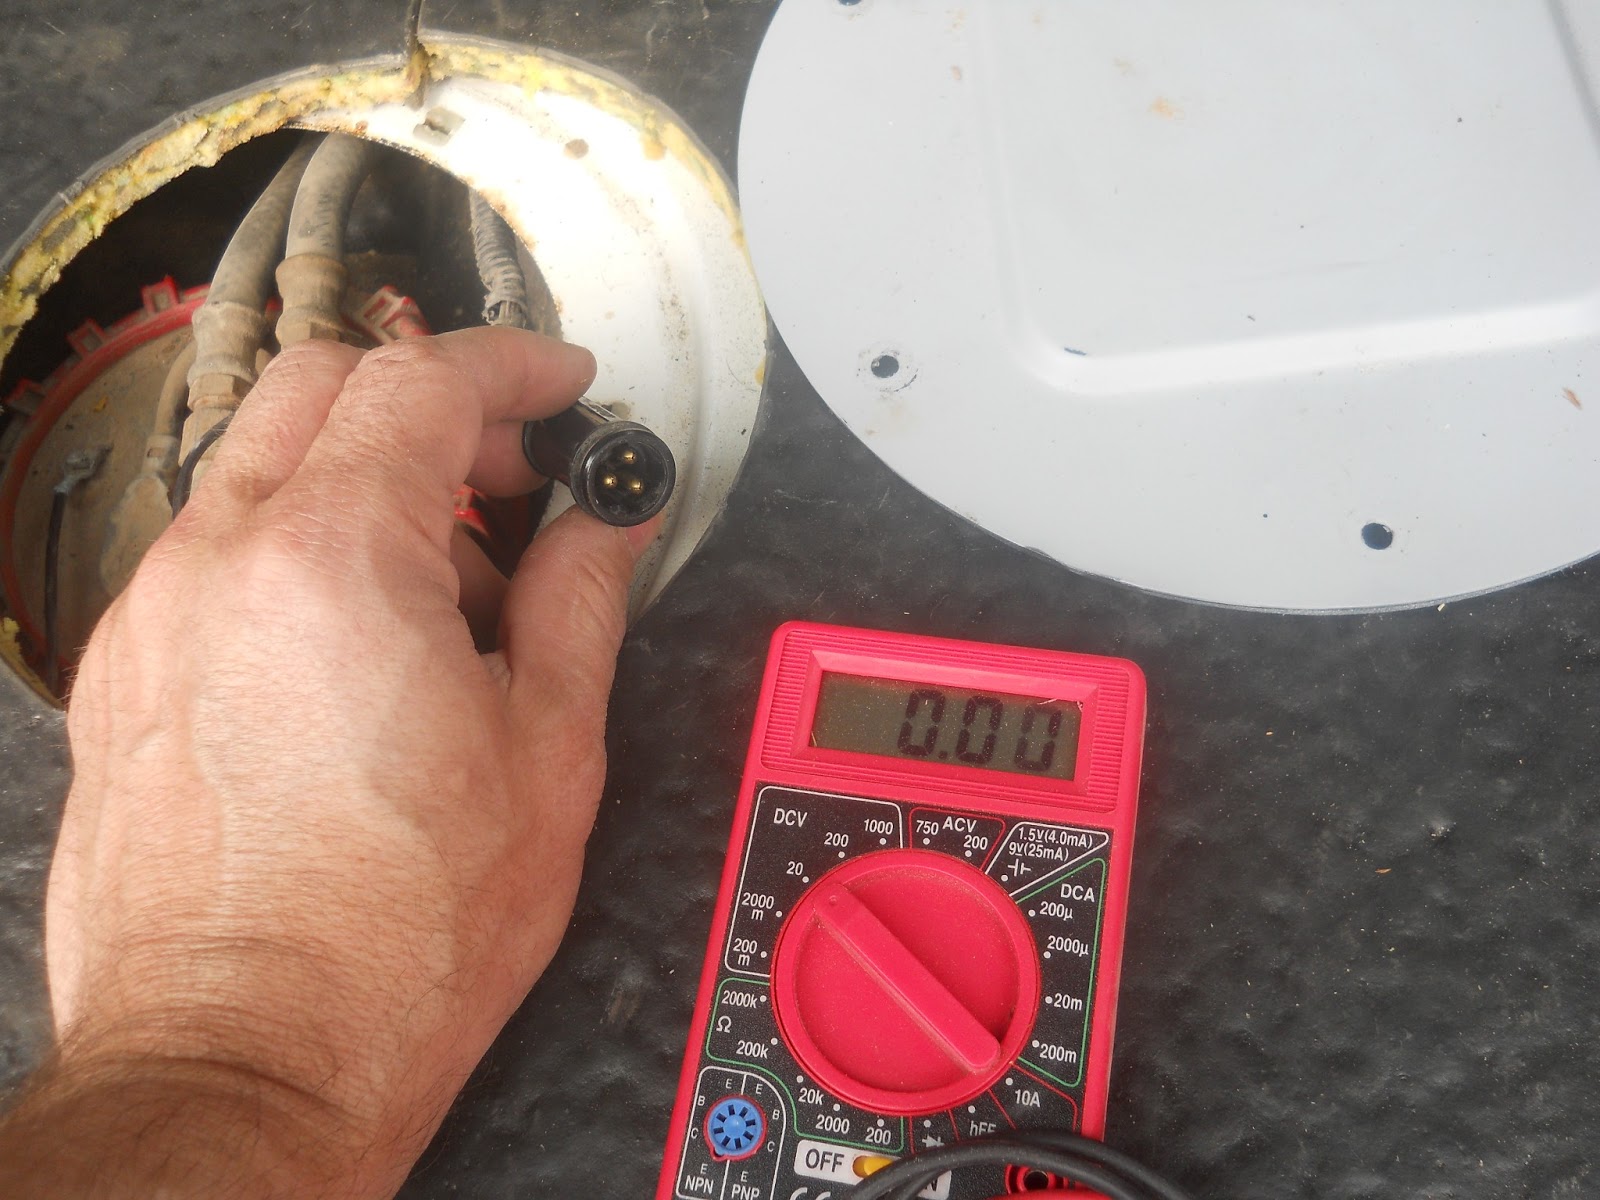
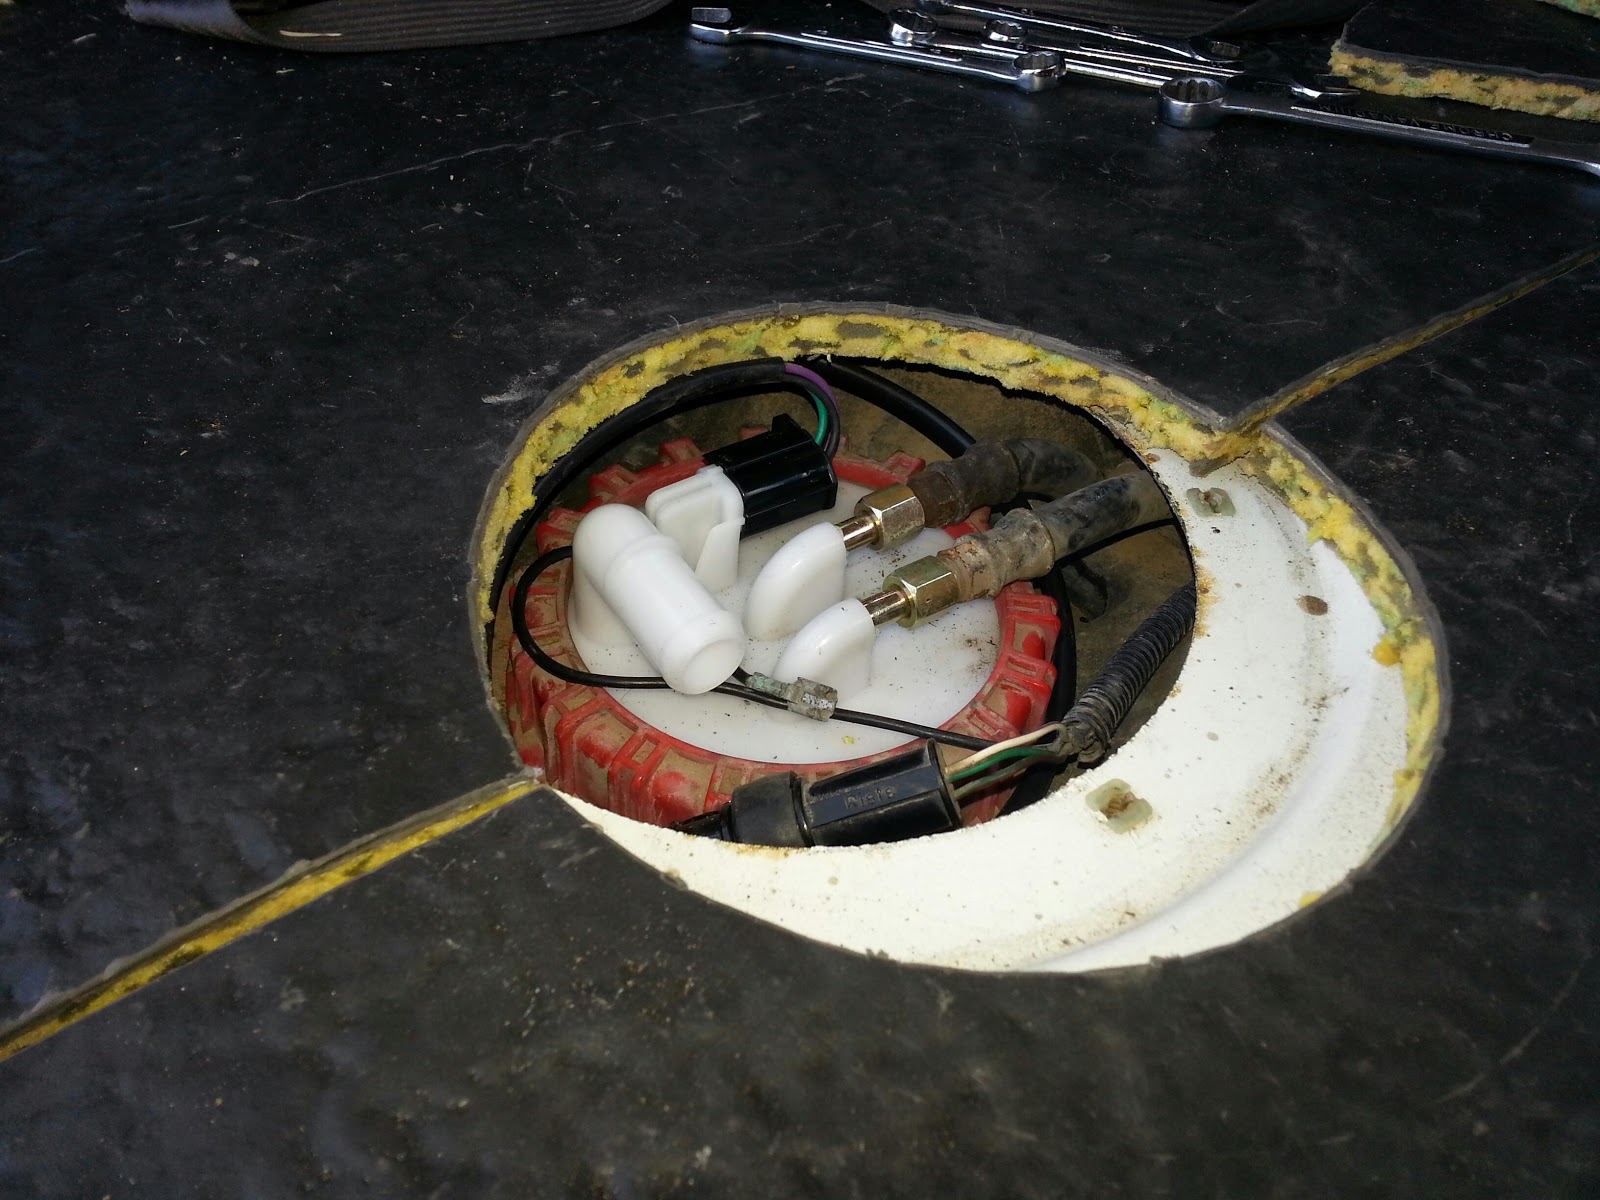
Before you put the tank back in place connect the low pressure brake fluid hose. You can see it much better in your hand than buried behind all the hoses and wires. Line the tank up and gently press the tank into the new seals. Reconnected the low pressure brake fluid hose and screw it all down with the new bolt.

This is a really crappy picture of the old rusted hose clamp. It was so badly rusted the drive nut was basically welded in place. I replaced it with a new clamp.

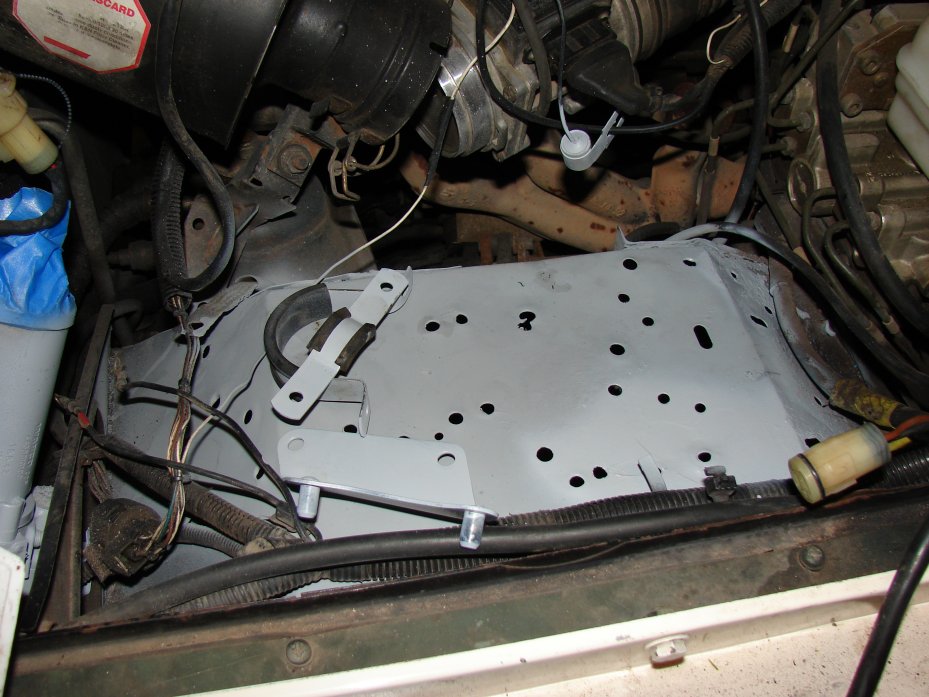
It is easier to replace all this if you remove the ABS pump and the vacuum accumulator and the coil. This fender is full of stuff. And from looking at this picture of swiss cheese the top of the fender, things have been moved around a bit. And those relocations required new holes be drilled.

I’m the kinda guy who uses the existing holes when ever possible. I know I drilled a few of these holes. But no where near all of them. And as you may guess…that’s right it was badly rusted. Big surprise, NOT!

The more I encounter the rust on this Rover the more I’m guessing its days are numbered. If I had the money, a donor Rover and the time, a frame off restoration would be required. I have just resolved I will just protect the metal I can and see what happens in the future. I got the angle grinder out and knocked off all the rust I could and covered it with acid etching primer and Rust-oleum automotive primer. I covered the top and the bottom of the fender with several coats of paint.

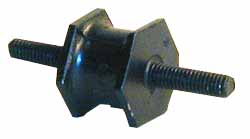
In the process of removing all the parts from the fender I found the broken rubber mounts for the ABS pump. The good news was I only needed to cut two of the four off because they were so badly rusted wrenching them off was impossible. It seemed like every bolt and nut on this fender was badly rusted. Several of them broke instead of coming apart traditionally.

I will have to get an assortment of stainless steel bolts and nuts to put everything back together. I’m debating on designing my own ABS pump mounts. I think I could do something with a set of rubber stoppers cut down and drilled with some stainless bolts. I’m pretty sure it will work as well as the factory designed ones.

These mounts are available from several suppliers. Atlantic British has them listed at 7.95$(US) each. The stoppers, stainless bolts, washers, and nuts will probably be about the same cost, WITH NO RUST. I’ll post up my results when I decide.

I also don’t like the GIANT gap in the fender near the shock tower. I’m going to be looking into some rubber sheets to cover these spaces. This is the awkward segue to discuss the mud flaps.

To be have mud flaps, or not to be to have mud flaps: that is the question:
Whether ’tis nobler in the mind to suffer the slings and arrows of outrageous fortune have ground clearance, or to take arms against a sea of troubles not have as much ground clearance, blah, blah, etc…
William Shakespeare – Hamlet

Few people know that Bill was a huge fan of “green laning” and wrote those prophetic words while sitting in a carriage that was hung up on its mud flaps in a field near Guildford. He changed the words slightly to highlight Hamlet’s dilemma over life and its many torments.

I have long ago lost the mud flaps. The brackets for the flaps are attached in the front to the wheel well and provide three more holes for water to get under the carpet. Great idea guys, have another Guinness or twelve on me. I can only guess these holes did not contribute to the water in the floors but it’s anyone’s guess.

I have painted the brackets and cut off the rivets that held the old flaps. I have stainless steel hardware ready to attach new mud flaps. The question now is…do I want mud flaps?

I read a debate about this on a forum many years ago. I have removed my running boards and the mud flaps failed and fell off or were ripped off long ago. The debate was basically that of “ground clearance”. I’m not a fan of mudding. I know there will be places I go that will be muddy. But I can tell you I’m pretty sure I will NOT be driving the Range Rover into mud pits, AKA mud bogging.

The question of cost is also hanging over us. A mud flap costs about 10$(US) for my Range Rover at Atlantic British. All of the suppliers are about the same on the cost. At that cost there isn’t much point in finding a source for a sheet of rubber that might reduce the cost. So for around 40$(US) plus shipping I can put mud flaps back on my Range Rover.

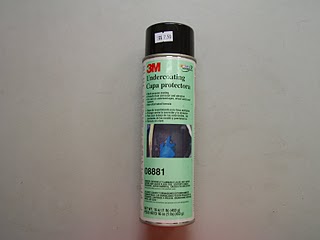
Finally, well for this post anyway, I sprayed some of the rubberized coating material. I sprayed the floor on the driver’s side where the holes for the mud flaps are located. I sprayed the bottom of the footwell too. I got the angle grinder under there and cleaned the holes of any rust.

I will install the stainless steel hardware and then spray the spots again for good measure. I think any holes I can get too will get a stainless steel bolt and nut with washers to close the hole. I can then spray those with the rubberized spray inside and outside.

I was warned about using this product. Mainly if you cover up rust with it, the rust will eat the metal under the coating and you will never know it. I have used it only where I think there is no longer any rust.

I also coated the rain gutter at the tailgate end of the back. As you recall this is where I found the first rust on this restoration project. I have at least three coats of paint on the metal here. I figured any water I can encourage to go out of the Rover on a nice rubberized gutter the better. As a disclaimer I will state at this time, “I have no fantasy what-so-ever that this product will help me with the rust problems on this Range Rover.”

I mostly disavow any hopes here because from what I’ve seen this Land Rover’s days are numbered. How many you might ask? I have no idea. Hopefully it’s a decade or more.

So it’s off to the hardware store Lowe’s to buy stainless steel hardware. And once everything is bolted back down, bleed the brake system. And then the project I’ve dreaded most, the viscous coupling, will begin.

Wish me luck…as I post this the allergies are acting up and I’m packing a snot rag every where I go.
Thanks for reading and Happy Rovering.

Diesel Land Rover? YES, wait what? (Post #183) 6/28/2010

“The performance of our new LR-TDV8 can only be described as awe-inspiring,” said Paul Walker, Land Rover chief programmer engineer. “We are confident that the combination of reduced CO2 emissions, EU5 compliance and the massive increase in performance while delivering a huge improvement in fuel economy, is world class.”

Click the beauty to the left for the story from Atlantic British. Spoiler alert: It’s not available in the United States, let us all collectively thank the car emission standards of the People’s Republic of Kalifornia.