Brake Bleeding Procedure (Post #427) 12/30/2013

I’ve been conversing via Private Message on Rangerovers.net’s message board with Yungblud04 (I don’t have his “real” name) about the ABS system on Classics. He is going to bleed his brakes and needed a procedure.

Rover’s North has a lovely Tech Tip section and they offer this procedure (Rovers North) for bleeding your ABS brakes. I used it the last time I bled my brakes and it worked very well. It was even confirmed by Mickey of Mickey’s Garage (Mickey’s Garage) that I had done it correctly. This was quite different from another process I read online somewhere. It only required fluid to be bled from #1,#2,#7,#8 in the diagram starting at the farthest (right rear) caliper and working forward to the left rear, then the right front, and lastly the left front. That procedure has worked for me a few times but was not the proper procedure.

I am still having the buzzing ABS relay or whatever problem. I will need to investigate that further when the weather get warmer in a couple of months.

Thanks for reading, Happy stopping, and Happy Rovering.

Not a Failed Brake Caliper (Post #368) 7/12/2013

IF you read my recent post on a failed brake caliper, it turns out it wasn’t a bad caliper at all. Just a failed dust cover. I have since found that both have failed. Just another thing that is kinda annoying.

I bought a replacement caliper and even though the old one had not failed I replaced it any way. I’m having trouble getting the brakes bled correctly now. Just another thing that is kinda annoying.

I am taking the Big White Bus in to Mickey’s Garage on Monday to have the AC reconditioned, springs replaced, brakes bled (if I don’t sort them myself this weekend), and another drive line clunk investigated. I hope to keep the expense under the gross national product of Chad.

I was thinking of a beer commercial mixed with an add for Mickey’s Garage…

Thanks for reading and Happy Rovering..

Brake Caliper Failure (Post #364) 7/2/2013

I’m pretty sure that should be dry.

Look what I found. No, not the rust on the splash guard, I expected to see that. The left front brake caliper is leaking. I’ve been hearing a pop on that side ever since I replaced the left rear brake caliper. I was just about ready to send the old gal to the shop for some fresh springs and air conditioning and then this.

I rebuilt all the calipers about three years ago, or was it four? I had trouble with the right rear staying together so I replaced that caliper with a “professionally” restored unit. I’m pretty happy with having 197,000 miles and one rebuild before a replacement for this part.

This may explain the ABS problem I’ve been having of late. When the brake is depressed (pushed down, not emotionally upset) it is hard (as expected) and is stopping but as the brake continues to be pressed it the braking really picks up and decreases the speed very quickly. That tells me something is not quite right time for a replacement.
More after the jump….

Upside down, stamped on the front axle.

When ordering a brake caliper you will need to know your axle number. My 1993 Range Rover LWB is axle number 57L03581A. This will tell the parts man which caliper to send you. The differences are also noted by the type of bolt used to mount the caliper to the axle. Either a 7/16th bolt or a 12mm 12 point head. I’m sure if you pull yours off and inspect the bolts you’ll know which one to order.

I’m looking all over the internet for the part. Rovers North has a unit for 149$(US). Atlantic British has one listed for 199$(US). I’m hoping for a price match. There are some other units available under a hundred dollars. One was “out of stock” and the others did not give me any confidence in who I was ordering from. These are brakes (read that as mostly important) so I’ll stick with companies I’m familiar with.

My grand kids came over while I was researching parts. While their dad and mom ran errands and I was awaiting a response on a price match request from Atlantic British we ate Jell-O and made funny faces. You might say I was encouraging them.

At this point I’m wondering when the caliper will arrive, what with the Independence Day holiday being mid-week. I’m too cheap to have it over-nighted. And when I’ve asked for “priority shipping” it always seems to arrive on the day it would have if I just order the “whenever you get around to it” shipping. If it arrived on Friday I could work on it that day. Saturday is out, Sunday would work but I’m not sure it will arrive by then. So I’m looking at a weekday evening.

Phone rings….
Bully for me, it looks like Atlantic British is going to price match for me. So I got that ordered and I’ll be ready to swap it when it finally arrives. I always enjoy talking to Eric at Atlantic British. After we briefly kibitz and share a joke about my new credit card number and being on a budget, he says it will be here Monday or Tuesday. Indeed the Independence Day holiday has things mucked up a bit.
Thanks Eric (and AB) for the price match.

I told Mrs. OkieRover that I thought I was getting close with the repairs. I’m guessing that was probably in vain. The circumnavigation of Oklahoma is still in the works, with every repair I grow more confident. The Big White Bus is a twenty year old British automobile and I’ll probably have something to work on every week until the rust wins the battle.

Thanks for reading and Happy Rovering.

Rust and the Art of Welding (Post #332) 4/22/2013

Do you know what this part is?

Nope, it’s an upper shock mount on a Range Rover Classic. Wait, what? You guessed that right? Bully for you. This weekend I climbed under the Range Rover to swap out the old and tired Old Man Emu shocks I bought in 2001. Before it was over, I had ordered two of these.

I sourced a set of Terrafirma shocks from Atlantic British and they had been languishing in their boxes on my garage floor. It was time to replace them.

The front shocks on went without a hitch. However the rear shocks were quite the ordeal to remove. It required me using the electric impact wrench. (Brilliant tool, by the way. If  you don’t have one, get one.) The rust was terrible. I have pictures to share in another post.

The nuts were welded to the shafts with corrosion and after hitting them with the impact wrench they just spun on the shafts. I had always wondered why people buy shock mounts, they are made out of metal right? How pictures have you seen or witnessed in person a person breaking a shock mount on the trail? I used to think these things were from hard use. Apparently they are from “use”. The part is shipped from the factory unpainted and you know what that means. RUST.

This means that after just a few years the rust has begun and the structural integrity of that part is being compromised. After climbing around under the Range Rover this weekend I was really surprised at how much rust was forming on the parts I had painted with Marhyde Self-Etching Primer just a summer ago.

If I had the budget and time I would probably pull the major bits and have them all powder-coated. But that is not really practical nor affordable. If I were doing a FULL RESTORE it would be. But I’m not, so I’ll just chase the rust around, part by part.

Speaking of rust, I noticed the brake calipers on the rear are really nasty. I replaced the right rear brake caliper a year or two ago when I noticed my second caliper rebuild failed. Frustrated I sourced new brake calipers. I did not paint them at the time thinking if I needed to return them under warranty they would not take them back. That left them with what ever they were coated with to rust. Turns out they were coated with Pre-Rust ™. Yes, I just trademarked that product. I will show a picture of the right side rear caliper in a future post.

After pulling the wheel to remove the shock, it turns out, I will need to replace the left side brake caliper as well. It does not seem to be contacting the brake disc. I may or may not have mentioned already that I have a pop when I apply the brakes and I would bet 100$(US) that this caliper is sticking and the culprit.

So what started as a Difficulty Scale 1 shock replacement, is going to be four jobs:

  • Replace Upper Shock Mounts
  • Rust Abatement on Right Rear Brake Caliper
  • Rust Abatement on Left Rear Brake Caliper
  • Replace Left Rear Brake Caliper

I think I will pull the right rear caliper and take it to JagGuy’s shop this coming weekend and sand blast the rust off. Then everything will get two coats of primer and get slapped back on. I wonder if anyone makes a “portable sand blaster”? I’m guessing Google is going to get work out on that search string later today.

I missed SCARR this weekend (http://scarr.texasrovers.org/) I really wanted to go but the time was not available. And as it turned out, my Range Rover wasn’t ready either.

Happy Earth Day. I hope it was awesome for you. In honor, I cut down a tree Sunday which was encroaching on my swimming pool. Up with people! (there will be no singing).
Smoke’m if you’ve got’em.

Thanks for reading, and Happy Rovering.

Brake Caliper Problem Solved (Post #282) 1/16/2012

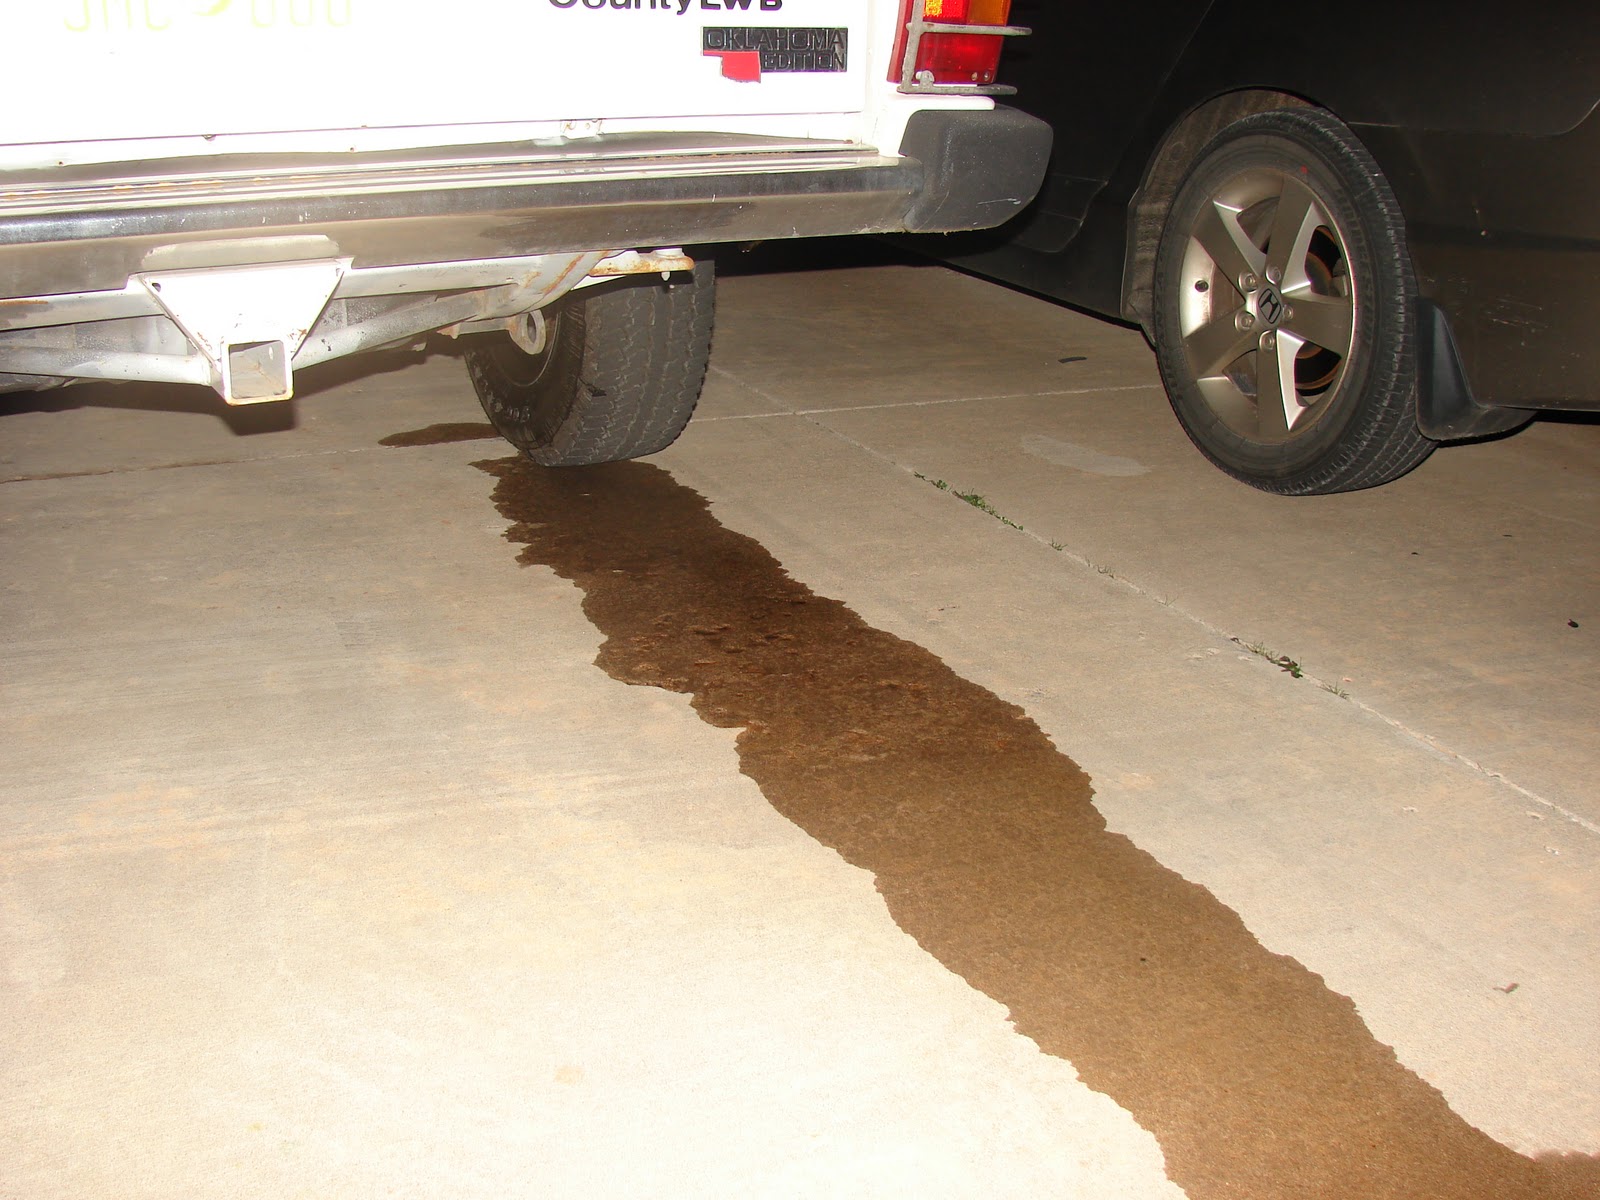
We had an uncharacteristically warm Saturday just in time for me to sort out the problem with the brake caliper on the Range Rover. As you may remember I came home to find this in my driveway.

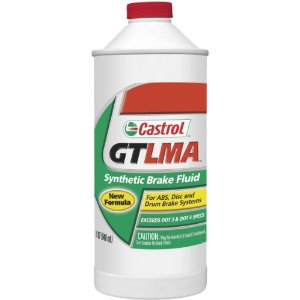
As you can imagine it was very disappointing. I knew it was behaving like a warped rotor. As I mentioned in my previous post those rotors were brand new. I got the parts in and found brake fluid at a store I normally don’t shop in, Pep Boys. Its good to know someone around here stocks Castrol LMA Dot 4 brake fluid.

As I mentioned Saturday morning came around and I pulled the Range Rover into the garage with only the hand brake to slow me down. I ordered brake calipers for the entire rear axle. I figured if one had failed the other would be near enough to fail as well. My son’s friend “Scuba” wanted to learn about brakes so I told him to come over when he was ready. I started and not long after he wandered in. He is studying mechanical engineering and would like to be a automotive designer/engineer for BMW after he graduates.

So back to the caliper. I got her jacked up and got the tire off and started looking at what might have happened. What I found was very, very disappointing.

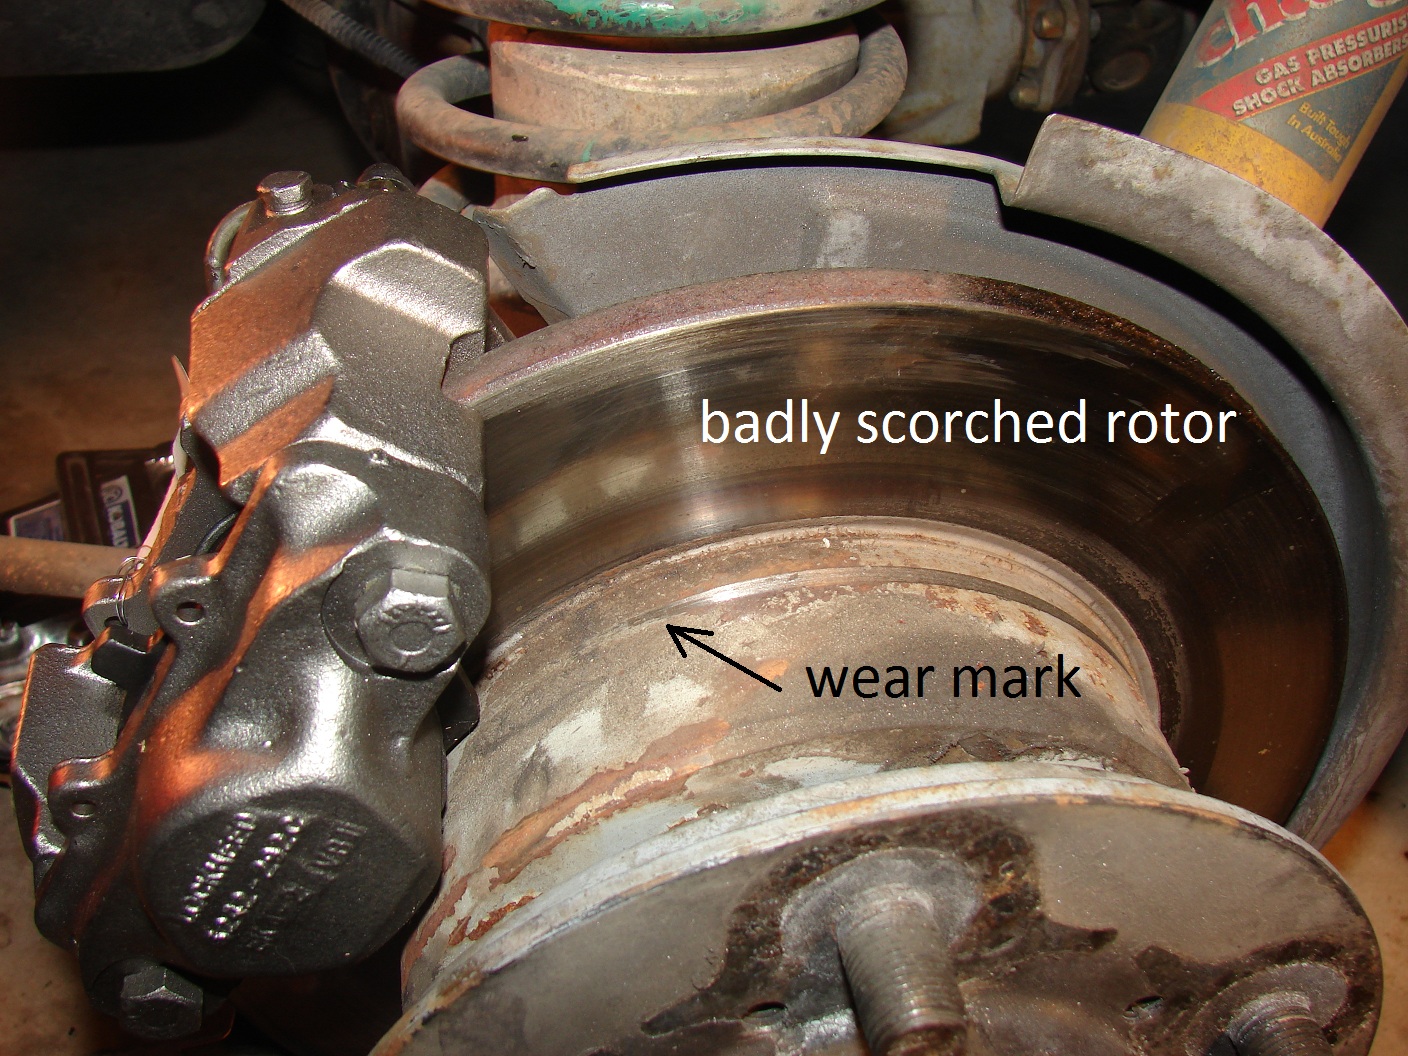
I noticed a wear mark on the rotor.

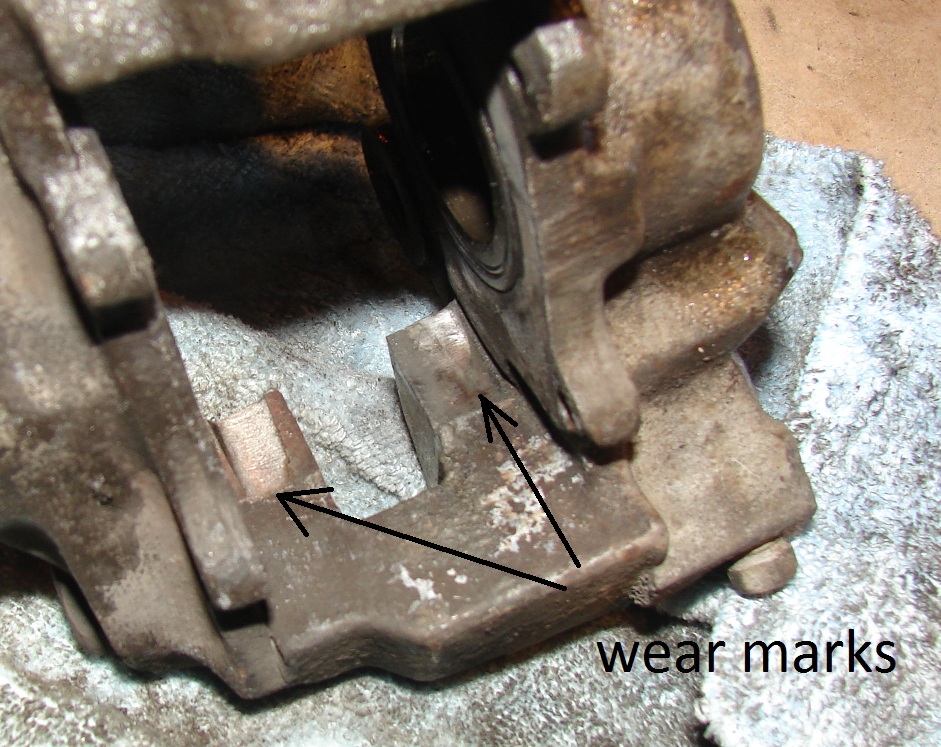
The wear marks are only on part of the rotor. This would account for the whomp, whomp sound. So I looked at the brake caliper. The brake pad was dragging on the rotor. This is not designed to happen. So I looked at the caliper for an explanation.

The brake caliper had two distinct wear marks. With the caliper in place the brake pads were definitely rubbing on the rotor. I showed Scuba how the caliper works and we thought about the design and what might have failed. I decided to fit the new caliper and see if we had the same conditions.

With the new caliper in place we didn’t see any contact between the rotor and the pad. as I was looking at the setup I noticed something not quite right.

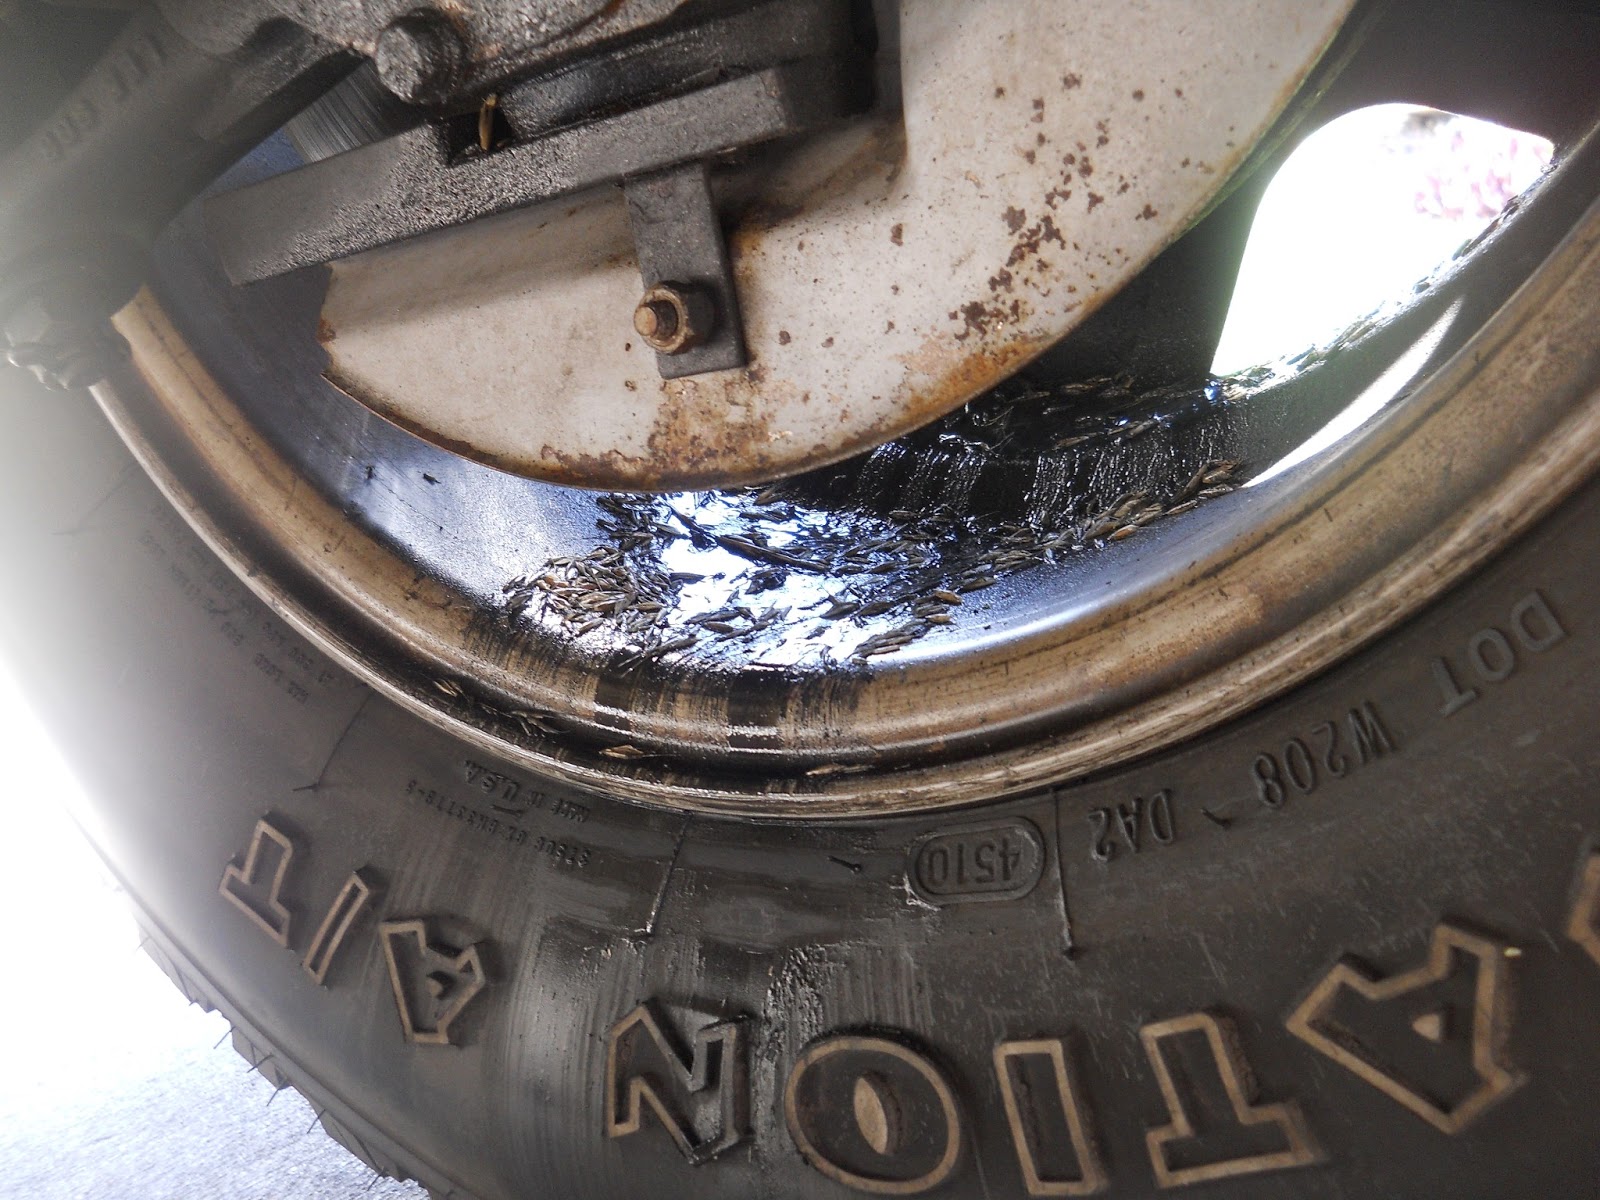
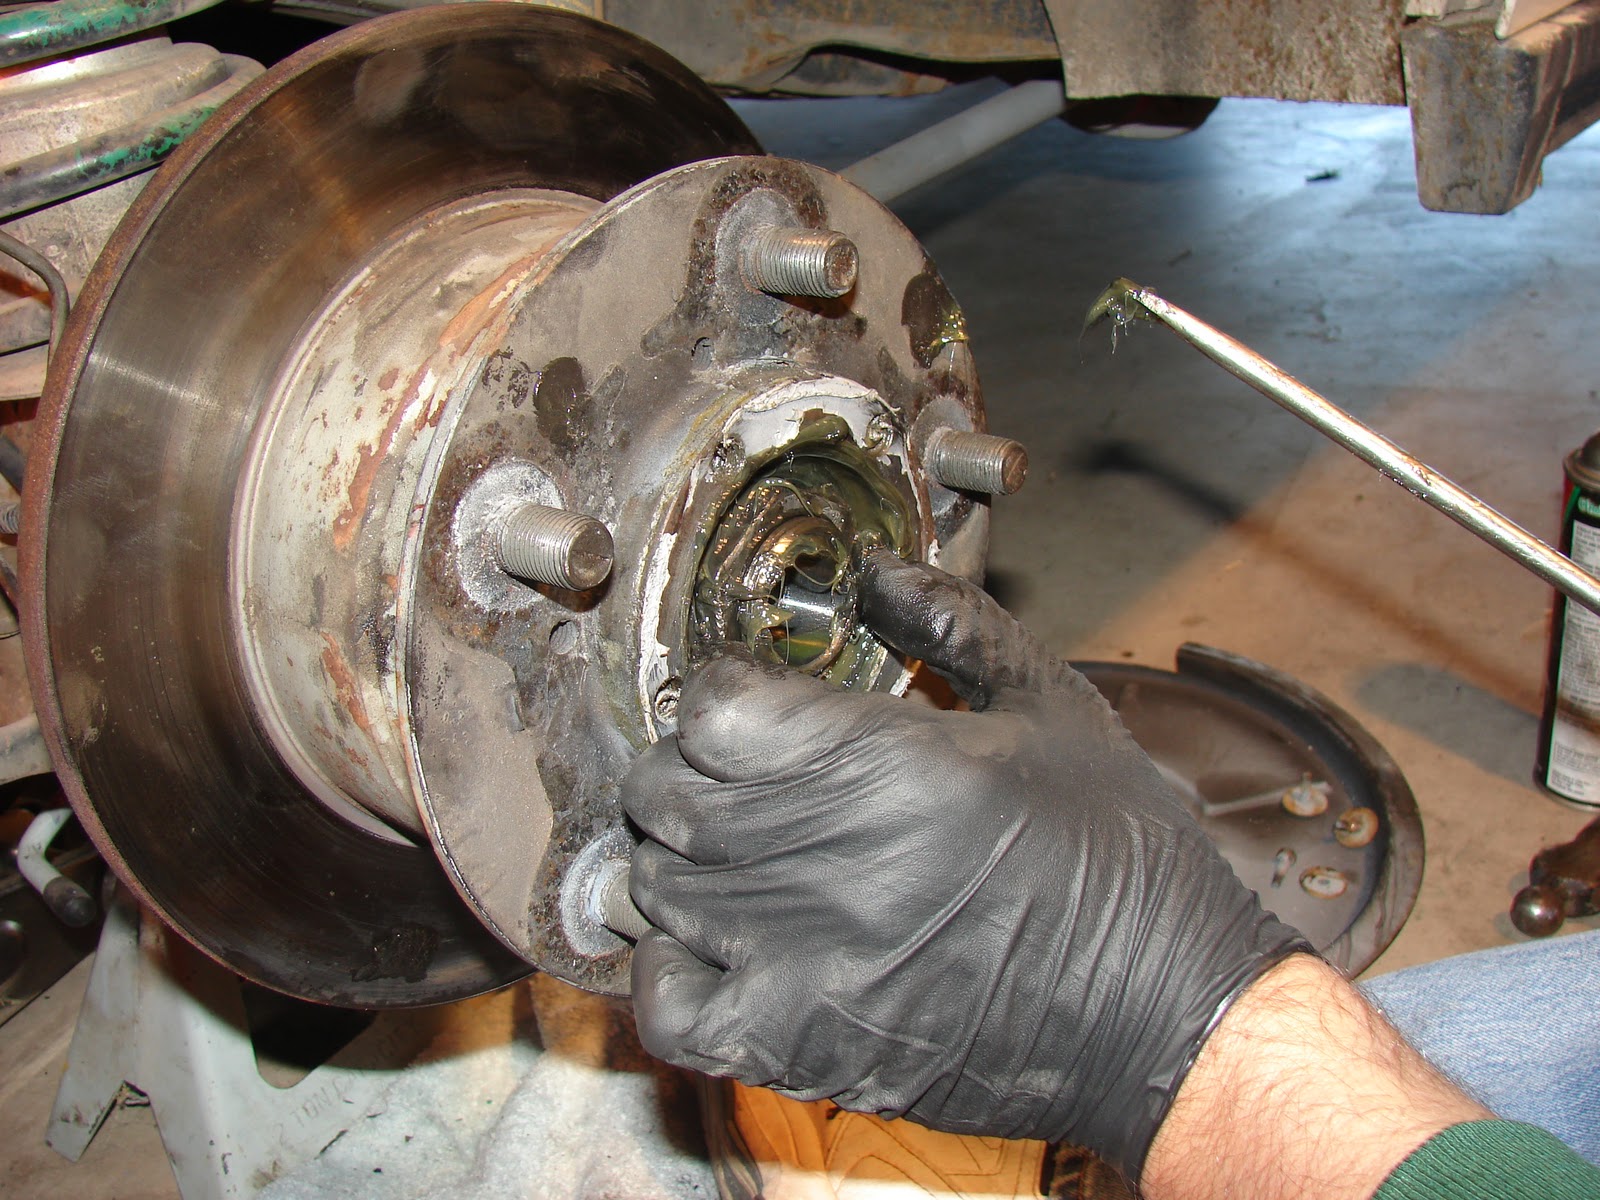
There was a gap between the rotor and the hub. There should not be a gap there. I examined it even more closely and noticed the hub and rotor were touching on the opposite side. But on this side they were separated.

This causes rotor to wobble and as it was rotating it was causing vibration and parts that have very tight clearances were now rubbing on each other. This caused a couple of bolts to be shaved off a bit.

I removed the hub and rotor and found even more damage. The ABS ring was also not properly attached to the rotor. That was apparent from the nyloc nuts that were not properly tightened down.

You can see everything the the following picture. How it stayed together I will never know.

It goes without saying, but I’ll say it anyway. The brake rotor was scorched and had to be replaced. The brake pads were ruined from heat. The brake caliper seal had failed and need to be replaced or refurbished. I had sourced that part but the pads and the rotor were another thing.

I went to O’Reilly’s Auto and they told me they didn’t have one in any store or in the warehouse. I went out to the parking lot and called NAPA Auto. The kid there told me they had pads and rotors in the warehouse and could have them brought to the store in Norman by Monday. The good news in this is the warehouse is in Edmond. So I called the kid back and told him I’d just drive up there (35 minutes) and pick them up myself. So I did. Ricky was fun to chat with as they pulled my parts.

I headed home and found myself on the road where my family is buried. I stopped to see the burial plot. I didn’t stay long.

I got back to the garage and started disassembling and reassembling the parts. In the reassembly I used red thread locker on the bolts that go in to the ABS ring. I used blue thread locker on EVERYTHING ELSE.

I had lost an entire quart of brake fluid. I emptied the full contents of the bottle into the reservoir. Scuba pumped the brake peddle as I bled the air out of the line and caliper. We hopped in and took her for a ride around the block. All was well.

Conclusion.
How on earth did those bolts come out? I know for sure that I tightened the bolts. I remember how I rigged up the breaker bar. I remember the reassembly. There was no thread locker on the bolts when I disassembled it. This was the main reason for not putting any on when I initially did the brake rotors.

I will definitely have the driver’s side rear off to check for assembly. If this could occur on the passenger side it could occur on the driver’s side.  Better to find the problem before it destroys that side.

I have had nothing but trouble with that corner (passenger side) of the Range Rover since I did the last restoration. Was I exceptionally tired that day? Was I loco de color that day? It was exceptionally hot that summer.

Well that is all. I have a few other projects that demand attention. First and foremost is the driver’s side door handle. My son Diet Mtn Drew managed to nearly rip it off when he borrowed the the Range Rover while his Scion was in the shop. The main problem is the latch needs adjustment. I will look at that when I pull the door card and sort out the bad handle. I also have to fixed the faulty brake peddle switch.

School starts back on Tuesday. My next free time will be during Spring Break. Let’s hope nothing breaks before then.

Thanks for reading and Happy Rovering.

That’s not supposed to happen (Post #280) 1/4/2012

QUICK! Name three things you didn’t expect to happen when you got home today.
Was one of them “finding a puddle of brake fluid in your driveway?”
No?
Me neither.

This is what I came home to today.

You will remember in my last post that we had a brake rotor we thought was warped. On first inspection of it, I didn’t see anything like that but the evidence (sound and peddle surging) was there.

My son, Diet Mt. Drew, called today and asked to drive the Range Rover to lunch. He first asked, via text, if it was “safe” and “reliable” enough to drive. THE NERVE! He had to ask to drive my Range Rover because his Scion xB was in the shop. It was in the shop because he hit a curb in front of the Cleveland County Fairgrounds while traveling 40 MPH. Yes, a cell phone was involved. Yes he bent the lower “A” Frame, destroyed two rims…etc… but I digress.

In any event…he drove the Classic today. I did not expect the brake caliper to fail with him at the wheel, but apparently it did. He reported all this to his mother, the noted blogging mechanic in the family  “that he had severe braking issues” while driving her today.
Did anyone call me or notify me by text?

I’ve rebuilt that caliper at least once. So today I ordered a couple of re-manufactured brake calipers. They were half the price of new and free shipping, so I bought one for each side on the rear. No core return, so I can rebuild my old and tired ones again and have a spare….just in case Diet Mt. Drew drives to lunch again. (wink, wink)

If you remember the last major brake restore (I keep referring to these previous posts like you all are AVID readers) I swapped brake hoses and ground off all the rust (theoretically) and re-sprayed the brake calipers with some acid-etching primer. It was kind of silly because brake fluid is a paint solvent. But I felt obligated.

When I had them apart I noticed a lot of rust. Especially inside the caliper. I even took a picture of the rusty bleed screw, see below. The picture doesn’t show it very well but it was pitted with rust.

When I did that project, it was determined that I had a bad proportioning valve. I vaguely remember replacing it. But quite honestly if I hadn’t seen the picture labeled “Valve that failed” I wouldn’t have remember it.

It is likely that these old tattered calipers are past their prime. I’m a bit surprised with only 191,000 miles on them. (okay I’m not really all that surprised).

I’ll let you know how the replacements go and whether or not I’d recommend the company as a source for parts for your Range Rover.

Thanks for reading and Happy Rovering.