CV Joint and Front Axle Seal (Post #504) 6/23/2014

Here is what will pass for a how-to video on the CV Joint and axle seal replacement. I had trouble videoing it with greasy hands. I also had trouble because the phone ran out of disk space.

That let to some choppy video and you didn’t get to see the assembly. What I do hope you get from this is that it is not as complicated or difficult as it may appear. Take it one step at a time and it will become really easy to understand.

On the Okierover Difficulty Scale this is a solid 3. You’ll need more than your average tool kit. You’ll need some help with the brake bleeding. It is a technical job but relatively straight forward.

I hope you can get something from the video. It was not what I wanted to present. But I also didn’t want to waste all the video and effort.

Thanks for watching and thanks for reading and Happy Rovering.

Brake Bleeding Procedure (Post #427) 12/30/2013

I’ve been conversing via Private Message on Rangerovers.net’s message board with Yungblud04 (I don’t have his “real” name) about the ABS system on Classics. He is going to bleed his brakes and needed a procedure.

Rover’s North has a lovely Tech Tip section and they offer this procedure (Rovers North) for bleeding your ABS brakes. I used it the last time I bled my brakes and it worked very well. It was even confirmed by Mickey of Mickey’s Garage (Mickey’s Garage) that I had done it correctly. This was quite different from another process I read online somewhere. It only required fluid to be bled from #1,#2,#7,#8 in the diagram starting at the farthest (right rear) caliper and working forward to the left rear, then the right front, and lastly the left front. That procedure has worked for me a few times but was not the proper procedure.

I am still having the buzzing ABS relay or whatever problem. I will need to investigate that further when the weather get warmer in a couple of months.

Thanks for reading, Happy stopping, and Happy Rovering.

ABS Lights and Finding Your Fault (Post #365) 7/10/2013

My ABS light has been on so long I can’t remember when or why it came on. I will attempt to clear the error and find the problem this week. I felt like this info was so important, at least to me, that I wanted it all in the same place.

I found a video from Dariush Heydary on YouTube on how to test your ABS on a Range Rover Classic. Its a pretty good video. This is how you have to approach the procedure to find the fault.

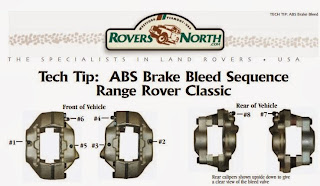
Below are instructions on how to retrieve ABS fault codes for RRC.
I pulled this from the RangeRovers.net Forums. Go to the link to read it in its entirety.
http://www.rangerovers.net/forum/8-range-rover-classic/25706-rr-91-abs-problem.html

More after the jump….

Under the RRC’s front driver seat in the front is a blue connector used to connect the ABS testbook equipment.

1. Fabricate a jumper wire with 12 gauge wire about inch long

2. Connect jumper wire to the “black” and “black/pink” pins. Turn ignition to position 2.

3. Five seconds after the ignition is turned to position 2 the Anti-Lock warning light will extinguish, indicating the start of the cycle.

4. Observe the Anti-Lock warning light, the start phase of the blink code is signified by the following:

– Pause = 2.5 secs. (long)
– Flash = 2.5 secs. (long)
– Pause = 2.5 secs. (long)
– Flash = 0.5 secs. (short)

5. The first part of the code number is determined by a pause of 2.5 secs. which precedes a series of short flashes then a long pause. The number of short flashes is equal to the first digit in the fault code.

6. The second digit in the code number is determined after a pause of 2.5 secs. which occurs between the first and second code flashes. After the pause there will be a number of short flashes, the number of flashes is equal to the second digit in the fault code. After the flashes there will be another pause of 2.5 seconds before the system repeats the flash and pause sequence. This will allow for a verification of the code or if the initial flash and pause sequence was missed.

7. The sequence of the start phase, first and second code parts will continue until terminated by the operator. To terminate the code sequence disconnect the jumper wire.

NOTE:Termination will clear the memory of that particular fault, and the fault will not be retrievable. Do not terminate the sequence if unsure of the code number.

8. The memory is capable of storing more than one fault. To search the memory, after the jumper wire is disconnected wait until the Anti-Lock light illuminates and then turn the ignition off, the code is now completely cleared. To obtain the next code repeat the procedure from step 2.

9. If there are no faults remaining there will be a long pause of 7.5 secs. after the start phase.

10. Once all the codes have been obtained and cleared, locate the problem cause and rectification for each code and fix accordingly.

FAULT CODE LIST

KEY: IV – Inlet Valve, OV – Outlet Value, RCP – Recirculation pump (ABS pump)

Sensor check:

1. Carry out multimeter test, check electrical resistance of sensor, this should be 700-2000 ohms. Check sensor voltage output, this should be greater than or equal to 0.93 VAC RMS when rotating the wheel at 1 rev/sec.

2. Check sensor air gap. Push sensor through bush until it touches exciter ring. Sensor will be knocked back to correct position when the vehicle is driven.

3. Check run out of the exciter ring and rectify if necessary.

4. Check bearing play and adjust if necessary.

5. Check sensor bush and exchange if necessary.

*********************

The Codes:
Code 2-6 – Faulty stoplight switch or wiring. Fuse A5 blown or not fitted
Code 2-7 – Continuous supply to ECU with ignition off. Faulty valve relay or wiring Code 2-8 – No voltage to ABS solenoid valves. Faulty valve relay or wiring.
Code 2-12 – Front right, too large an air gap or the sensor has been forced out by exciter ring.
Code 2-13 – Rear left, too large an air gap or the sensor has been forced out by exciter ring.
Code 2-14 – Front left, too large an air gap or the sensor has been forced out by exciter ring.
Code 2-15 – Rear right, too large an air gap or the sensor has been forced out by exciter ring.
Code 3-0 to 3-9 – Open circuit in connection from ECU to solenoid valve in booster, or in ECU
Code 4-0 to 4-9 – Short circuit to earth in connection from ECU to solenoid valve in booster
Code 4-12 – Front right, wiring to sensor broken or sensor resistance too high.
Code 4-13 – Rear left, wiring to sensor broken or sensor resistance too high.
Code 4-14 – Front left, wiring to sensor broken or sensor resistance too high. Code 4-15 – Rear right, wiring to sensor broken or sensor resistance too high.
Code 5-0 to 5-9 – Short circuit to 12 volt in connection from ECU to solenoid valve in booster, possible earth fault.Code 5-12 – Front right, intermittent fault with sensor or wiring
Code 5-13 – Rear left, intermittent fault with sensor or wiring
Code 5-14 – Front left, intermittent fault with sensor or wiring
Code 5-15 – Rear right, intermittent fault with sensor or wiring
Code 6-0 to 6-9 – Short circuit between two connection from ECU to solenoid valve in booster.
Code 6-12 – Front right, no output from sensor, sensor may have too large an air gap.
Code 6-13 – Rear left, no output from sensor, sensor may have too large an air gap.
Code 6-14 – Front left, no output from sensor, sensor may have too large an air gap.
Code 6-15 – Rear right, no output from sensor, sensor may have too large an air gap.

My ABS light has been on so long I can’t remember when or why it came on. I will attempt to clear the error and find the problem this week. I felt like this info was so important, at least to me, that I wanted it all in the same place.

Thanks for reading and Happy Rovering.

Brake Caliper Failure (Post #364) 7/2/2013

I’m pretty sure that should be dry.

Look what I found. No, not the rust on the splash guard, I expected to see that. The left front brake caliper is leaking. I’ve been hearing a pop on that side ever since I replaced the left rear brake caliper. I was just about ready to send the old gal to the shop for some fresh springs and air conditioning and then this.

I rebuilt all the calipers about three years ago, or was it four? I had trouble with the right rear staying together so I replaced that caliper with a “professionally” restored unit. I’m pretty happy with having 197,000 miles and one rebuild before a replacement for this part.

This may explain the ABS problem I’ve been having of late. When the brake is depressed (pushed down, not emotionally upset) it is hard (as expected) and is stopping but as the brake continues to be pressed it the braking really picks up and decreases the speed very quickly. That tells me something is not quite right time for a replacement.
More after the jump….

Upside down, stamped on the front axle.

When ordering a brake caliper you will need to know your axle number. My 1993 Range Rover LWB is axle number 57L03581A. This will tell the parts man which caliper to send you. The differences are also noted by the type of bolt used to mount the caliper to the axle. Either a 7/16th bolt or a 12mm 12 point head. I’m sure if you pull yours off and inspect the bolts you’ll know which one to order.

I’m looking all over the internet for the part. Rovers North has a unit for 149$(US). Atlantic British has one listed for 199$(US). I’m hoping for a price match. There are some other units available under a hundred dollars. One was “out of stock” and the others did not give me any confidence in who I was ordering from. These are brakes (read that as mostly important) so I’ll stick with companies I’m familiar with.

My grand kids came over while I was researching parts. While their dad and mom ran errands and I was awaiting a response on a price match request from Atlantic British we ate Jell-O and made funny faces. You might say I was encouraging them.

At this point I’m wondering when the caliper will arrive, what with the Independence Day holiday being mid-week. I’m too cheap to have it over-nighted. And when I’ve asked for “priority shipping” it always seems to arrive on the day it would have if I just order the “whenever you get around to it” shipping. If it arrived on Friday I could work on it that day. Saturday is out, Sunday would work but I’m not sure it will arrive by then. So I’m looking at a weekday evening.

Phone rings….
Bully for me, it looks like Atlantic British is going to price match for me. So I got that ordered and I’ll be ready to swap it when it finally arrives. I always enjoy talking to Eric at Atlantic British. After we briefly kibitz and share a joke about my new credit card number and being on a budget, he says it will be here Monday or Tuesday. Indeed the Independence Day holiday has things mucked up a bit.
Thanks Eric (and AB) for the price match.

I told Mrs. OkieRover that I thought I was getting close with the repairs. I’m guessing that was probably in vain. The circumnavigation of Oklahoma is still in the works, with every repair I grow more confident. The Big White Bus is a twenty year old British automobile and I’ll probably have something to work on every week until the rust wins the battle.

Thanks for reading and Happy Rovering.

Falconworks brings us some good news about ABS Pumps! (Post #352) 6/13/2013

I found this post hiding in the DRAFTS. It’s information that everyone that drives a Range Rover Classic should have.I have long believed that the ABS pumps we affectionately love to hate (is that possible?) are re-buildable. I’ve done a little looking around and figured it was completely possible if I could find the right shop.

Lo and behold I get this email from George.

Hey OkieRover!
Happy New Year!
Just letting you know that ABS pumps ARE repairable.
Got mine back from Al Cowan after a $US378 overhaul (vs $1500 new):
http://www.falconworks.net/ along with a new accumulator and 2 new relays.

I held off replacing the accumulator as I wanted to see what it did with a decent pump. The howling has stopped (bearing?) and all I hear is a buzz like a mosquito in my ear. I can also hear the relay click when it starts/stops. AND The Three Amigos have ridden off into the sunset too!

Stationary, I get 3-4 pedal pushes before the pump starts and it only runs for 2-3 secs. On the road, it starts when the brake pedal gets a good push but it stops pretty quickly. By referring to Al’s bible:

http://www.jewellamberoil.com/sales/index.php?

I’ve concluded the accumulator is getting near the end of its days but I’m due to change the brake fluid this year so I’ll replace it then.
Cheers
George

So I emailed Falconworks and asked them about the service. This is the email I got in return…

Yes Eric,
We still do. We also make and sell new brush-holders and armatures for them, for those who want to attempt it themselves. We no longer keep exchange units on the shelf, but will repair or rebuild clients’ old units:  turnaround is usually a couple days in the shop. Any number of Rover-specialist garages use us routinely.

Also, to aid in diagnostics, we have a full bench-test fixture, and can test pumps, accumulators, and pressure switches for folks: it runs $59 to test all three.

And, of course, we still sell the guide to Range Rover ABS brakes, “Getting Comfortable ….” online as a download.
Cheers!
Mobile message from
Alan / Falconworks

Thanks goes out to George for finding this service. And thanks goes out to Alan of Falconworks for responding so quickly.

Sorry it took me so long to publish this info.

Thanks for reading and Happy trouble-free stopping Rovering.

Slow Down, Part Duex: Electric Boogaloo (Post #343) 5/25/2013

As I mentioned in my post Slow Down, Buy Fewer Tools to Fix Your Mistakes I cross threaded one of the bolts that is used to mount the brake caliper to the hub. This brake caliper is the one I posted pics of that had completely rusted over. I used my new sandblasting cabinet to remove most of the rust.

I learned that the bolts for the caliper are a common 7×20. I put some oil on the tap to collect the metal bits that are cleaned off when the tap does its magic. As you are aware, you turn left and then turn back, easing your way into the bungled threads.

Here the caliper is back in place and the brake pads are back in place. I am breaking one of the cotter pin rules, “Never reuse a cotter pin.” by reusing the pins for the brakes. I did not plan to have the brakes out so I didn’t source the parts for this job.

The tapping went fabulously well after a bit of a rough start. I put the painted brake calipers on. As I mentioned before I had to replace the left (driver’s) side caliper. It had failed. The cylinders had rusted in place and were not actuating to apply the pads to the brake disc.

I will put the Range Rover through he paces this weekend when I take her out for a test drive.

The comedian DC Benny checked on us via email. He is a on-again, off-again Land Rover owner. Owning a Range Rover Classic in Brooklyn without a garage to work on it is a special kind of dedication. His wife lost her home business when the basement of their home was flooded by Super Storm Sandy. It was good to hear from him.

I collected a couple of comebacks for my cross country concerns with corrugated conveyances. (See what I did there? Do ya? do ya?) I need to check the forums and see what else they have to share.

Thanks for reading and Happy Rovering.