Fan Troubles Plague All the Cars from the British Isles (Post #436) 1/24/2014

That heading is probably a stretch but when I was a kid, the last thing you could expect to fail on your 1965 Pontiac Tempest was the iron cooling fan. You were more likely to lose a finger than it to fail in any way.
“Got Lucky” was the title of the text I received from JagGuy. His initial comment was, “Even metal radiator cooling fans fail.” He sent the following two pictures.
Cooling fan on JagGuy’s Mark I Jaguar.
The “Lucky” part. Only slight damage to the radiator.
His text to me was in response to one of my recent posts, Radiator Cooling Fan Cracked Again. In it I mention the options to replacing your radiator fan. One of them was finding a replacement fan made of metal. JagGuy had replaced his crappy plastic fan with this aluminum one. He also mentioned that Jaguar actually started making fans out of a different type of plastic. These “black” colored fans don’t suffer from the same type of failure as the crappy “white” ones.
He was very worried that he would be repairing his radiator due to this recent failure. Its entirely likely that the fan blade failed due to metal fatigue from flexing. He was in the process of putting electric fans on.
So in short, you really can’t escape fan failure. You can only hope it doesn’t destroy something else in the process. 
The exchanged ended as such.

JagGuy: “$20 fan with 200,000 miles on it. I want my money back!”

Okierover: “They just don’t make things like they used too.”

It’s true…they don’t make things like they used to. 
Thanks for reading, and Happy Rovering.

Garage Day: The Long Awaited Electric Fans Post (Post #433) 1/15/2014

The electric fan conversion is complete!

Over the weekend I employed The Evil German Dude and the newly named Paparazzi Ford (Butch) to assist in the install of the electric fans. As this will be a somewhat lengthy post let me start by saying, thank you Frank. Without you this project would have been completed but would have been no where near as freaking awesome as it turned out.

Butch, thank you for taking WAY too many pictures photo-chronicalling this project. Butch said we should do some video blogging. I think he is on to something. He was none too happy about being relegated to the camera for this project but he cheerfully took pictures through out the 8 hour event.

If you don’t get together with your friends and do projects like this, I feel sorry for you. You are seriously missing out on some of the best stuff you can experience with friends. I’ve known and worked with these two guys since June of 2000 and their friendship is something I cherish deeply. We always have a really good time together. Man Bonding Time or as the Evil German Broad says, “babysitting Frank so I can watch football.” is some of the best stuff in the known universe.

I’d also like to thank the Evil German Broad for preparing us the delicious meals and reporting the scores in the Seahawks/Saints game for us. Mrs. Okierover was actually a little put off when she offered me breakfast that morning and I declined because as I said, “I get to eat breakfast at Bettina’s.”

Evil German Broad

Not only are Garage Days at the Evil German Dude’s a culinary treat they are educational. EGD’s education in Germany and his experience in fabricating make projects like this an educational event. I don’t think there has been a Garage Day where I didn’t learn something from him.

This is a Huge Post

This project started at 0930 and didn’t get wrapped up until 1830. We took three breaks, one for breakfast, one for lunch, and one to weld up the exhaust leak. Butch and I mostly watched the whirlwind that is the Evil German Dude. It is his shop and only he knows where all the entrances to his secret earthquake generation lab tools are located. Overalls are not required but highly recommended. Two of the three of us (the smarter ones) were wearing them. So sit back and put on your reading glasses, you are going to need them for this one. Continue reading “Garage Day: The Long Awaited Electric Fans Post (Post #433) 1/15/2014”

Helpful Tips for My Helpful Tips (Post #404) 10/21/2013

Ken Arciga of Los Angeles, California, sent me an email recently. He wanted to thank me for the site and to share some comments back with me on things he’d learned and tried when working on some of the same projects for his 1995 Range Rover Classic expedition project vehicle.

He has many of the same issues I have with the fuel economy and is yet another “old Rover” guy looking to swap in a diesel. He uses his Rangie in typical fashion to drop off the kids but at 4$(US) a gallon its expensive.

I must say, excellent color choice 😉

Before we get to the email, my first observation, Ken has the cleanest engine bay I’ve seen in a LONG time. Ken, you’ll have to tell us the secret to that in another email. His email after the jump…

Hi Eric,

Pleasure to meet you, thanks for putting up your site and sharing. Wanted to share notes on a couple of things I just went through:

1. STEERING SHAFT – Looking at your picture, my steering shaft was also put in the same way your old one was, is the part with the rubber band (crash/break away joint?) was on the steering pump side. So that is the same direction I put in my new one. However I had my truck in for alignment and the independent dealer noted my steering shaft was installed backwards!
Sure enough I looked in the manual and it is backwards – that rubber band part is supposed to be on the steering wheel side. I bet it was probably put in either way as these manuals aren’t always accurate.

2. 2ND BATTERY – I kind of did what you did with my P/S pump reservoir and bracket, however for the air box I just drilled a couple of holes to move it over and was able to get the 2nd battery to fit – with the HORN OFF.

3. CC VACUUM PUMP – I ended up not wanting to go through the work to relocate my cruise control vacuum pump unit (my cruise control isn’t working either) but the battery was pressing up against it which I didn’t want – so I ended up taking a little metal off the radiator bracket so the battery could be positioned over enough to give the CC Vacuum enough room.

Anyway thanks for your info, reading up on some of your stuff that I still need to tackle!
-Ken

Steering shaft. My Range Rover was a front end wreck before I got it. When it was put back together there is a good chance this was put in backwards. With that in mind, there’s probably a very good reason one way is preferred than the other. Knowing my OCD will not let that stand, I’ll probably switch mine to match the manual. Great find.

Bracket. Nicely done. I think the bracket I used was from a Discovery I. I read that online quite a while ago. So I just went down to Rover Cannibal and picked one up. I like Ken’s bracket, simple and functional.

After getting such high praise and being a generally curious guy (and seeking permission to publish him) I followed up with another email. He sent the above picture of his excellent Range Rover and the following description of things he has already dealt with. He wants to take his Range Rover to Peru someday and has thoughts of a shake-down expedition a little closer to home in Baja California.

Here is what it looks like so far – I started with suspension (OME 2″ springs, nitrocharger shocks), front radius arms and adj. pan hard to get steering back, wheels, tires, P/S pump (PAIN in the butt, Cardone rebuild didn’t work), gearbox (Meridien – LOOOOOOOSE but I tightened up) and shaft, got the 2nd battery in but saving up for the kit to wire it, oil pan gasket and probably doing the head gasket next (leaking of course : )

Just finishing up the fluids – have the trans pan kit and fluids, transfer case to do, just got my LR grease for the swivel housings. A ton more plans.

I don’t know how to weld but contemplating learning so I can build my own bumpers and skid plates – really a big part of this is to fix stuff and to learn on a vehicle I’ve always wanted since I was a teenager.

Rack, lights….this list goes on!

Anyway thanks again for sharing your stuff, only people that dig into the nuts and bolts I think can really appreciate the details!

Ain’t that the truth?!?
Like myself, I imagine he has expedition dreams on a domestic beer budget. While I am worried about breaking down in my own STATE! he is contemplating a long trip to another continent. Excellent.

Thanks for contributing Ken. These are great tips and I felt they had to be shared. Thanks for letting me put them up for every one.

Thanks for reading, and Happy Rovering.

Radiator Repair Part Duex or is it Troi (Post #397) 10/6/2013

Why am I counting in French?
In Cherokee it is tsoi (pronounced “joey”).
In German it is “Dieses mal war zu viel”.

And in any language it is “one too many times”. I went back to Osborn Radiator for the repair. It is also the only place in Oklahoma City who still repairs radiators. As they have told me before, everyone else just wants to replace them.

Radiators are fairly inexpensive on modern cars. A radiator for a 2010 Ford F-150 XLT 4WD with a 4.6L SFI 8 cylinder is just 270.00$(US). That’s less than half a radiator for a Range Rover Classic.

Click through to read the rest…

I get that its from England and all that but wow. I have thought about replacing the Range Rover Classic radiator with one from another model of automobile preferably one with electric fans.

But this time  it was just a leak, so off to Osborn. This leak surprised me with it’s location on the driver’s side. I was fully expecting it to leak on the passenger side where it has been weeping on and off for a year.

I had a problem with where the shroud and the big mechanical fan happen to come into contact. This as you can well imagine is NO BUENO. The fans on the Classic are prone to explode when they become damaged or start to crack. The “fan explosion” is legendary in the damage it causes. Think replacement hood, replace radiator, replace fan shroud, replace hoses, etc… Needless to say it is bad.

I have a clearance issue I have shown before. I had wedged a piece of wood under the radiator to prop the radiator up away from frame piece the lower hose had been coming in contact with. So this came to mind when I decided to fix it with a rubber spacer. i was kicking myself for tossing the bushings from the old shocks. They would have been perfect.

I shaved them down a bit as I thought the original rubber bits I found at O’reilly’s were too tall. It was a total guess but it turned out to be correct. I slipped them over the guidance pins on the bottom of the radiator.

I fitted the radiator and the fan and holy crap! it fitted perfectly. I didn’t have to wire the radiator back or fiddle with the fan shroud. Perfect fit.

Here is the radiator in place with the proper gap.

This moved the radiator up away from the mount you see there. And when I’m bouncing down the back roads of Oklahoma I can be assured that the radiator will not be banging the fan shroud and fan together and the radiator on the bracket. I am very pleased.

So…one more item down that I don’t have to deal with. The coolant is replaced too. I did have a bit of trouble getting the air bubble out. After a couple of runs to work, I got it all sorted out.

I also have started thinking about electric fans again. I even went so fart as to find a set of dual electric fans from a 1999 Ford Contour at Dollar Auto Salvage. As I pulled up I didn’t have much hope for this yard. It was tucked off the road in Choctaw, Oklahoma. But they had the majority of a large school bus filled with fans that had been pulled off various cars. And a HUGE amount of rat poop. The yard man said it had gotten cold so the snakes had probably moved out. I had boots on so I wasn’t worried too much having a Copperhead chomp on my leg. But it was interesting the yard man made mention of it.

I’ll be checking the fitting and sorting out the electrics in the coming weeks and months. I’m sure the Evil German Dude, who provided the above German translation, will be happy to help me get the electrics done the way they should be. I’m thinking separately wired fans with dual speeds.

That way one fan can fail and I wouldn’t lose all my cooling. And when the AC is on the fans would go at half speed to assist the front fans. There is a lot to research first. But that’s the current thinking.

Thanks for reading and Happy Rovering.

Zip Ties? Really? (Post #387) 9/6/2013

Look closely. Bumpers should not be held in place with zip ties. Seriously? That’s just lazy and dangerous! I guess he thinks the ticket for not having his vehicle license plate displayed is worse than the one he will get when that bumper comes off on the highway and causes an accident.
Don’t get me wrong, zip ties have their proper uses. 
Like for instance:
  • Holding the back of your ignition switch to the locking mechanism.
  • Holding a wire in place so it doesn’t melt and short out against your exhaust.
  • Holding your make-shift awning in place on your roof rack.
  • For use on rowdy hippies as you remove them from protesting their latest outrage.

This is just another fine example of why we (the State of Oklahoma) need vehicle inspections to be reinstated. 
Thanks for reading and Happy Zip Tying Rovering.

Shocking (Post #311) 1/11/2013

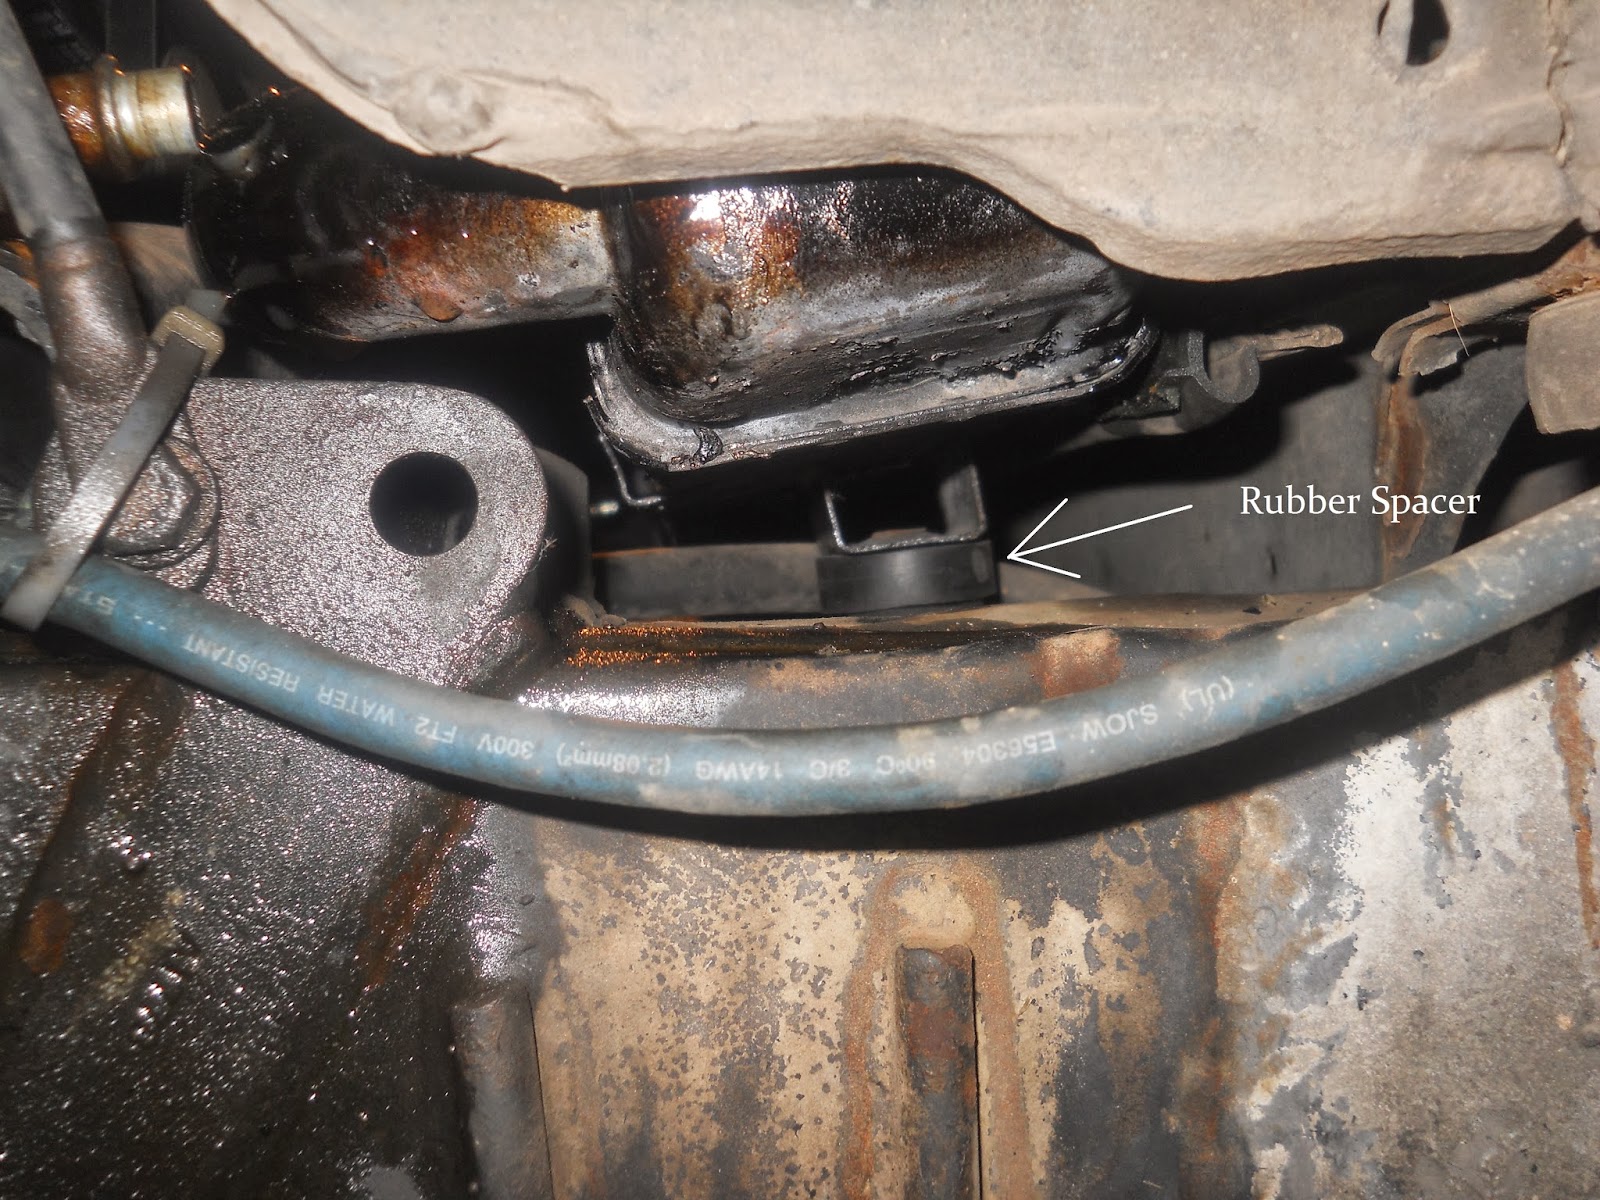
If you are a regular reader you will remember, or perhaps you will not, that I found the broken shock mount back in July 2012 when I was working on the steering box. At the time I did nothing about it.

As you can well imagine that would come back to haunt me. While driving the Range Rover during the latest little bit of snowy weather I heard some new clunking from below. I was pretty sure of the location and source.

I knew this would require welding so I called up my buddy JagGuy. His superior shoppe and skills to go with it were just the ticket for this project.

I drove up to the shoppe on Saturday morning. We never really do any work before lunch. We spent that time chatting and catching up on the latest news on our children and grandchildren’s progress to and through adulthood.

We share stories and generally solve all the world’s problems and as the Grinch so eloquently puts it in How the Grinch Stole Christmas (2000), “Solve world hunger, tell no one.”

When Paul and his son arrives it is time to get on the road and get some food. We headed off for lunch at Earl’s Rib Palace (I know classy name, right?) It’s hard to beat their chow. The owner was Elvis’s personal chef at the time of The King’s death. With yesterday (January 8th) being the King’s birthday I thought this tidbit was appropriate to this story. After reading the history of Earl, it’s not too far a stretch to say, “Earl killed Elvis.”

Due to the conversation we had at lunch, I almost put black bars across everyone’s eyes to mask their identities.

After we put on a couple of pounds and drank a half gallon of tea we returned to the shop. We cleared the rack and ran the Range Rover up on it and lifted her up for an inspection.

The steering damper is showing some wear. I have a post prepping for that. The rear differential is showing a leak on the drive shaft seal. After I pointed that out, JagGuy quipped, “That’s not a leak, when you have to put a receptical under it to catch the fluid, then it’s a leak. I’ll keep an eye on it just the same.

We lowered the Classic so we could get the work done on her. I removed the left front wheel and wired the shock up out of the way. I took the busted piece off and we examined what would need to be done to fix it.

The shock mount is welded to the axle and is thus not a part you can readily buy and bolt on a new one. It requires a repair.

JagGuy took the mount off to the sandblasting cabinet for clean up. I got the angle grinder and wire wheel out and cleaned up the remaining part of the mount. I wiped the bits off with some degreaser and was ready for the welding to begin.

JagGuy cleaned up a large “military grade” washer. The plan was to use the washer to splint the broken bits back together. His work with the “Ma Dueces” he bobs provides lots of left over bits such as washers. The fact that the splint came from a vehicle our military used to keep Mr. I Hate America at bay makes me proud.

JagGuy started by “tacking” the broken bits in place. A few bursts of light and some sparks meant the TIG welds were in place. I learned a lot about TIG and MIG welding between coolings. This makes me wish I had taken that night class at the Vo-Tech when I worked there. Oh well, as long as I have Evil German Dudes and JagGuys willing to ply their skill I don’t have to learn it.

JagGuy then set the washer in place and used a “C” clamp to hold it in position for the first tack. This caused some issues with the bits of the original part. It moved and caused him to start over. I was happy to fetch the tools while he sorted out where it went wrong.

He got it all back in place and proceeded to weld her all up.

JagGuy finished up the welding. He was quite funny about the job. He said don’t show this to the Evil German Dude. “He wouldn’t like it, but it’ll work.”

I got some rust resistant paint and put a coat on it. After it dried…more or less…I started bolting everything back up. That’s when the slight difference in thickness of the washer caused me some problems.

The added thickness caused me to have trouble getting the nut started. JagGuy produced a different nut an after some effort I got it started and tightened up. The alignment of the bottom cup of the shock bushing is slightly skewed but shouldn’t cause any trouble.

The good news is, the weld made it all the way home and is working out well. I don’t anticipate any more trouble. If it does fail, JagGuy said we would just cut out the old one and weld in a new one. If that happens maybe I’ll invite the Evil German Dude and put his welding skills to the test.

Thanks go out to JagGuy for helping me out.
Thanks for reading and Happy Rovering.