The Big White Bus Will Not Start (Post #624) September 18, 2023

Fuel pump

Well, awesome. The Big White Bus won’t start.

I have fired it up once since I parked it in my newly constructed shoppe 5 years ago. I guess I should have expected there would be “issues”. But I wasn’t expecting the issue to be this one.

Mr. Fisher came over and we diagnosed the issue. We started with checking the power at the pump. As you may be aware, when you turn the key over it powers the pump briefly. So if you just “turn on the key” and go back there to check the voltage you won’t find any. That’s why it takes either some seriously creative use of a volt meter or you get one of the bestest friends to come over and turn the key for you. We had voltage all the way through the wiring harness.

We then confirmed we have spark from the ignition system. I pulled the number 1 plug and with a screwdriver I grounded it and watched for spark. You can buy a fancy spark tester, matter of fact I think I own one. I have no idea where it is though. Spark confirmed.

So we have two of the three things (Meatloaf would say that “ain’t bad”) to make the vehicle run. Air and Spark. Now why aren’t we getting fuel.

I pulled the gas line off at the regulator on the back side top of the engine and had Mr. Fisher crank the ignition. We should have had gas squirting out if it worked. It did not. This fit with me NOT hearing the pump run when the ignition was turned over.

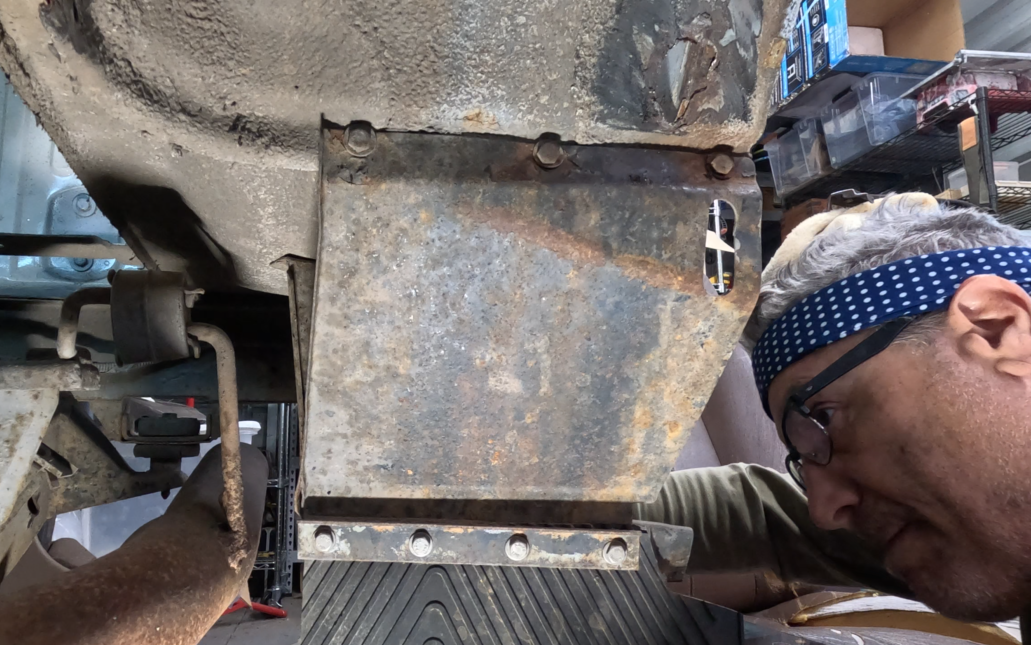
The only thing left was to pull the fuel pump and do a visual inspection. What I found was not expected. I said, “Wow.” a lot in the video. There were several parts that were obviously degrading due to being submerged in petrol for so long. There was visible rust on the steel parts as well. Generally the pump was in a terrible state. I was not aware that petrol would do that to those parts. The only gas I ever put in my Classic is 100% real gas, unless I am in Texas where they only sell ethanol (at least the last time I was buying gas there). You would expect ethanol to eventually separate and turn to water. You can read all about that on the Road Guardians website.

I will be replacing the fuel pump and have ordered the part from Atlantic British. I found some that were cheaper on Amazon. But my skepticism and need to have it delivered before next October weighed heavily on my decision where to purchase. The pictures all looked like the pumps were manufactured in the same place. Same white plastic. Same blue plugs.

Fuel pump
PRC9409K

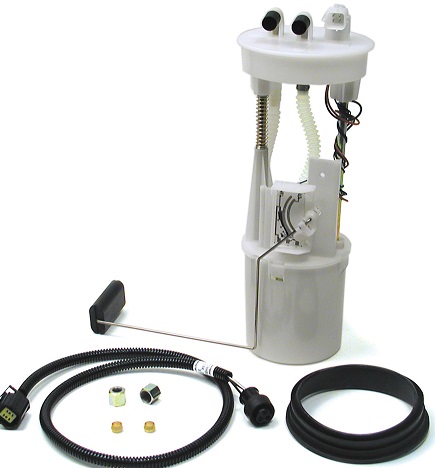
If you look on Amazon you’ll see the pumps look like the same ones. If I had unlimited funds or sponsorship, I’d buy one from everyone and do a side-by-side comparison.

All this “BUY IT NEW” has me thinking about what this would cost if we just fixed the pump. All you need to do is replace the pump in the collector can (that bottom part). I’ll do a post about that in the coming weeks.

So…do I drain the tank too? If the gasoline HAS turned to varnish I should probably put some treatment in there. I’m thinking I’m gonna add a silly amount of STP Fuel Injector cleaner in that tank. I can say, WHEN I get it running It will run for quite a while before I shut her down. I want to give the truck plenty of time to dislodge any crap in the fuel lines. I’m also guessing I’ll need to swap the fuel filter too.

If its not one thing, its another. It really, never ends.

Mr. Fisher also brought over his Viair Compressor. We spent some time looking at it and checking out all its features.

Thanks for reading and Happy Rovering.

Fender Repair Part 5, MORE Crappy Welding of the Large Fender Patch (Post #622) September 2-3, 2023

Super happy

In this installment I finish the left rear fender panel. And by finish I mean I had to completed replace the outer fender I had previously welded up. I added a strap to attach the inner fender to the outer fender.

The outer fender’s welds were compromised because I ran out of shielding gas halfway through. The panel was 16 gauge and I swapped it with an 18 gauge. The right thing to do was replace it and “do it right”.

Now, I’m no body man and right to me is probably not right to someone who actually knows what they are doing. As I mentioned in the video I need another 10 or 20 years of welding experience to be “competent”. Over all I’m a lot happier with this replaced panel. The 16 gauge panel would not have worked. It would not have been watertight no matter what I did.

I covered everything with yet another coating of primer. I also put seam sealer in the appropriate places. This only seemed prudent as I am almost certain this will rust again. My hope is it will take at least 20 years to rust out.

I thought some of the welding went a lot better than the previous attempts. I want to say, “I’m getting better.” but I’m pretty sure I’m fooling myself. Most people could probably weld if shown how and a little practice. Welding WELL however is really hard.

So add to the fact I’m saying welding is hard…and welding UPSIDE DOWN is another level. We did not go over this scenario in my class. I’m half tempted to take the class again and do the entire class upside down. I finally figured out the I could weld sideways that worked pretty good. Even with my new sideways technique it didn’t stop me from getting some new holes in my PPE and my skin from hot slag dripping down. My grandson Grady was horrified by the scab in the crook of my elbow. The chunk that got me on the chest made a similar hole there.

I also did quite a bit of cutting and the sparks flying back on me warmed me up a bit. Thankfully my Round House Overalls1 deflected the sparks and only “warmed” my family package. If you remember this post from December 2010, “The one where I catch myself on fire in the furtherance of Land Rovering” [Okierover] I caught myself on fire cutting the passenger side floor panel. What I learned from that was:

  • Blue jeans are not safety gear and are a sad substitute for PPE.
  • Longjohns [IBC] (aka long handles [Collins], thermal underwear, etc…) will keep the flame off you for a brief time.
  • Your best friends don’t want you harmed, but also want to take videos of you when you are on fire so they can tease you later.

Thanks for reading and Happy Rovering

1This is my unsponsored review of Round House Brown Duck Overalls. It is a solid 10 out of 10. They are made in Shawnee Oklahoma (Home of Brad Pitt) and at $60.00 a pair (on sale at the time of this posting) a real bargain. 

Fender Repair Part 1, Welding Patches (Post #616) July 25, 2023

Welding a patch for the body mount

I finally broke down and welded something on my Range Rover. While I will admit freely, I am NOT a welder, but I did enjoy getting the patches welded on. I took a few hours the day before this video was shot to “practice” welding with some scraps I had cut off the Big White Bus.

One of the difficulties is the metal on the Range Rover and the metal I am patching with are different thicknesses. I believe the OEM body panels are 18 gauge whereas my patching material is 16 gauge. I watched a YouTube video where a young man from Weld.com showed how he setup his welder to weld different thicknesses. It’s pretty good stuff and I recommend it if you are still wondering how to setup your welder and what settings you might want to start with. His settings for 18 and 16 weren’t different so I just need to find the same settings he suggested and convert those values to the letter equivalent on my Lincoln MIG Pro 180.

I also watched a fellow from Make It Kustom that has some great tips on welding and patch making. Good stuff there too. This guy is obviously an artist and I imagine has, “done this a time or two.”

In my video there is a lot of grinding and sparks flying and hopefully some good tips to help you weld your patches on your Range Rover Classic. I sped a lot of it up so I’m not consuming a lot of your life watching my low grade videos.

The camera overheated at the end for the second time that day. The temp inside the shoppe was above 110°F (which is 43.3°C for you metric system types). Yeah that’s pretty hot for this old man. I’m seriously going to investigate getting an exhaust fan installed to pull the hot air out.

Overall I’m pretty excited that I can weld stuff. I did fix a yard swing that one of our trees landed on and crushed. I’m looking forward to finishing the welding on the rust and turn my attention to making stuff like a 270 degree awning, a rear bumper, and lots of other stuff.

Thanks for reading and Happy Rovering

Fender Prep Part 2, Rusty Bits (Post #615) July 18, 2023

Prepping the fender

In this installment I spent two days preparing the fender well for welding in the patches. Two days (4 to 5 hours each) of wire-wheeling and grinding and cutting. It was a dirty job with lots of rust dust and rubber flying all over.

My spinal cord didn’t enjoy sitting on the hard shoppe floor for so long. And, it was hot. Deep in the Congo humid Africa hot in the shoppe. It would rain in the morning, then the sun would come out and crank up the air temp along with the humidity. Temps from 95F to 100F plus 90% humidity, AND I’m in the metal hot box of the shoppe where the temp is 105F to 115F. Brutal. I need an exhaust fan for the heat.

My shooting of video was mostly terrible. It also was extremely long. I’m not sure what I should have done differently to make this more consumable. Watching other Youtubers I see they sometimes have longer videos. I would have most likely had to skip some of the work. How much grinding does one need to watch? I sped those parts up to cut time.

I’m prepping the first of the welding videos now and should have it out this week.

Thanks for reading and Happy Rovering.

mmmm rust removal….

Fender Prep the Mud Flap Post (Post #614) July 9, 2023

Mudflap Removal

In this installment of me removing rust I work on the mud flaps. They were in the way of me grinding the rust spots in the wheel well. So I removed them, and good thing I did. The driver’s side (port side) mud flap steel was nearly rusted through under the flap.

The pitting was impressive and the amount of rust stuck on the flap was amusing too. So instead of welding my rust holes in the wheel well I had to take a day to fix the mud flaps. I went ahead and did both sides. The passenger side (starboard side) did not exhibit the same amount of rust as the other.

I got them cleaned off and applied the Duplicolor Rust Preventative to them. This is the stuff that is supposed to take surface rust and transform it into “not rust”. Through the magic of chemistry this “paint” converts the rust to I’m guessing zinc? hell I don’t know I got a “D” in Chemstry 1 and Chemistry 2 at the University of Oklahoma. In my defense, I drank more than I studied, and I had a nearly full-time job, and served a weekend a month as a Field Artilleryman in the USMCR.

Whatever, it’s magic and I’m not likely to do that job again on this Range Rover. Once I’m ready to reinstall them they will also receive a coating of rattle-can bedliner/rhino lining/stone seal or whatever they call this stuff in other countries.

The week had a lot more work done and filmed but I’ve run out of time as it is now Sunday. I’ll post another video this week of the rust cutting and removal under the fender well.

As we say here in Oklahoma, my hands and knees and back hurt “something fierce” [Merriam-Webster]. I haven’t done this much wrenching/grinding/hammering in at least a year. I ain’t gettin’ any younger so I gotta play through the pain.

Thanks for reading and Happy Rovering.

Grinding makes me happy.

Fender Prep and Planning to Weld (Post #612) July 3, 2023

Me looking back at the camera.

In this installment I talk about how I will attack the rust in the driver’s side rear wheel well. I bought some shielding gas for my mig welder and will be welding patches and fixes this week. My GoPro camera decided not to record audio on the underside review so you’ll have to settle for a lovely voice over (which is terrible). You’re welcome.

Hope you enjoy the content. You can contribute to help with the cost of keeping this site on the internet through my Patreon account.

Thanks for reading and Happy Rovering.