Transfer Case Knob Repair (Post #604) 3/14/2023

Shift Knob

Looking for the thread specification was pretty easy with a Google search. I stumbled on this thread on Rangerovers.net. “Tex” from Italy states its a M10x1.5. “LanceL” had a novel idea to use a M10 Rivnut.

https://www.rangerovers.net/threads/transfer-case-knob-thread-pitch.345708/

I decided to use a M10x1.5 nyloc nut. I also bought a bolt to go with it which provides a clean threaded path to the nyloc nut. I also used some of my supply of Dr. Crafty Clear Epoxy Resin [Amazon.com]. As you will see in the video. I cleaned out the shift knob. I also carved “channels” in the knob to provide “keys” to keep the resin from someday rotating inside the perfectly cylindrical knob.

I then placed the bolt with the nyloc nut on it down inside the knob. Mixed up my resin and poured it in. It took 72 hours to cure. I let it sit for a full week, due to work, and a living history camping trip I had planned at Ft. Towson [Oklahoma Historical Society].

This project turned out great. It was easy, didn’t require any tools that most Land Rover owners don’t already own. I was genuinely surprised this actually work as I had hoped it would. Now I can turn to the rest of the 3000+ things I need to do to the Big Whit Bus to get her back on the trail.

This project was a 1 on the Difficulty Scale.

Support me on Patreon if you feel moved.

Thanks for visiting and Happy Rovering.

Fender Rust (Post #597) 4/5/2022

Big shocker!

I found some rust under the left rear fender wheel well. I know! you are probably as surprised as I am!! (/sarcasm).

There were some signs of rust under the wheel well. I pointed them out in another video. So I decided to investigate. I found a lot of rust.

I’ve watched a bunch of videos where guys fix the rusted body panels and sub-structures. I guess it is my turn. I took a welding class a few months back and this was exactly why I took the class. However, I don’t have the tools I need to do most of these repairs. Not yet, anyway.

I will need:

  • A welder ($400 to How much do you want to spend amount of dollars)
    • Welding hood (already own it)
    • Welding gloves (already own it)
    • Fancy pliers (already own it)
    • Training (already done did it)
  • Metal break ($50 to I’ll probably borrow JagGuy’s)
  • A bunch of wire wheels to remove rust ($6 to $15+ for the fancy name brand ones)

I’m going to take a couple week break. I need to do some remodeling on the house’s master bathroom (Mrs. Okierover will be happy when I get this done.) I’m going to the Midwest Overlanding and Off-Road Expo (aka MOORE EXPO).

If you are thinking, “when will you get the Big White Bus back out on the backroads?” Well, I don’t know. At this pace…probably in the Fall. Trust me when I say…I really want to get her fixed and reliable again. Funding does matter, so hopefully that won’t be too big a constraint.

There will be more on this rust issue as I get back in the shoppe and start to sort out this mess.

Thanks for reading/watching and Happy Rovering.

D Pillar Vinyl Replacement, Part 1 (Post #596) 3/24/2022

D Pillar Vinyl Replacement

In this video post I investigate my cracking vinyl on the D pillar of the Big White Bus. The Southern Plains is very unforgiving to fabric, even plastic fabric. Mine is cracking and looking pretty terrible. Time to pull it off and get it replaced.

I’m going to need to refresh the black paint on all the pillars and the door frames. I found the part number for a rattle can of Beluga Black. Lots of cleaning, light sanding, cleaning, taping, priming, sanding, and painting, and more painting coming this summer.

And…the headliner is going to need either regluing or replacing…..again. I might go with a fabric that I can stick my souvenir event patches can stick to, just.like.a.real.overlander.

I also find a lovely whole rusted in the passenger side D pillar that will need some repair. Lots of grinding away the rust (rust abatement), welding in a new piece of metal, priming and painting. Good thing I took a welding class last year.

This is part one of possibly two or three videos.

Thanks for watching and Happy Rovering.

A Long List of Repairs (Post #592) 3/30/2021

I’ve been sidelined by a knee surgery. I’ve had an issue for a while (over a year) and I decided it was finally time to get it sorted out. So while I convalesce, I thought I’d put up a post detailing what I believe to be a mostly concise list of repairs that are required on the Big White Bus. We are getting another round of stimulus money from the O’Biden administration. And why not spend it on my Land Rover? Let’s get started:

Ignition

You’ve read my mis-adventures with my ignition system (Okierover). I mostly attempted to replace the entire system with GM off the shelf parts. In the end I could not stop the ignition modules from overheating. This leads to them failing basically every two weeks. With “lifetime warranty” I only bought the part twice. And when I was completely convinced I would either have to drive in the right lane, everywhere, or doing something else, I had trained myself to change the module in less than two minutes. Standing on the side of I-35 during rush hour traffic every two weeks for 4 months is not among the smartest things I’ve ever done.

At this point I’ve decided that I will replace the entire ignition system with an after-market version. I haven’t picked that version yet, but know it will be my first repair. This means the distributor, ignition coil, modules, all of it will be replaced. I currently have a “Lucas”1 setup. I don’t believe it is reliable. I have driven her with this setup, but I’m not convinced it is safe.

Alternator

Once again I am faced with a failed alternator. I have written many times about the alternator issues (Okierover). I bought the NAPA alternator back in 2005. I have replaced it under warranty 6 times (with 7 coming). Sometimes you can’t beat a NAPA warranty, even if the part only lasts about 2-3 years before it fails. It still surprises me that an OEM alternator from the factory lasted 15 years but a replacement part would not give me 2 years of service.

The BWB has a slow battery drain, I suspect it is the diode pack as it was three times before. Once a diode fails, it’s over. The alternator will still charge, but it will also discharge the battery when the engine is off. If you still have any of your hearing left, you can hear tell-tale ultra high pitch sound coming from the back of the alternator when the engine is off.

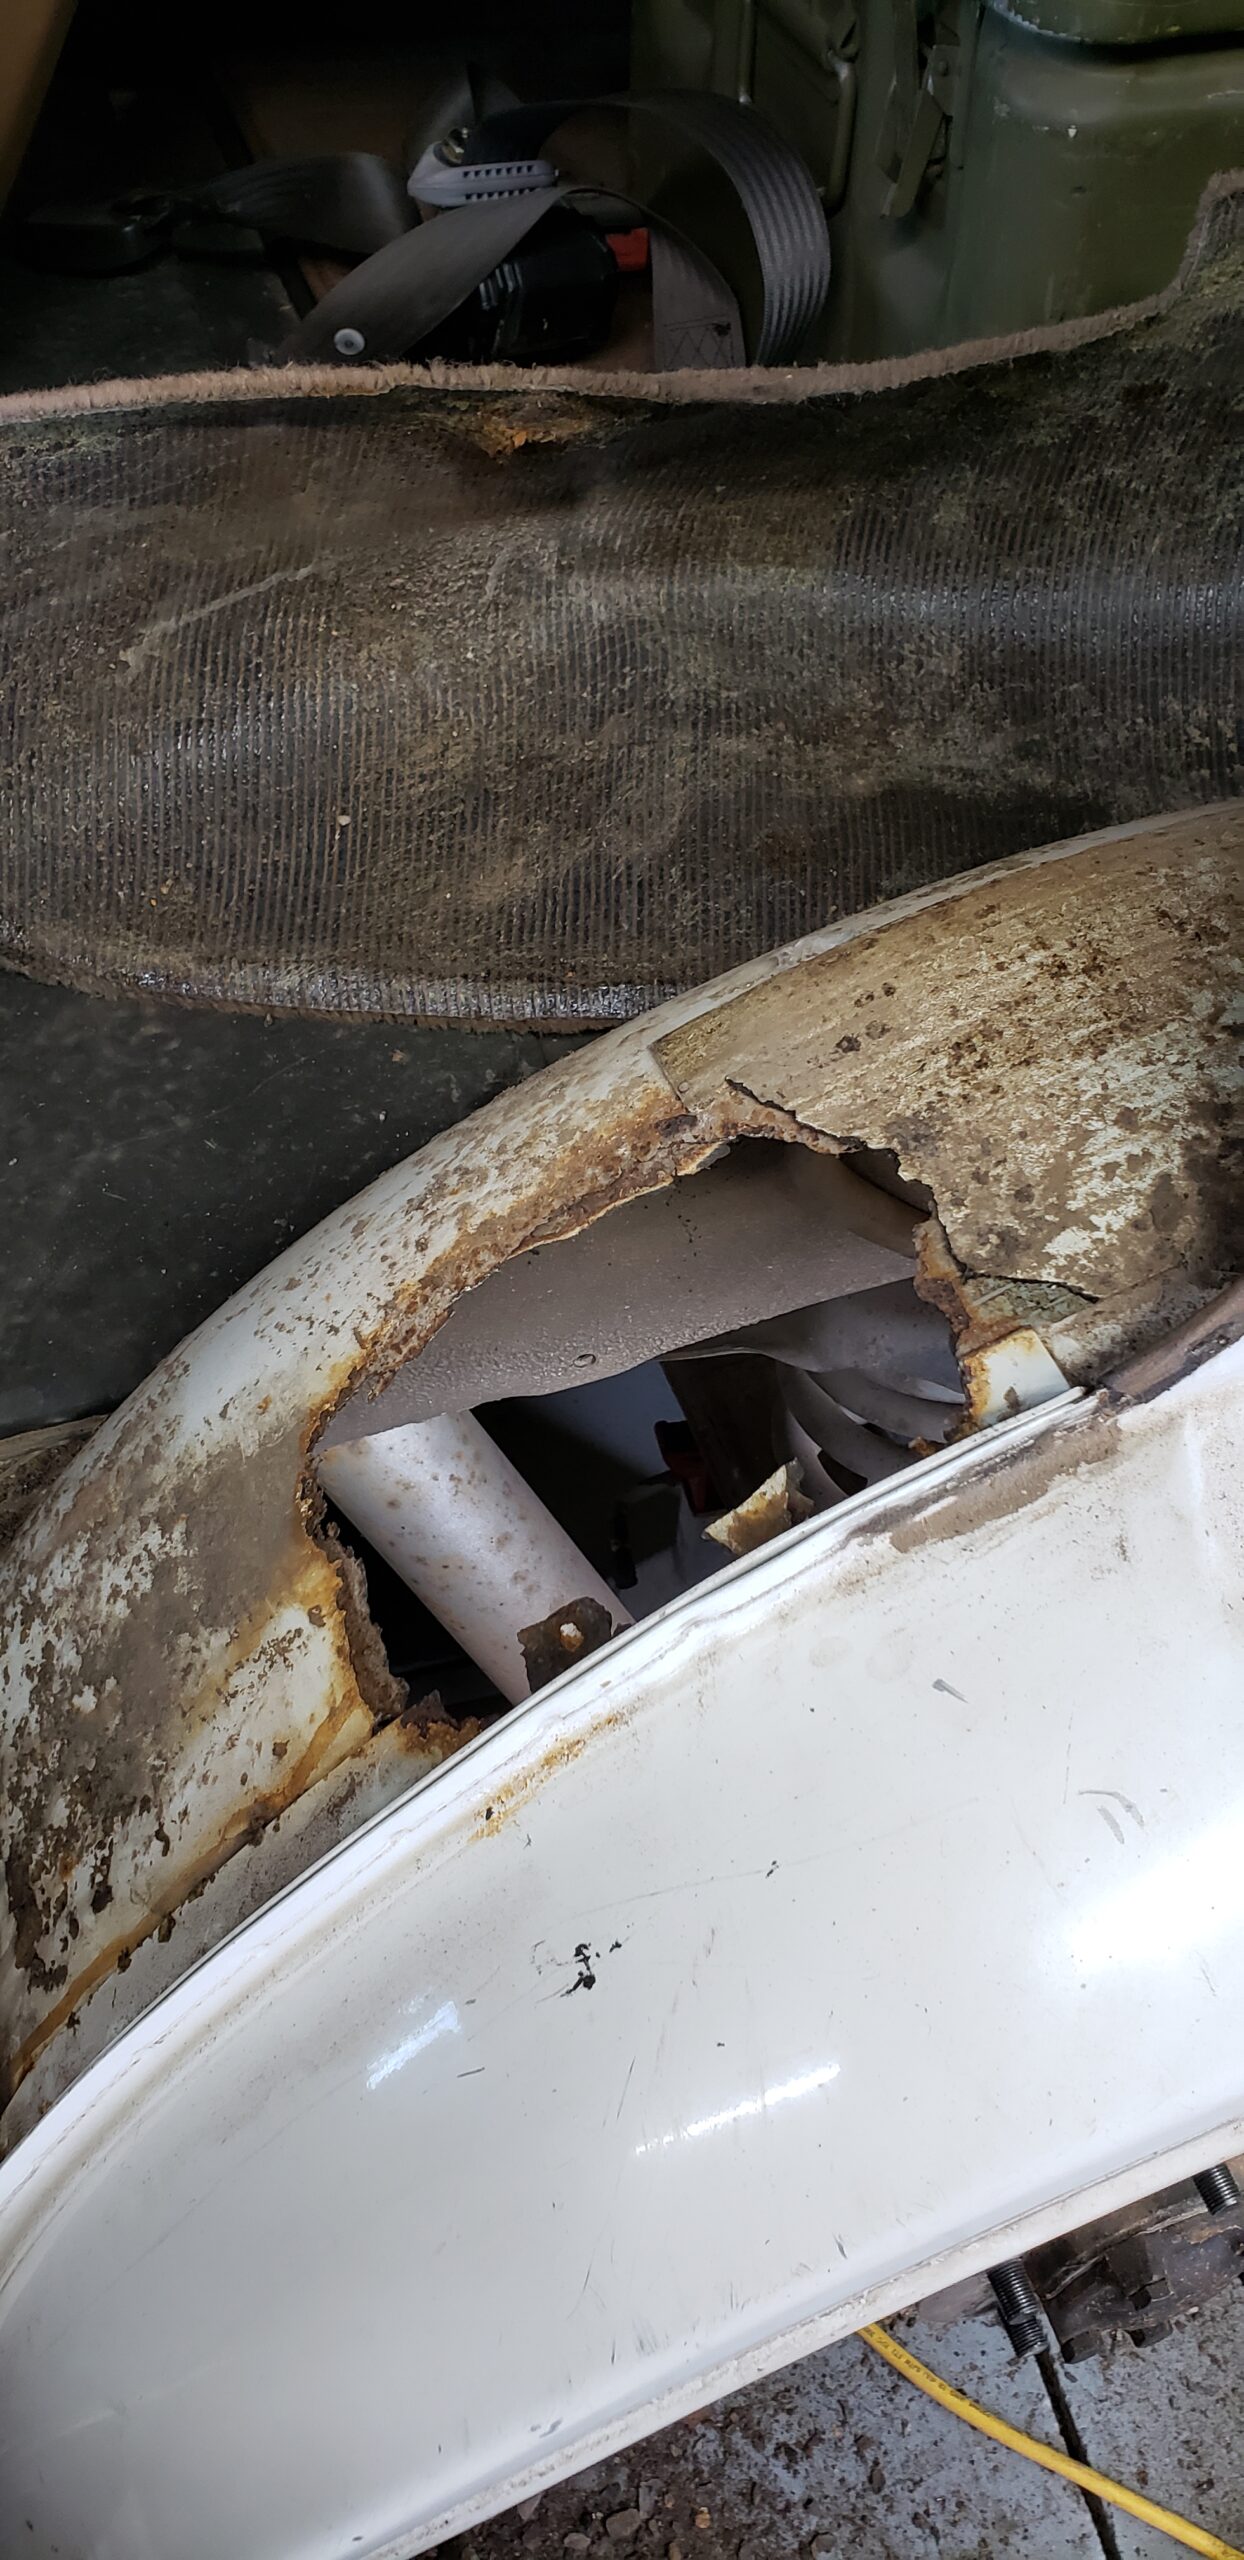
Heater Fan Blower Motor

This repair is in progress, you’ve seen the posts (Okierover). All that is left is to source the new hoses and the foam gasket sets and such. I broke a couple of plastic bits and found a great source for spares in Matt Gaum (Roadside Werx) Some of these plastic bits are starting to become unobtainium. 

This leads me to contemplate 3D printing of these parts. I’ll look for a 3d printer and do some research into the types of plastics that might work best. I’m a little surprised I haven’t seen someone doing this already. If you have, leave us a link in the comments.

Clunky Steering

At some point the bushing on the steering shaft has slipped. I need to pull it all out and get it corrected. It is not dangerous, it’s just annoying.

Rear Compartment Tie-Downs

I can’t believe I’ve driven around with a hundred plus pounds of tools and spares NOT tied down in the back of my rig. I have only avoided an epic stupid mistake because I’m a hell-of-a-driver and have avoided serious accidents.

Nice to Have

Now let me talk about what we in the Project Management game call, “Nice to Have’s”. 

Radio

I have researched a replacement system that I think will be great. When I buy it I’ll do a full write up. Bluetooth…backup camera… Van Halen “Eruption” or Wagner’s “Die Walküre” at 120dB depends on your situation.

Air Conditioning

This probably shouldn’t be a nice to have. I live in the southern plains and I promise it gets hot here. This is more than likely going to be a must have/critical. This system is a total loss. I will have to replace EVERYTHING including hoses. The testing for leaks will need to be epic if this is going to be a long term solution.

Power Steering Leak

I STILL have a power steering leak. After all my issues with leaking steering boxes you’d think this wouldn’t plague me. You’ve seen where I bought a rebuilt steering box (Facebook) from Carsteeringwholesale.com (NOT RECOMMENDED, DO NOT TRUST). I received the steering box from them and it was leaking out of the box. I fussed and yelled at them to no avail and they sent me a replacement (that I had to pay shipping on) that leaked EVEN WORSE than the shitty one they sent me to start with. Buyer beware.

I have another slow leak and will at some point need to replace this pump too.

Mystery Leak

My left front hub assembly is leaking. I’m not sure which part has the leak. I’ll have to find it eventually and replace the seal or brake caliper, or whatever it is.

Gas Gauge Uncertainty

When I replaced my last fuel pump (Okierover) I managed to get the float out of sorts and its basically a mystery as to how much fuel I have in the tank at any time except when I fill it. I need to get in there and futz with the level and see if I can fix that.

Cosmetics

Rugs

I would LOVE to have new rugs. Maybe a proper steam cleaning would do the job, I don’t know.

Seat Covers

I have looked at a lot of seat covers. I think I’m leaning toward a NON-Leather cover. Leather covers are readily available and modestly priced. I just think I can get a more durable, no maintenance option sourced that wouldn’t make me cry a little bit inside each time I slide into the BWB with mud all over me or soaking wet. Oklahoma summers are not kind to old leather.

Tint

I don’t need gangster dark tint. I think a tint one these plethora of windows would go a long way toward keeping me cool in the summer.

Paint

The BWB is losing her clearcoat. And the vinyl D pillars are quite knackered. In a perfect world with everything else repaired, I’d probably throw some paint on her.

Eviction

I have a mouse somewhere in the truck. I noticed some evidence of a mouse making its home inside. I couldn’t blame them with -14F this winter. Car spiders (Okierover) are one thing, I can’t have mice.

1: The name Lucas can be licensed by just about anyone wanting to use their name. The last set of “Lucas” parts I got were made in China….CHINA. You should not associate quality replacement parts to anything made in China.

Never fear… I have not let my wrenching skills go to waste. I helped my dear friend Eric and his son Vallie change the plugs and coils on their 2000 Jaguar S-type. We had a great afternoon. And it was a fine example of no matter what you think a job will entail…something will go wrong and will require a part no one has in stock.

Pro Tip: Jaguar (Ford) coolant hose “T”s are made out of some form of plastic-mache and hope.

Thanks for reading and Happy Rovering

Plug and Plug Wire Failures (Post #575) 8/8/2017

Looks like I’ve got some rough running again. This time I suspect it is the plug wires and plugs. I have also replaced the distributor cap and rotor. In doing so I managed to unintentionally disassembled the distributor due to a sticky rotor. There are some very scary pictures coming for that repair. Look for the post this weekend.

I managed to get it back together after a few tries. She started up and I thought I had the Big White Bus running again but that was not true. She came home today on the flatbed of shame…sorry no picture…and I’ve begun to diagnose the issues.

I hope you enjoy the video.

A shout out to Ringer for his offer to rescue me in his Jeep Wrangler with extra doors, and to John Joyce who saw me on the side of the road and pulled over and offered a ride.

Thanks for watching and Happy Rovering.

Goodbye Lucas Ignition (Post #566) 1/22/2017

Lucas ignition module, coil, and relocation kit.

This week was the last week I will use Lucas Ignition parts. If you are a regular reader of my blog you will remember that I recently updated all my ignition parts to correct some poor performance and rough running. I’ve had a few run-ins with Lucas the Prince of Darkness…

Ignition Coil Strikes Again
Bad Fuel? Nope…

I’d forgotten how many times my ignition either through a bad coil or ignition module or both had left me stranded. Last week it did it again. The symptoms are all to obvious now.

  • The engine seems to misfire at speed.
  • The idle is rough. Frequent misfires.
  • Engine cranks but does not fire.

As I was lamenting this with JagGuy he said, “Why don’t you swap it for a basic General Motors (GM) EMI ignition. That’s what’s in all the Jaguars. It would be simple.” Simple for him for sure. And in the end not terrible at all.

JagGuy said it would be easy and it was. I called him on Wednesday night when Mr. Fisher and I were swapping ignition bits to try and find the issue. On Thursday afternoon he told me to come by after work and there it was a new module.

The fun part was how he sourced the parts. The ignition module is from a 1978 Chevy Silverado, the coil comes from a 1988 Chevy, and the bracket comes from a 1998 Chevy Caprice.

The actual part numbers from O’Reilly’s

  • BWD – CBE4P – 26.99$(US)
  • MPI – 2-5198 – 22.99$(US)

For that price…a lifetime warranty. Where is Lucas’s lifetime warranty? LIFETIME WARRANTY. And even better they are available at any O’Reilly’s or AutoZone in America. Probably in-stock, in the store.

The wiring is pretty simple.

Here it is mounted in the engine bay.

You can find a diagram pretty much anywhere on line. The only tricky part was getting the two wires that go to the distributor correct. Initially we had them switched. If you happen to do this you may notice the idle RPM to be somewhere around 1200.

I need to zip tie the leads down a bit more. I don’t like them wiggling around. We shortened the pink wire that goes to the wire coming off the clear-ish octopus like plug just below the air filter.
When we had it installed initially the idle was terrible and it caused several Code 44’s. I got those cleared by disconnecting the battery for a minute or so. They say you can disconnect the serial cable to the display, but I’ve never had any luck with that.

After I drove her to Edmond for the new tires and up to JagGuy’s shoppe for him to go over her to find the issue with the idling. When I pulled up she was running like a top. Apparently the computer starts learning after you clear the codes and run a fun cycle without any codes. By the time I drove her home she was running like a top.

On the Difficulty Scale this is a two. The assembly is easy, getting the wires hooked up is a bit of fun but not ridiculous.

Thanks goes out to JagGuy. I really appreciate your expertise and your amazing abilities.

Thanks for reading and Happy Rovering.