In this video I continue to refurbish the upper tailgate frame. It’s crusty. I ordered some 30 inch wire bottle brushes to attempt to get the rust out of the frame.
They worked great. I ordered them from Justman Brushes. Made in America too!! I eventually nipped the ring off of one and inserted it into my drill. This was pretty clever of me if I do say so myself.
Once I got as much of the rust out as I thought I could get, I moved to get the paint in there. It did occur to me that I could have dipped the frame in sulfuric acid. But I would have had to start all over and in the end, I still had to rely on the paint pouring to coat the interior.
I will still have to lightly sand the frame to even up the paint. The rust preventative paint is some very thick stuff.
At the end of the video I go on a rant that I liken never finishing the Range Rover Classic to Shipwright’s Disease. I posted on this previously back in 2022. You can see that by clicking the link Shipwright’s Disease [Okierover].
In this post I play a chemist and use muriatic acid to de-galvanize the zinc off my Z bar. Some time ago I sourced some Z bar to rebuild the rusted ledge of the floor panel. Welding galvanized steel can make you sick. It requires a well ventilated space and likely a respirator. There are lots of videos on the YouTubes that show guys welding galvanized steel. I’ve seen enough warnings to know I don’t want anything to do with it.
So using some of the acid for the swimming pool I decided to chemically remove the zinc. This too is very dangerous. So this is fair warning, don’t try this at home kids.
I got the zinc off in short order and got the Z bar double primed and double coated with black paint. I have no fantasy that this will never rust. I just don’t want it to rust through in the next 10 years.
I also got the sunroof drain installed. This was rewarding. Getting little jobs done is great. I bought a “step drill” and am now wondering why I didn’t buy one A LONG TIME AGO. This was pretty awesome. It was expensive at $58.00(US) for one that would cut mild steel.
My next step is to dry fit the panel to confirm the Z bar and panel will fit in the place it once was. I also reached out to my biological brother’s sister (we didn’t grow up together) to see what getting the panel stripped with her metal stripping service. I really can’t go forward without that step completed.
That’s about it for this week. Like and subscribe on YouTube. Subscribe to the blog so you get notifications. I had a hit with…
Well here we go again. I decided this weekend I was going to get the Big White Bus started and move her out of the shoppe. I tried to get her started and nothing. I didn’t hear the fuel pump kick on. That’s…a bad sign.
So I asked my son to help me test. I had him turn the ignition on while I checked the voltage at the fuel pump. I had voltage.
That eliminated a LOT of testing of other components. I had a bad feeling the fuel pump was crapped out again. Turns out I was right. It was completely varnished.
What the hell right? I put 5 gallons of fresh gas in it back in December after I replaced the rubber filler hoses. I guess that wasn’t enough fresh gas. I called my friend JagGuy and asked some “chemistry” questions regarding gasoline.
Is it possible that the gas in the tank is so far gone that it varnishes? Its possible was his reply. We came to the same conclusion that all the gas needs to be removed and fresh gas added. We also talked about fuel stabilizer. I’ve never used fuel stabilizer. I guess I’m going to use it going forward.
Who knows how long the Big White Bus is going to be laid up until I can get her running regularly? Not me and I’m the project manager! So fuel stabilizer is going to be all the rage. And I’ll start running her on a regular basis.
What is odd are all these “This [insert vehicle type here] has been sitting in this field for 30 years!!! Will it start?!?!” videos on Youtube. JagGuy surmised, probably accurately that most of the truly ancient stuff has mechanical fuel pumps. Throw in a fresh battery, hope the rats haven’t eaten the wires, and if they drain the tank and use fresh gas…maybe that’s how they get them started.
Otherwise I’m calling bullshit on all these videos. There’s no way 30 year old gas is any good. My gas is five years, old give or take a year, and it’s crap.
Now I’m going to be tasked with trying to drain the tank. And then what do I do with it. Do I dare trying to mix it with good gas and burning it in my cars? What do you think?
If you watch the video you’ll see a demonstration on how simple it is to fix the fuel pump.
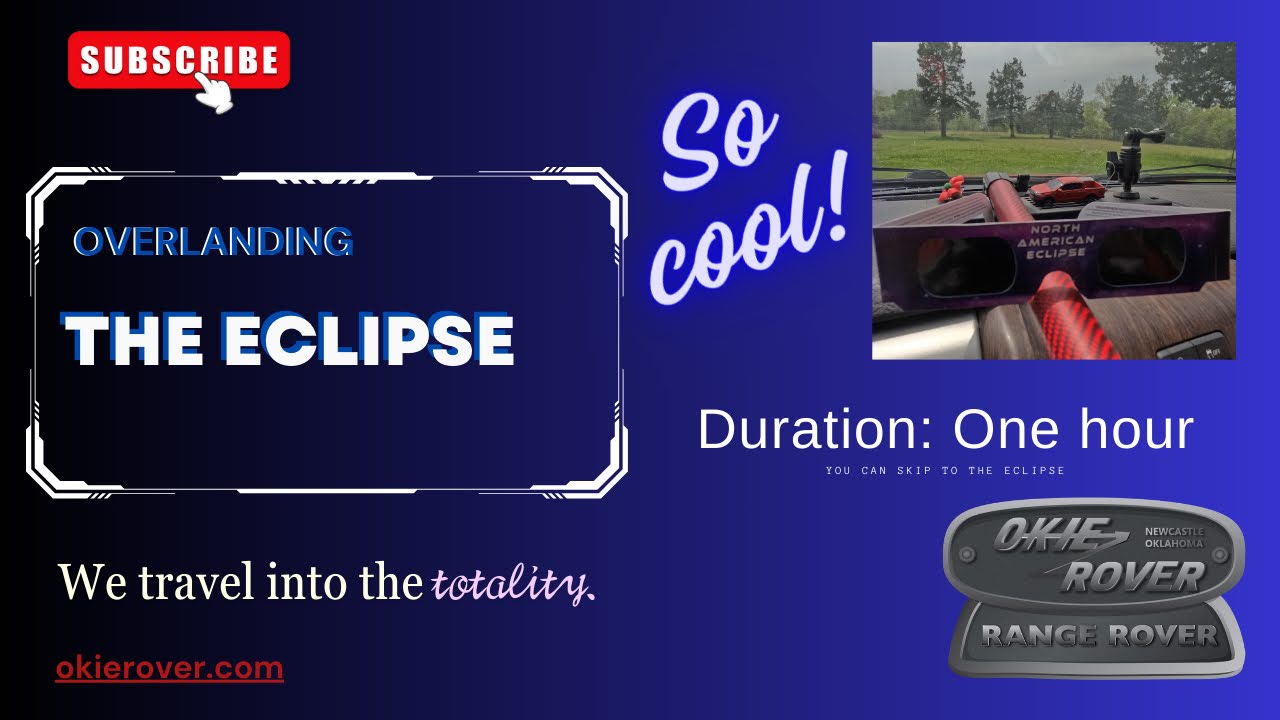
Unless you just crawled out from under a rock or came down from a cave in the mountains you probably know there was an eclipse on April 8th, 2024. I told Mr. Fisher and our newest add on Mark Obermiller that we had to go see it. So…we did.
Let’s talk a little about comms first. All three of us got our GMRS licenses prior to the trip. Mr. Fisher splurged and bought several radios.
First was the Midland GXT1000X3VP4
My personal experience with it? Battery life A-. We used them while we were driving for 6 hours. The knock on it was the battery life indicator showed full, right up to the moment it died. That’s pretty disappointing. Sound quality, B-, they were scratchy at the beginning of each transmission. We didn’t really test how many “far’s” it would work but a mile they seemed to work okay. Three pack for $99.00(US). That’s an inexpensive option.
The Second was the Rugged GMR-2 Plus
Mr. Fisher used this one when his other died. It took him a bit to program and his main complaint was getting it setup. We also were broadcasting on Channel 19 privacy 19. But on this radio the display showed channel 19 privacy 10. Not sure about that. Two for $150.00(US)
We’ll have more to say about these and others as we get further into GMRS. Almost all the options for GMRS radios are made in China. There are some made in Japan.
I did fiddle-fart around a little bit and didn’t bother to secure a campsite. Thankfully my friends at Fort Towson were hosting a Eclipse Watch Party. They consider me family, mostly because I visit them with my 1820-1840 Cherokee living history presentation.
We started out on Saturday morning. Mr. Fisher had plotted our route and I fell in behind him and Mark. Our first stop was Lexington Wildlife Management Area. This is a public hunting and fishing area in Slaughterville, Oklahoma. If you watch my videos, you may have seen a sign in my shoppe. Look for it next time. I have a creepy Slaughterville story, so ask me some time we are around a campfire.
We saw some fun stuff along the way including this moderate sized snapping turtle. Which apparently I can’t add a photo of right now. Thanks Google Photos, good work.
About a foot across the shell.
We drove around visited the Lake. My camera didn’t record while we were at the lake. Bummer cause we had some fun stuff to say.
The wind was blowing pretty hard 20-25mph with gusts to 30mph. We looked around a bit to find a campsite. We started where you see above but also went down to the lake shore but the site was too windy. With Mr. Fisher and Mark in tents, that wasn’t ideal. I went around to the opposite side of the lake but there wasn’t a suitable site over there either. We’ll be back to this site another time.
We setup camp and had some delicious sirloin steak, fried potatoes, and yeast rolls. Dessert was cookies. We had some adult beverages and started a small fire. We were expecting storms and they did not disappoint. We had a nice gust front hit us and then the rain started. I ducked into the F150 and they to their tents.
We rode out the weather which turned out to not be all that impressive. Considering I’ve slept through two near misses with tornadoes, once outside Kansas City dressed for 1750s living history where I slept in a wickiup and the second I was in the back of the Big White Bus at American Horse Lake, this one barely rates mention.
It was my turn to lead so I used Gaia to map out a route. I didn’t have as much trouble mapping as I did when I tried to use the PC. At this point, if it doesn’t get better I’ll probably cancel. I need to try the Overland Bound app.
We had a mostly uneventful second leg. That is until we were traversing what we call a “jog” in the road. This one made a right and then an immediate left all on a 10% or greater grade. There were some brick-sized rocks. Mark must have caught one just right because it separated and cut the tread on one of his Wrangler SR tires. Not necessarily rated for “trail” running but I didn’t think they would fail.
Without a spare we got back on the pavement to avoid another incident. We didn’t have another tire and it was a Sunday so better safe than sorry.
We arrived at Fort Towson and setup came while I found my friends and said hello. We cooked dinner and got setup for the night. They had a nice spread and we had some delicious food. Homemade cinnamon rolls really finished the night off right.
We were tasked with parking duty. We had a good time and welcomed everyone. I shared some fort history to those who hadn’t researched it themselves. All in all we parked around 75-100 cars and roughly 375 people came to watch.
The clouds were sparse early but built up more and more as the day went on. It was looking like we weren’t going to see the eclipse. But just as one of the guest said the parting of the clouds would occur and just in time.
There are no words to describe the eclipse. It was in the top 5 events I’ve ever attended. The light right before the eclipse was eerie. It was like an old Argon street light. Such a special event. Seeing the ring, seeing the solar prominence, it getting dark right in the middle of the day. Birds stopped singing, a tree frog croaked, basically nature thought it was night. I said “so cool” about a dozen times during my video. Like I said, there were no words.
The fort staff set off a cannon during the totality.
They say the next one is in August of 2045. I’ll be 80 years old. The path will go right through Oklahoma. If I’m still residing in Newcastle, I’ll only need to drive 75 miles to be in the center of the totality.
I hope you enjoy the video. I know it is a bit long, but it was a big weekend.
Like and subscribe to the blog and the YouTube channel if you see fit. I would really appreciate it.
I have a Patreon account setup if you would like to help with the cost of keeping this website up. Okierover Patreon.
Thanks for reading and Happy Rovering (of F150-ing if your Land Rover is in a shoppe).
I have fired it up once since I parked it in my newly constructed shoppe 5 years ago. I guess I should have expected there would be “issues”. But I wasn’t expecting the issue to be this one.
Mr. Fisher came over and we diagnosed the issue. We started with checking the power at the pump. As you may be aware, when you turn the key over it powers the pump briefly. So if you just “turn on the key” and go back there to check the voltage you won’t find any. That’s why it takes either some seriously creative use of a volt meter or you get one of the bestest friends to come over and turn the key for you. We had voltage all the way through the wiring harness.
We then confirmed we have spark from the ignition system. I pulled the number 1 plug and with a screwdriver I grounded it and watched for spark. You can buy a fancy spark tester, matter of fact I think I own one. I have no idea where it is though. Spark confirmed.
So we have two of the three things (Meatloaf would say that “ain’t bad”) to make the vehicle run. Air and Spark. Now why aren’t we getting fuel.
I pulled the gas line off at the regulator on the back side top of the engine and had Mr. Fisher crank the ignition. We should have had gas squirting out if it worked. It did not. This fit with me NOT hearing the pump run when the ignition was turned over.
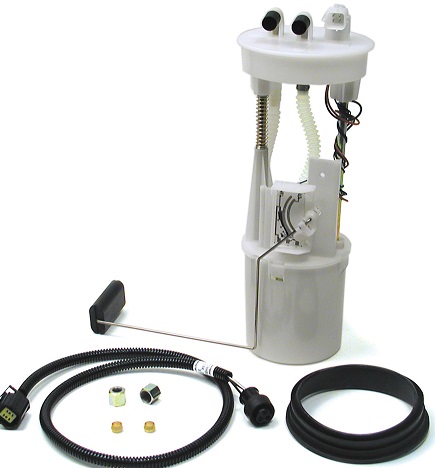
The only thing left was to pull the fuel pump and do a visual inspection. What I found was not expected. I said, “Wow.” a lot in the video. There were several parts that were obviously degrading due to being submerged in petrol for so long. There was visible rust on the steel parts as well. Generally the pump was in a terrible state. I was not aware that petrol would do that to those parts. The only gas I ever put in my Classic is 100% real gas, unless I am in Texas where they only sell ethanol (at least the last time I was buying gas there). You would expect ethanol to eventually separate and turn to water. You can read all about that on the Road Guardians website.
I will be replacing the fuel pump and have ordered the part from Atlantic British. I found some that were cheaper on Amazon. But my skepticism and need to have it delivered before next October weighed heavily on my decision where to purchase. The pictures all looked like the pumps were manufactured in the same place. Same white plastic. Same blue plugs.
PRC9409K
If you look on Amazon you’ll see the pumps look like the same ones. If I had unlimited funds or sponsorship, I’d buy one from everyone and do a side-by-side comparison.
All this “BUY IT NEW” has me thinking about what this would cost if we just fixed the pump. All you need to do is replace the pump in the collector can (that bottom part). I’ll do a post about that in the coming weeks.
So…do I drain the tank too? If the gasoline HAS turned to varnish I should probably put some treatment in there. I’m thinking I’m gonna add a silly amount of STP Fuel Injector cleaner in that tank. I can say, WHEN I get it running It will run for quite a while before I shut her down. I want to give the truck plenty of time to dislodge any crap in the fuel lines. I’m also guessing I’ll need to swap the fuel filter too.
If its not one thing, its another. It really, never ends.
Mr. Fisher also brought over his Viair Compressor. We spent some time looking at it and checking out all its features.
The weather cooperated, but my back didn’t so much. The temperature was mostly pleasant compared to the scorchers we’ve had lately. My back however was not very cooperative. I’m pretty sore after just a few hours of work.
The work on the fender from the last post was, pretty terrible. I had trouble shaping the 16 gauge steel. The patch after shaping was also the wrong size. Couple that with running out of shielding gas and my welds being pretty terrible, I needed to start over. Without shielding gas protection you have a brittle weak welds. Not to mention holes in your weld called porosity.
I cut the patch out with a cutting wheel. Some of the welds were actually pretty good, so I must have run out part way through the welding. I made a patch with a piece of paper and cut out a new patch out of 20 gauge steel. When I was getting the shielding gas at Chickasha Industrial I noticed they had a lot of steel in the shop area. Turns out they sell steel. So I picked up a few “cutoff” pieces for a good price.
The new patch with some help from a ingenious use of a 2×4 and a bottle jack fit nicely. I welded it in and it worked out pretty well. I struggled with one spot when the welding blew through a thin patch of original fender. With some creative welding I got the holes patched.
I still have to weld up the underside. Welding upside down is difficult. I’m going to have to figure out how to do that. Maybe watch some Youtube videos or something.
I will use the 16 gauge steel to reinforce the 20 gauge and weld in the seat belt mount. I don’t plan on having seat belts in the rear again but if I did, I’d need a place to mount them.